🛋️ Transform your space with flexible style and effortless elegance!
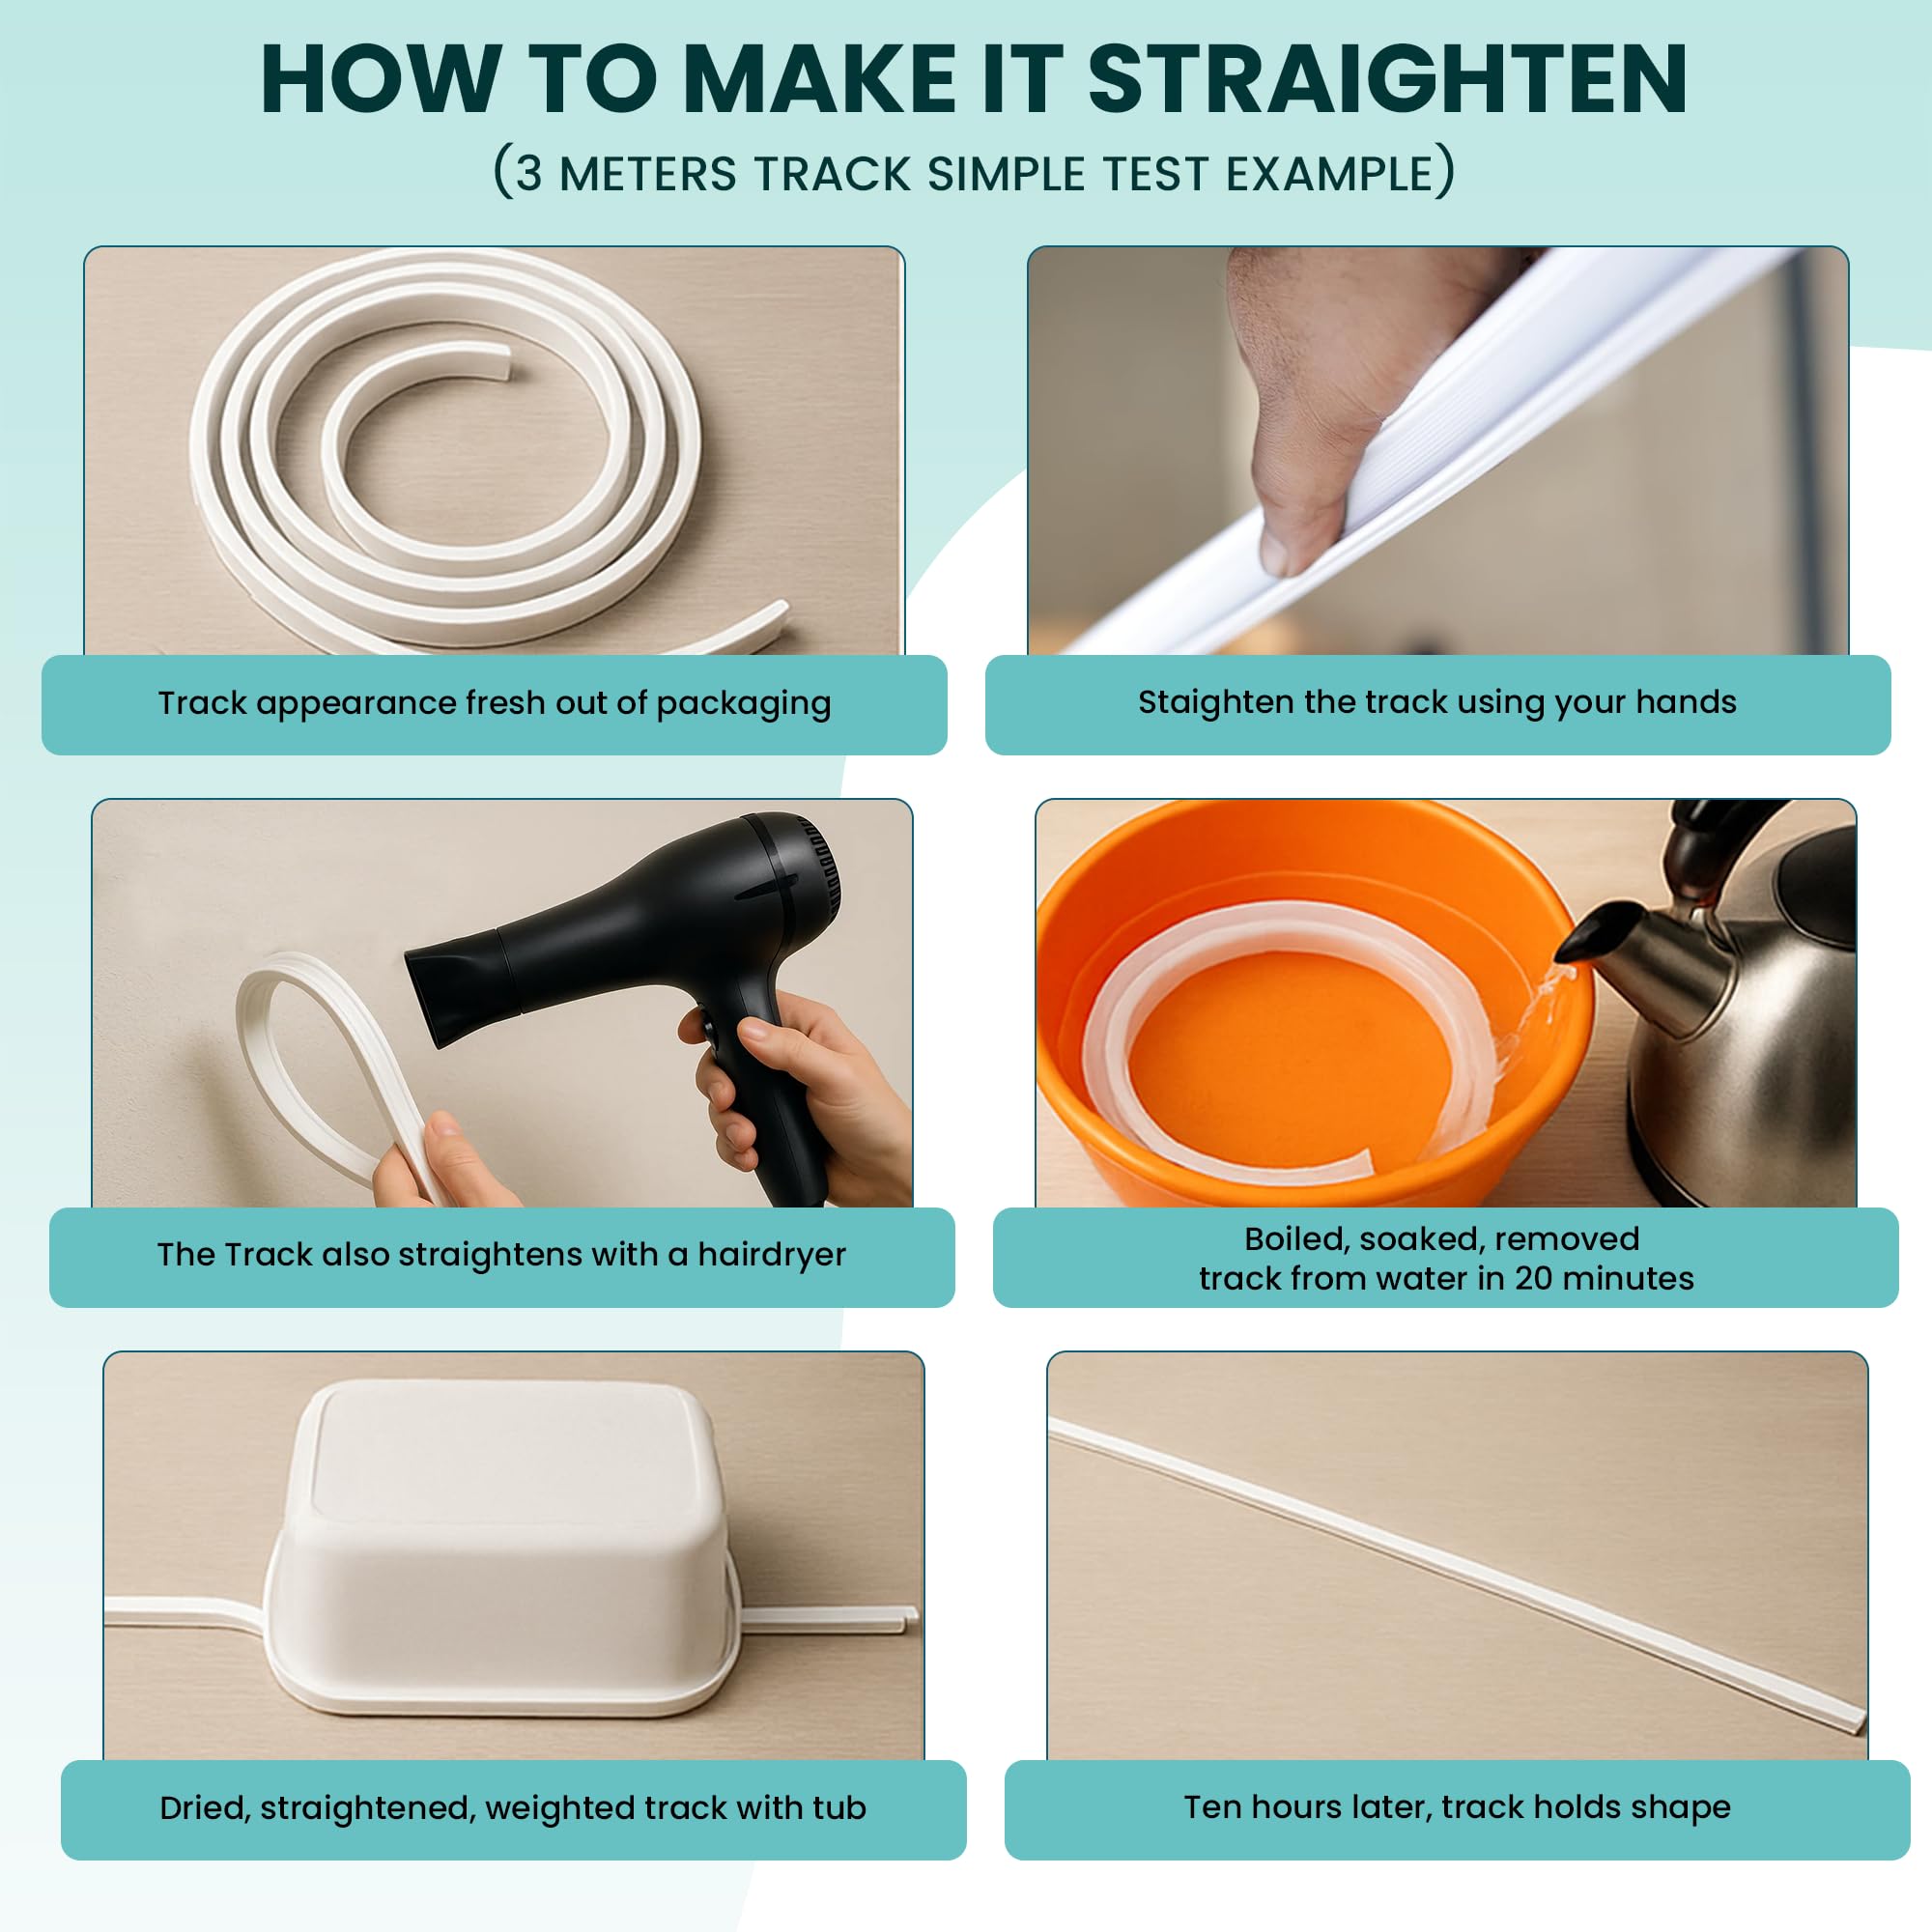
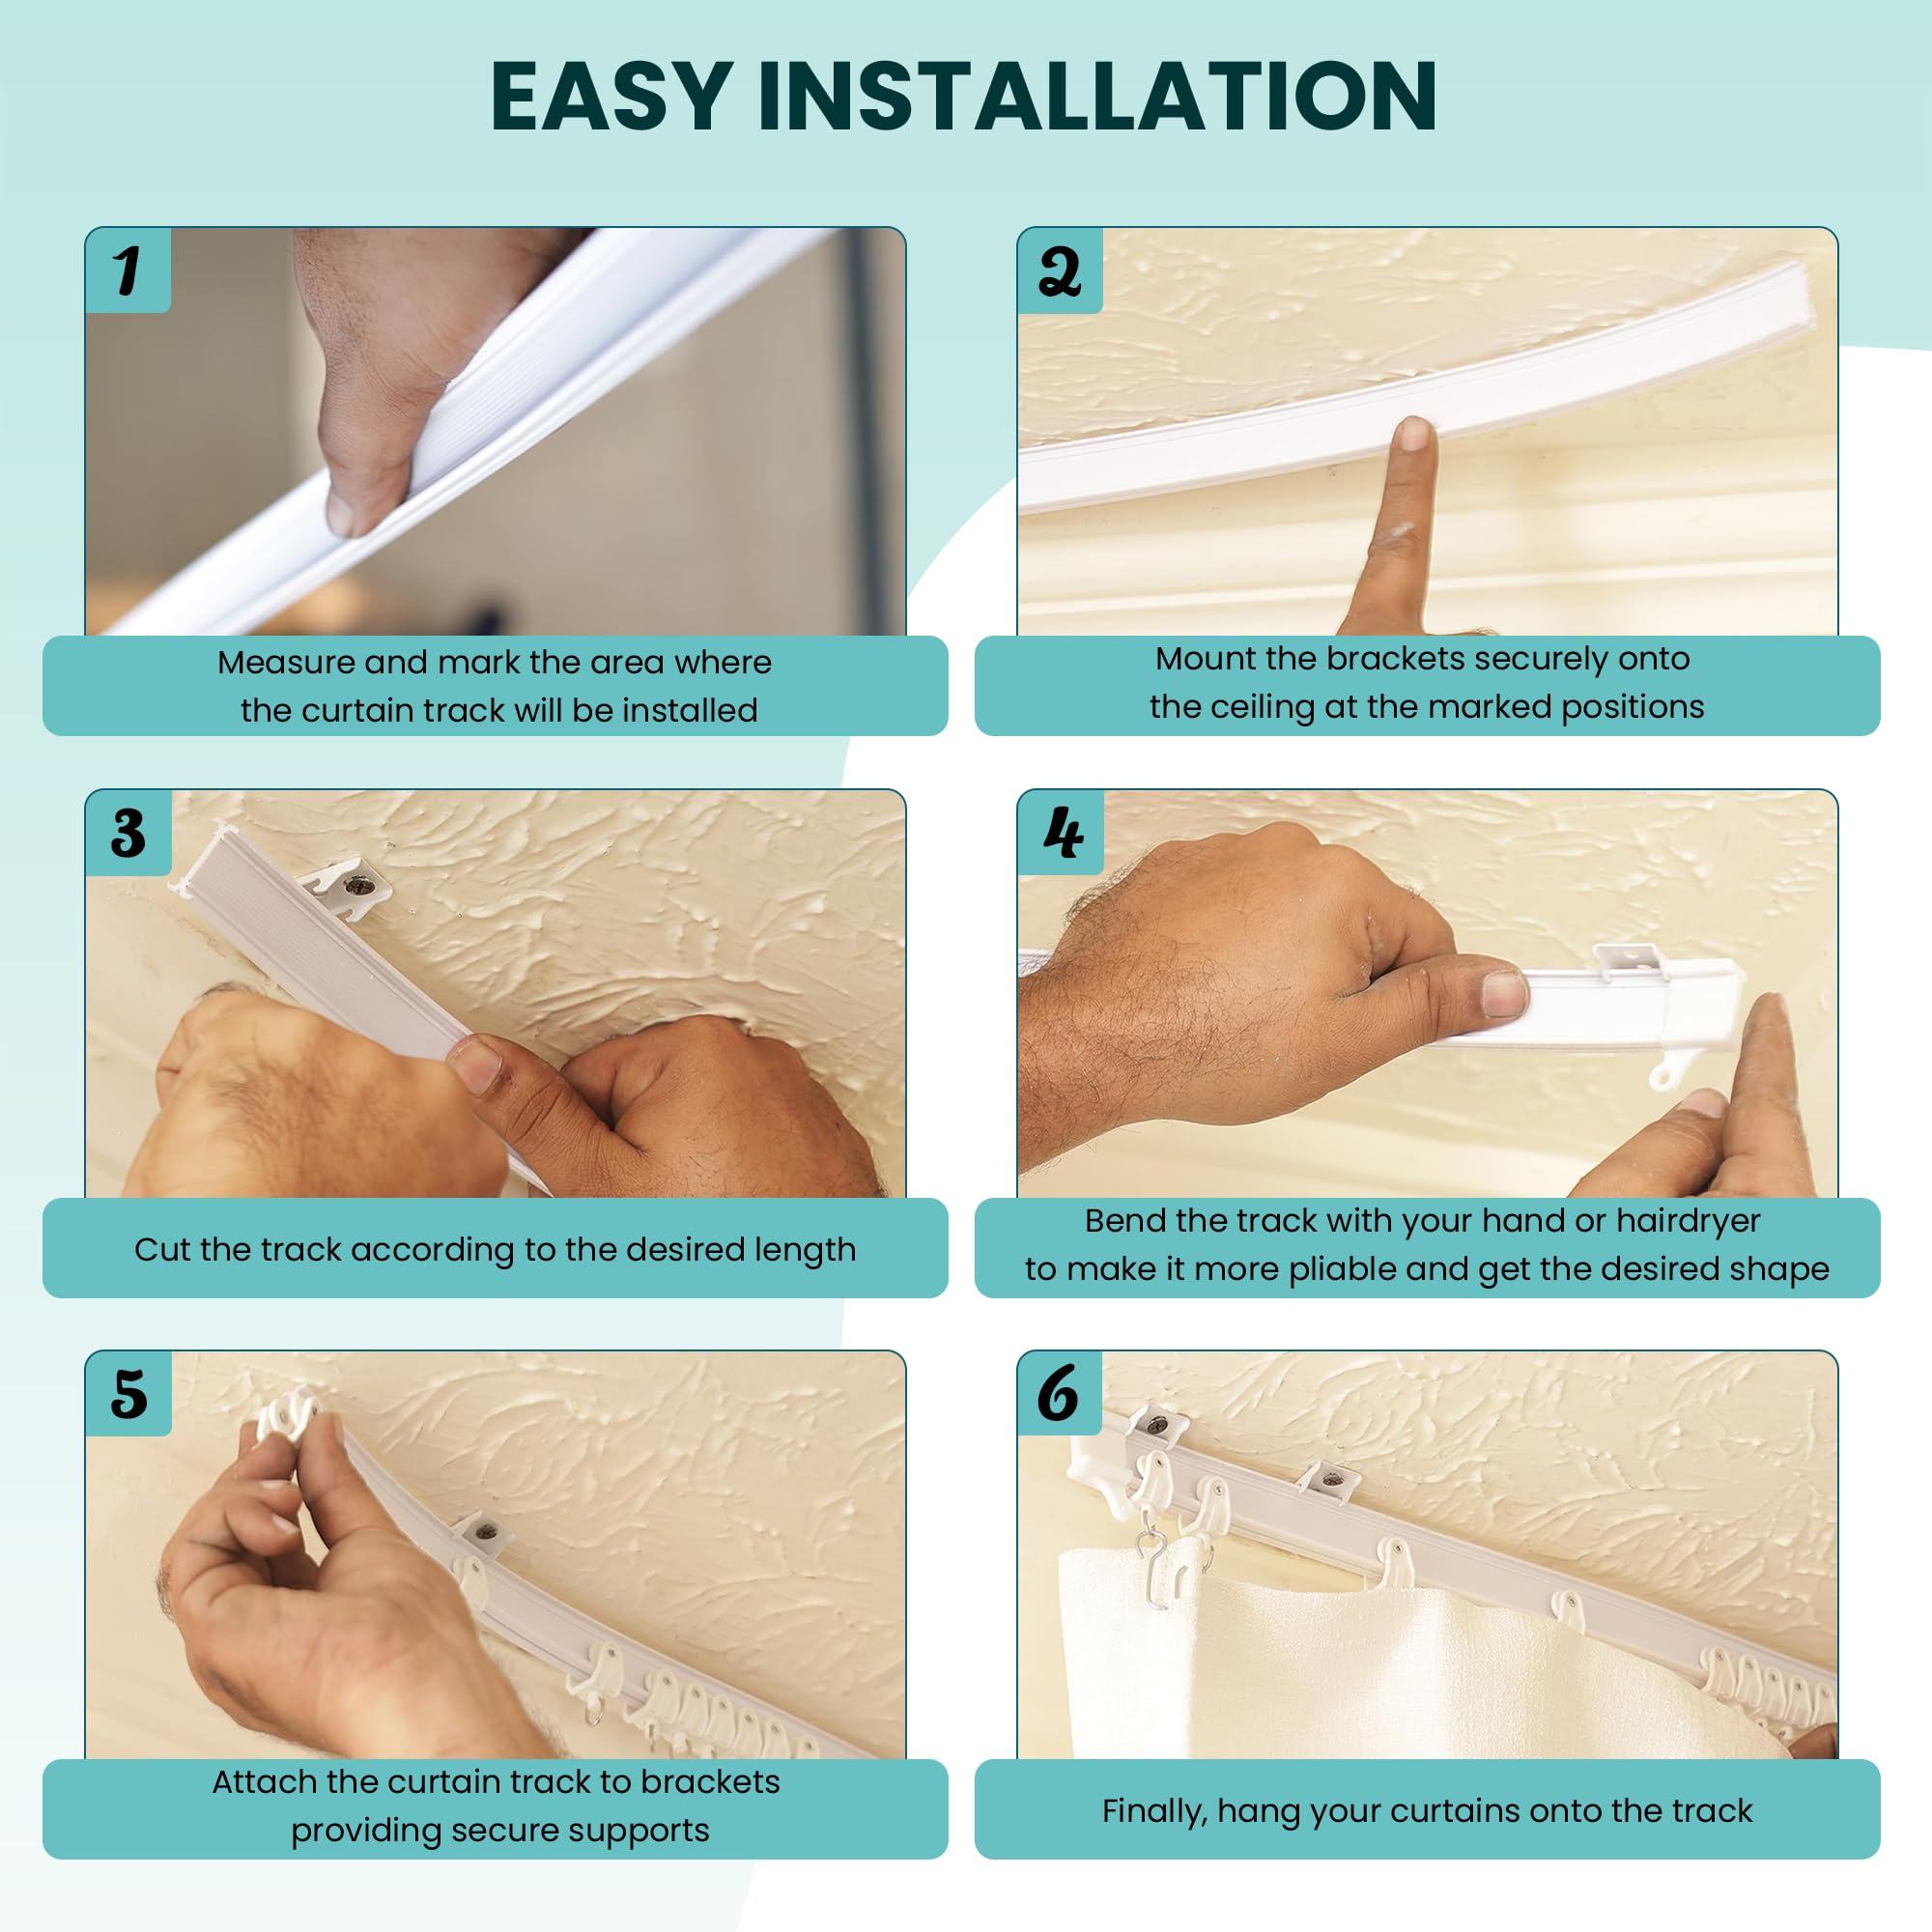
The UrbanRed Flexible Bendable Ceiling Curtain Track is a 16.4-foot premium PVC curtain rail system designed for curved or uniquely shaped windows. Featuring 40 smooth-glide rollers and iron hooks, it supports up to 33 lbs of curtain weight. The kit includes snap-on ceiling brackets and end covers for easy, tool-free installation, making it ideal for room dividers, RVs, or any space needing a sleek, customizable curtain solution.
Brand | UrbanRed |
Color | White |
Product Dimensions | 196.8"L x 5"W |
Material | 40 track rollers and universal sturdy iron hooks compatible with any curtain or tapestry, Premium UV-resistant vinyl flexible to 180° or any shape, End covers and brackets for a pro-look installation |
Mounting Type | Easiest Installation |
Item Weight | 2.31 Pounds |
Maximum Weight Recommendation | 33 Pounds |
Manufacturer | UrbanRed |
UPC | 657814750036 |
Part Number | NO |
Item Weight | 2.31 pounds |
Country of Origin | China |
Item model number | CT-FLEX-ALL |
Size | 5 Meters (16.4 FT) |
Shape | curved |
Item Package Quantity | 1 |
Number Of Pieces | 1 |
Included Components | curtain tracks, track rollers, iron curtain hooks, end covers |
Batteries Included? | No |
Batteries Required? | No |
L**D
Easy to install
Super easy to install. Works perfectly and really does leave a better look to block off a space
H**Y
Very easy to install, but you need at least two people, a drill, a screw driver.
My ceiling was 30 degree sloped, but this rail worked both horizontally as well as vertically. On the vertical side, gravity will pull the curtain down.The rail was shipped coiled and it took a while to straighten it, but it doesn’t need to be very straight. A 45 degree coil would also just work. The anchor will be pretty strong once you install them, so the rail will stay in shape as how your anchors are aligned. The rail is very flexible and durable pvc.There are 16 anchors in the 16ft version, it’s more than enough. The hardware looked high quality.We hung a photography background as a curtain, so we don’t know how much weight the rail can take. However regular curtail should have no problem.The end pieces are smaller than the rail, so you need to expand them a bit to put them on.Remember to put the rail on the non movable side of the anchor, then push it in. Otherwise, it won’t go in.You can clip the roller into the rail after you have installed everything. You can also slide them in before you out the end pieces on.If you need to cut the rail, you will need a pretty strong scissors. We used the garden scissors.Overall, very happy about the product.
L**T
very decent product - see installation notes
I found the Urbanred product to be pretty decent quality for a good price for its intended use in my Tiny Tiger-70s-lite Lady Lounge. I have some mid century windows that I had installed some shelving and cat (tiny tiger) steps beneath, so I didn't want long shelves directly flush with the windows. Instead, I used the track to create a soft, sheer separation between the shelving, steps and window light and the rest of the lounge.Since the track is plastic, and slightly flexible, I was able to create a soft wave pattern by measuring the space between each peak and valley of the wave on the ceiling, mark it, and install a clip at each one so that the wave came out somewhat evenly. The wave added fun visual interest and mimics the waves in some other areas of the 70s influenced lounge. You can see some of the stages of installation and final product where I hung just 2 of the sheers on either end of the final track, just to create a division. I'll be adding more sheers to the entire track, soon, but the pictures give you an idea of the result. Since the windows face the forest, I didn't need privacy curtains for my use, but i think the hooks and track rollers are strong enough to hold something heavier than the light sheers I hung.Installation notes: I WAS able to do this myself, and I'm only 5'3. The ceiling I worked on has a slight slope, so it was definitely a somewhat difficult project, overall, because the track has to be put up all at once, and manuevering by yourself isn't super easy. Things that make it more manageable:1. Put it under some heavy stuff for a few days to try to straighten it as much as possible but not flatten or scar the grooves on it. It's ok if it doesn't come out completely straight afterwards, but you do want it to be mostly straight, and not coiled up when you install it. I would recommend putting it under some moderately heavy furniture that no one is sitting on for at least 3 days. If it's coiled up when you go to put it up, I don't think the clips alone will be able to straighten it out. You need to train it before the installation. Some people use warm water to do that - I used some medium weight furniture and stretched it across the floor, repositioning the furniture legs on different curved areas every day.2. I definitely recommend using the quality clear plastic butterfly toggle anchors! That made a huge a difference in installation and security of the track in the ceiling!3. Get good screws - I wouldn't use the ones it came with, I'd use good screws meant for the butterfly toggles anchors. I used a combination of small and medium ones; small toggles definitely fit and work, but I used medium toggles every 4th hole because they are heavier-duty, meatier, and can sustain a heavier load, just to give the overall track strength. I used only the heavy duty ones at the ends and center, as well, which might have been overkill, but I wanted more assurance that the clips will hold and not yank out of the ceiling.4. Definitely mark all of your holes where you need clips installed in the ceiling ahead of time for drilling, then pre-drill holes to correctly fit each butterfly toggle anchor so that it's not loose in the ceiling. Use a rubber mallet to gently put your butterfly anchors into the holes. Once you have your anchors in, the process goes more smoothly.I don't know if the anchors it comes with would be reliable since there's nothing hardcore to prevent them from popping out of a ceiling application when weight is put on the track. I didn't even risk it.Next install your clips by using the screws that fit the butterfly anchors to secure the clips into the anchors. It's tedious, but not too bad.4. It is possible to cut the track to the size you need, it's just a pain. The end caps will cover the cut if your saw job isn't perfect. You can put the end caps on now or after the track is installed5. If your clips are secure in your anchors, it's a matter of slipping the track into each. This is the hardest part though. It would definitely be so much easier to get the entire track into the clips with another person, or even 3 people!6. Getting the track into the clips isn't an easy task, but it's possible even if you're doing it alone like I did! If you're by yourself, the key is having something to rest the track on that's up high near the ceiling, like a tall ladder or something on the other end, while you get your other end into the clips. Once you get one end into the clips, you can go put the other far end into the clips on that side, so that the track is not hanging anymore. (It's very hard to manage and get into the clips when the track is hanging down on one side) It's possible to kind of move and adjust it into just the right place once you get both far ends up though! I had to stand on the ladder and take it out of the clips and readjust it several times since I did a wave formation with it, but I think if it's installed in a straight line, it's much much easier to install. You do want it tight and not loose, and when you take it out of the clips, sometimes the plastic track gets scarred.It's definitely a P.I.T.A. project which took me multiple days to complete, but once it was done, it functioned great for me, and I haven't had a problem with the wheels on the roller pieces. I think it suits the application I needed it for perfectly, and it doesn't look unsightly at the ceiling level in my setting.Goodluck!
T**.
ceiling track kit.
hung 6mill plastic 7' high 50' around inside of garage to make a wash bay .Track worked well, easy to install and the rollers roll so smooth . very pleased.
K**L
Nice quality
Worked great for my cellar used it to cover storage
G**P
Good enough but end caps don't fit
Overall the rail works well enough, the mounting brackets are sturdy and hold the rail very securely (it's going to be difficult to remove if I ever have to), and the rollers move pretty smoothly. Unfortunately the rollers do bump up against each other and lock up, so you have to pull from the direction you want the curtain to go instead of drag from the edge that's moving forward, but that's easy enough to get into the habit of. The track is very flexible and should be able to fit any configuration I would reasonable want. The included instructions are very bare-bones and leave a few open questions about how it should be installed (e.g. is there a recommended spacing between mounting brackets) but if you're buying this you can definitely figure it out.My main complaint with these is that the end caps *do not fit* on the track. I've tried firmly pressing them, heating them up with a hairdryer, tapping them with a mallet, and other attempts at forcing them on, and they just flat out don't fit. I contacted the company via their information included with the instructions, and they replied very quickly and offered to send an accessory pack which would include the correct end caps. When I received that, it had end caps which were the exact same as the current ones, which *do not fit* the track. A bit more back and forth with them and they recommended some things to try to get them to fit, but I've already tried their suggestions, and these caps just *do not fit*. So I wrapped a rubber band around the ends of the rail to keep the rollers from falling off like another reviewer with the same problem, and it's good enough (although looks a bit janky). That's a lot of complaining about one small problem, but I'm tired of buying products that mostly work with a few small flaws, it's exhausting and I wish companies would ensure quality through the entire product instead of just most of it.
A**R
Just what I needed
This was an easy, peasy install. Common sense prevails. The package came with everything you need to install. I suggest mounting the end brackets to ceiling last and have your curtain on hand so you can count the # of rollers you need to install on track. The end clips need a slight hammer, they are tight fitting. Unfortunately I screwed into only one crossbeam,but I mounted ceiling clips every 12 inches and appears sturdy. Other than that I highly recommend this product
Trustpilot
1 week ago
1 month ago