✨ Elevate your decor game with STICKGOO! ✨
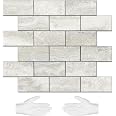
The STICKGOO 10-Sheet Subway Tile Backsplash offers a modern, peel-and-stick solution for transforming your space. Each tile measures 11.58x11.35 inches, covering approximately 9.12 square feet. Made from high-quality PVC, these tiles are waterproof, heat-resistant, and easy to clean, making them ideal for kitchens, bathrooms, RVs, and fireplaces. With a realistic 3D effect and included gloves for installation, you can achieve a professional look without the hassle of traditional tiling.


| Brand | STICKGOO |
| Material | Polyvinyl Chloride (PVC) |
| Size | 11.58x11.35x0.16 inch |
| Color | Beige Mixed Light Grey |
| Finish Type | Matt |
| Style | Modern |
| Installation Type | Peel and Stick |
| Product Dimensions | 11.58"L x 11.35"W |
| Pattern | Subway |
| Shape | Subway |
| Item Thickness | 0.16 Inches |
| Edge Style | Micro-Beveled Edge |
| Unit Count | 9.12 Sq Ft |
| Recommended Uses For Product | Kitchen, Bathroom, RV, Fireplace |
| Coverage | 9.12 square feet |
| Form Factor | Subway |
| Water Resistance Level | Waterproof |
| Special Feature | Peel and Stick, Easy to Install |
| Manufacturer | STICKGOO Direct |
| Item Weight | 6.98 pounds |
| Finish | Matt |
| Item Package Quantity | 10 |
| Special Features | Peel and Stick, Easy to Install |
| Usage | Inside |
| Batteries Included? | No |
| Batteries Required? | No |
A**Z
Perfect! Good quality
The media could not be loaded. Very good quality purchase, easy to install. I did this my self in a few hours. I cleaned my walls before with TSP to remove any grime. Looks like real tile. Has a nice texture to it. Thicker material, sturdy. Wipes down very easy for cleaning. Even my husband and judgy daughters were impressed with how real to tile it looks. I liked that you can cut to individual pieces if needed. Would recommend starting in corner and working your way out. Yes adhesive is very unforgiving so work with patience. 3 boxes did my whole kitchen with a couple to spare. I love the look. I chose beige color since previous review said it was a nice gray. It has varying colors of warm grays so goes well with my color palate. I feel like these will last a long time and won't start falling off like my other peel and stick tile. Highly recommend. I was able to update my kitchen without spending a ton of money and hiring someone. Note-my kitchen counters are different colors because I am covering my ugly green laminate with a granite like contact paper. Looks super real for cheap as well. Easy and affordable.
K**Y
Absolutely love it!
I love the my new bathroom. These tiles are so beautiful and made out of a thick material but they are so easy to cut. I was able to sear it with my exacto knife and the tile cracked leaving a perfect line. The adhesive is so strong. One tile was wrong. I tried to peel the sheet off and it peeled my wall, lol. I decided to tile my entire bathroom. I needed about 140 tiles so the price was cheaper than the quote I got from the stores. I decided to grout and caulk to make it more permanent and I couldn’t be more pleased it makes the powder room look bigger and brighter. I highly recommend the tile. I just love it!
A**E
Love
This backsplash is honestly awesome. I helped a friend put up this same product in her kitchen a few months ago, then ended up buying it for my own kitchen, and I cannot say enough good things about it. I did this solo and I am by no means a regular handywoman. The look of this is more modern because there isn’t that obvious subway tile ‘grout’ look in between tiles, so it has a very clean, uniform finish. I used the Dolomite White Marble color and my friend had gotten the Star White. Note: these two are super similar irl. The Dolomite White has only a little less gray.As this was my second time using this backsplash, I do have some tips to take your DIY to the next level, especially if you’ve never done something like this before.1.) You will need heavy duty scissors to cut through this. While they come in 1 ft panels, each ‘tile’ can be separated from the rest of the sheet easily. However you will need to cut through the vinyl to fit around outlets or if your kitchen isn’t exactly level, you will need to trim some. The ‘classic orange scissors’ worked and so did kitchen shears. If you try to cut this with less sharp scissors you won’t get a straight line and the tiles will warp. And you’ll be frustrated. Trust.2.) Before starting, I mixed rubbing alcohol and a bit of water together and with a cloth wiped down the surface I was going to be putting the backsplash on. This dissolved any oil or residue so the tiles can get a great stick and last for a long time. The alcohol evaporates super quickly so I could get started immediately afterward.3.) Start in the middle. This way if you’re off by just a smidge in keeping them level, your backsplash wont look like it’s on a downward slope if you start all the way from L to R.3.) Don’t just use the entire 1 ft square it comes as, one after the other, or else your backsplash will look like those foam puzzle mats you build for your toddler to play on. 😂 you can do that for the initial one, but I’d recommend putting these tiles up in strips (like 4-8 ‘tiles’ at a time max) or using only half the sheet at a time. It will look more like real tile. Also, trying to line up 1 ft of tile completely flush with the other after you’ve taken the whole sticky backing off is not impossible but way more difficult than it needs to be.4.) For the less DIY inclined, don’t freak when I say this, but you will need to get a sealant. Why? Firstly I didn’t even know what a sealant was before doing this project but I used the kind specifically meant for kitchen and bathroom. Because like others have shared, when you put this on with a putty knife in between all the tiles, it fills in any tiny gaps between tiles you created (bc you’re human and don’t cut/place with laser beam precision lol) and you will not be able to notice anyyyy spaces. THIS STEP IS SO IMPORTANT! I learned this the first time around because we didn’t do this step on my friend’s backsplash, and it LOOKED like we did it ourselves, which is not the look she was going for lol. If you want a professional ‘omg you did this?!’ look, I got a tube of kwik seal premium adhesive sealant in white. Any brand is fine, It’s waterproof, and cleans up so easily so if you’re kind of messy during projects (raises hand) it can be cleaned up with water. You put some on your putty knife and just press it between each of the tiles, not just the noticeable ones, then scrape off the excess. Afterward, I used a damp cloth and wiped the whole surface to get any of the sealant off the tile surface, and voila.Happy DIYing ⭐️
G**
Before and After
Looks better than I thought. Only 4 stars because I wanted the tiles to be a bit bigger. But all in all I like the look it gives my fireplace, easy to use. Updated my space.
M**2
Stunning. 10/10. Highly recommend.
We bought this to replace a much cheaper peel and stick backsplash that had yellowed and shrunk apart in the 3 years it was on. This. Tile. Is. Stunning. It is difficult to cut but we managed with a good utility knife and metal straight edge. The pieces fit together like a puzzle leaving no gaps. Obviously I can't speak for the longevity of the tiles yet but I can see them lasting for yeeears to come. Definitely worth the money. Grout it to make it look even more seamless if you have the time, supplies, and skill.
S**0
DO NOT BUY!!! Please read!!!
SAVE YOUR MONEY! I strongly urge you to NOT BUY this product. This was a complete waste of time and money and has now caused damage to my walls.WANT A REFUND!!!DOES NOT STICK- The listing also states that there is a “strong backing adhesive” that will “not fall off”. This claim could not be further from the truth! This product was installed as directed on brand new, smooth, clean, dry walls in a dry environment with temperatures that do not exceed 70 degrees F and they began falling off of the walls within days.NEARLY IMPOSSIBLE TO CUT- The product listing claims that the tiles are “easy to cut with simple tools” but they are nearly impossible to cut with the tools listed, likely due to a metal layer. It is nearly impossible to cut the tiles resulting in straight Ines without jagged edges that look terrible.DOES NOT ALIGN- The tiles do not align leaving unsightly seams and gaps. Note- I am referring to uncut/unmodified tiles directly from the box. These tiles should fit seamlessly interlocking with each other and they do not.COLOR DOES NOT MATCH- I purchased 1 box and 2 more in a 2nd order (Total of 3 Boxes). The one of the 2 boxes of tiles int he 2nd order did not match the others and was later replaced.
Trustpilot
5 days ago
4 days ago