🛞 Ride fearless, roll flawless — the tire that keeps you ahead.
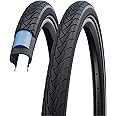
The SCHWALBE Marathon Plus HS 348 is a 700x28mm road bike tire featuring a patented SmartGuard rubber layer that offers superior puncture resistance without compromising rolling efficiency. Designed for extended durability and smooth performance, this wire-beaded clincher tire is ideal for professional cyclists seeking reliability and speed on every ride.


| Item Diameter | 7E+2 Millimeters |
| Brand | SCHWALBE |
| Tire Type | Clincher |
| Item Width | 28 Millimeters |
| Bike Type | Road Bike |
| Warranty Type | Extended |
| Material | Compound |
| Tread Type | Standard |
| Global Trade Identification Number | 04026495720588 |
| Size | 700 x 28mm |
| Manufacturer | SCHWALBE |
| Item Package Dimensions L x W x H | 15.12 x 8.98 x 2.36 inches |
| Package Weight | 0.77 Kilograms |
| Item Dimensions LxWxH | 11.81 x 11.81 x 11.81 inches |
| Item Weight | 0.75 Kilograms |
| Brand Name | SCHWALBE |
| Color | Reflex |
| Suggested Users | mens |
| Number of Items | 1 |
| Part Number | TYS0094 |
| Model Year | 2014 |
| Sport Type | Cycling |
S**N
Amazing tires. Not impossible to mount if you use the right technique.
REVIEW UPDATED ON 06/05/2012 (updates following initial review)REVIEW UPDATED ON 07/01/2012REVIEW UPDATED ON 08/07/2012 (first major issue)REVIEW UPDATED ON 08/28/2012 (first flat)Well, I figured I would go ahead and start an on-going review of these tires. During the time of this initial review I had only put a few dozen miles on these - but as some people say "If you can go ten miles without a flat, then you can go thousands", we'll see about that in the coming days.I'm going to keep the review portion quick because I still have to really get some use out of these for a fair review, so here's a quick review, which I'll follow up with mounting instructions. Future updates will be at the very bottom of this review.Weight: *Roll Resistance: ***Acceleration: ***Speed: ***Durability: ***** (so far)These are heavy, fairly low roll resistance (which is good), decent acceleration and speed but they are amazingly durable (at least they should be, only time will tell - but you can't ignore their reputation!). The Marathons are 5 star tires. The negative points can be forgiven because these are all about durability and longevity, which as a daily commuter are are most important.With my previous tires I started getting flats after 500 miles, and the flats became daily. Even though I don't have a whole lot of experience with the Marathons yet, I can just tell that they are FAR more durable. Broken glass is extremely common on my commute and I can almost hear these tires laugh as I roll through it.REVIEW EDITS06/05/2012:I put well over 150 miles on these tires over the last week, doing my best to hit all the different types of terrain I possibly could. There are a few things worth noting:First, as I mentioned these are heavy, which makes climbing hills significantly more challenging, I'd say by a good 15-20% over my previous tires. My legs have just started adapting to this, so it's not a huge problem, but hills do hurt a bit more.Also, I have tried to hit every possible type of terrain I possibly could. I've ridden over grass, gravel, pavement, dirt, etc. These aren't a fantastic all-terrain tire, but they will work on just about all surfaces if needed. They don't really have enough 'grab' to ride through loose dirt very well, but they handle packed gravel surfaces nicely. They have good cornering on pavement and they are doable on grass, though not ideal. They cut through little pools of water on pavement like a hot knife through butter.Finally, these things ARE durable as heck! I have purposely ridden over large glass 'fields' which would have easily punctured my previous tires, and these tires just roll right through it without any problems. On one commute I literally hit every piece of glass I possibly could (large and small) and I haven't had any issues.07/01/2012I just wanted to do a post-500 mile update. I'm well over 500 miles now without a single flat or issue. My legs have become accustomed to the additional weight. Wear on my front tire is very minimal, it still looks brand new. Wear on the rear tire is noticeable but very minimal considering I've put significant mileage on these. Previously I used Kenda Kwick Cross tires and by 500 miles my rear tire was near bald. I imagine these will last for many more miles!08/07/2012Well, now that I'm at the 1400-ish mark I've had my first major issue.I was commuting home when my back tire hit some piece of metal. I'm not sure what I hit, but I heard a loud *PING* as my tire kicked whatever it was into the frame, it bounced away and must have fallen into a storm drain as I couldn't find whatever it was. It sounded big though. Now there's a gash halfway between the center of the tire and the sidewall (I was turning at the time) and it runs lengthwise down the tire. It's about 1 1/4 inches long and I can clearly see the blue layer underneath (about 2 mm wide).I must have hit something big and sharp. Amazingly the tire didn't flat, the blue layer protected my inner tube. I didn't even realize I had damage in the tire until I did some routine maintenence the following day. Aside from this gash the tire itself looks like it's about 40-50% worn. The front still looks real good, perhaps 20-25% worn. I weigh 210 and often carry a 25lb backpack (plus I carry a wedge, safety light, headlight, 2 bottles) and at this weight it looks like I'd get about 3,000 miles out of the rear tire had I not hit whatever it was that caused this gash.Money is tight, so I'm going to still ride on the gashed tire for now (the underlying belt is in great condition and the blue layer has no visible damage). We'll see what happens!08/28/2012Just a quick update:Well, I got my first flat. I was 30 miles into a 60 mile out-and-back (of course) when my back tire became squishy. As it turns out, a thorn made its way into the gash I mentioned in the previous update. I guess when your tire is spinning at roughly 5,000 revolutions per hour something bad is bound to find its way where you don't want it. In this instance, the thorn managed to just barely dodge the blue belt and make it through to the tube (if you look at a cutaway image for this tire, the gash is right where the blue belt is at its thinnest).I can't fault the tire for this because I'm sure such gashes are quite rare and had I not had this gash then the tire would have simply laughed at the thorn and punted it away.On a positive note: dismounting/remounting wasn't anywhere near as painful as it was when the tire was brand new. It took me about 15 minutes to fix the flat, most of the time was searching for the hole, patching and testing. Remounting was only a tad harder than the average 700X32 tire.I'm going to install a boot in the tire where the puncture came through and hope for the best. I'll do my final update when I replace this tire, which will either be when I experience one more flat because of the gash, or wear the tire down entirely. I went right around 1900 miles before experiencing my first flat on these, not bad at all, especially given the circumstances. I put my full trust in these tires. The front tire is showing about 30% wear on the tread, the back tire is now around 60%Well, I guess that update wasn't so quick, my bad.TIRE MOUNTING INSTRUCTIONSIf you've read other reviews then you probably know that these can be a SERIOUS pain in the arse. I've read stories of people taking 6+ hours to mount these, or having to take them into a local bike shop only to have the mechanic give up, but it CAN be done by yourself with the right technique, and once you master it then you will not fear any roadside flats (like that's gonna happen anyways! *knock on wood*)So, I'll try to describe this the best I can but I highly suggest checking out a video on your favorite video site (sorry, have to be vague here - my reviews keep getting rejeceted). Do a search for "How to fit a Marathon Plus tyre", and check out the video made by SpaCycles. The nice gentleman in this video shows a great technique, however you may have to modify it a bit as I did because this man has a heroic grip and he makes it look a little too easy!Rule 1: Take your time!Rule 2: CONSTANTLY check the inner tube to make sure it's not going to pinch.There are two challenges when it comes to mounting these. The first is getting the second bead started and the second is getting the last little bit of the second bead over the rim.- First, inflate your tube slightly, just enough to give it some shape.- Now put the tube into the tire (I found it easier to put the tube in the tire prior to mounting, rather than putting the tube in after getting the initial bead on, your mileage may vary). Make sure you put the tire on in the right direction! The last thing you want to have to do is dismount and remount because of a simple oversight (I nearly did this!).- Work the initial bead on to the rim. This can be slightly challenging with this tire, but it's certainly manageable. Once the initial bead is on just do a quick check around the rim to make sure there is no pinching going on.- Here is the first real challenge - get the second bead started. Normally getting the second bead to start on a tire isn't too difficult but these Marathons are so stiff that it's a bit of a pain. If the tire were a clock I found that if I put my hands in the 2:00 and 10:00 positions and massage the tire into the rim I'm able to get the second bead to finally seat. Once you have the bead seated then use a zip tie, toe strap, or even a shoe string and wrap it around the rim/tire a cinch it down to hold the tire to the rim. Congrats, you're halfway there!- Now, starting from the cinched down area, work the second bead into the rim, keep working it in until the bead is seated on the opposite side of the cinched area from the previous step. Now cinch the tire to the rim like in the above step. You should now have half the tire seated and two straps cinching the tire to the rim opposite of each other.- Continue working the second bead in until you simply can't budge it anymore. I'll assume the remanining unseated bead is in the 12:00 position. Okay, to get the second bead to seat just a little more, start at the 6:00 position and squeeze/push the bead INTO the well of the rim (as displayed in the video). Squeeze it like a near-empty bottle of toothpaste, hand over hand, until you reach the unseated area. If you did this correctly then you should be able to seat just a tiny bit more of the bead into the rim. Keep doing this on alternating sides until you just cannot budge the bead anymore. If you have super grip strength you can probably finish seating the bead using this technique (as displayed in the video), but for us mere mortals move on to the next step:- Now you're going to need a lot of leverage to finish the job. This is a bit hard to explain, but essentially I sat on the ground and pretty much wedged the tire into my chest as if I were playing it like a harp. The unseated bead should be at the top of the rim. With the tire in "harp position" I was able to use my whole body for leverage. From this position you can use both hands, one to pull and one to push. So, go the the very edge of the unseated area, tuck the tire into your body, wrap your legs around it (I was even using my face for a little more leverage!) and now you should be able to seat the bead just a tiny bit more. Don't forget to use the 6:00 squeaze technique from the previous step, it helps. If you keep repeating this step then eventually you will hear a VERY satisfying pop as the tire finally seats correctly into the rim. Using a tire lever to push the in the bead can ease the job a little.- Remember: CONSTANTLY check to make sure the inner tube has clearance, the last thing you want to do is finally seat the tire, only to have a pinch-flat.- Once everything is kosher then run along the rim, squeazing the tire in, just to make sure there are no pinches. If you see a pinch then gently use a tire lever to stuff the tube under the tire (and pray you didn't pinch-flat it!).I was able to get the first tire on in about 40 minutes and the second tire in about 25. I'm confident that I can mount these in 25 minutes or less now, but dismounting them - well, that might be different. Hopefully I don't have to do that for a long, long time!If any of this is unclear then please leave a comment, I will be happy to try and clear things up.I will update this review periodically (I promise!)
D**Z
High quality.
First I have to say these are super well built and extremely solid and durable. They look awesome on my All City Thunderdome. For build and quality you can’t go wrong with these tires.Now, they were a pain to install. Because of the solid build I ended up pinching two inner tubes before the third one worked. You can probably also say user error and I’m sure that was part of it, but even so, these are pretty tough to get on the rim, so I’m definitely nervous if I ever have to replace a tube on the side of the road. But given these are one of the most durable tires I’ve had, I don’t expect any punctures.
W**S
Well earned good reputation.
These tires have a well deserved reputation for long life and puncture resistance. I had no trouble with installing them, but I have over 50 years experience putting tires on bicycle and motorcycle rims.
F**S
These are really great tires but we're for me.
These are really great tires but we're for me. They are solid, great tread, puncture resistant, etc, etc. They are harder to install and the weigh a bit more. It's the installing and weight that had me go with something else but I'd recommend them easily if those two issues aren't an issue for you.
N**Y
A bike's best friend
Schwalbe continues to make the most incredible bicycle tires I've ever ridden on, managing to last over 5,000 miles before getting a single puncture! Definitely a worthwhile buy, highly recommendable.
M**.
I had no trouble mounting these tires and they fit perfectly.
I have read reviews from folks that have had issues mounting these Marathon Plus tires. They differ from cheaper tires because they have a wire bead and therefore the circle (the inside diameter of the tire) will not give, nor should it. That design feature is likely what gives these tires their outstanding wear qualities.Nonetheless, I was able to mount these tires with no tire tools, no lubricant, no anything except a little thumb pressure on the bead. Here are some tips:1) Before mounting anything after old tire removal, make sure your spoke buffer strip is intact and clean, and that the valve hole is aligned with the receptacle in the wheel rim. Make sure your rim is more or less clean and free of burrs.2) I recommend using a new tube (you might as well, you have the wheel off) especially a previously patched tube. Make sure your tube and tire correspond in size. You can successfully mount a smaller radius tube but inflation will make its walls thinner than its design and weaker, we want tough. Use the correct tube.3)Inflate your tube just a bit to make it easy to manage but not too much or it won't all fit easily in the tube cavity of the tire. Physics and all.4) Take the time to line up the valve stem. It's worth the extra bit of fiddling to make sure it's properly aligned. Things work best that way.5) Make sure the tube is seated all the way up into its cavity, that way it's not floating around frustrating your efforts to seat the bead. I think this is where a lot of frustration is generated. Air it up a bit and get it up in there and out of your way.6. Take your time and gently seat the bead. It should be easy with hand/thumb pressure. If it's not fairly easy, something is binding, not aligned, the wrong size, etc. Honestly they didn't manufacture this tire to frustrate you, they made it to fit a wheel rim, it should fit snuggly but it really should not be a mega-struggle to get this on there. Check your work if you are having trouble.7. Have fun on your new tires.I was laughing because I installed these hundred dollar tires on my $45 clearance pile Wal Mart bike that I ride to the train station or to get groceries. I kept picking up goat-heads (a thorny seed contraption found out west here, I'm in Utah) so I found the skinny on these tires. I mean, I'm no bike snob, but the flats were getting pretty annoying, I was patching tubes a couple times a week. I'd say I'll update this review when I find out how puncture resistant they are, but we all know that's a lie.Let me just say that these are not run-of-the-mill cheap bicycle tires just slapped on a cheap bike. These tires obviously have some engineering and material science backing them up, and the fit and finish is nothing short of amazing. Right now I have zero regrets for the purchase. On top of that, they look fantastic.Happy cycling, friends!
Trustpilot
4 days ago
5 days ago