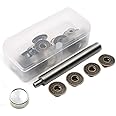
👖 Snap into Style with Ease!
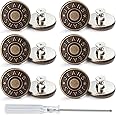
This 20-piece metal jeans button kit includes 17mm snap fasteners, perfect for quick repairs and stylish upgrades to your garments. With no sewing required, you can easily enhance your wardrobe while keeping everything neatly stored in the included box.
D**N
Works great if you know how to replace a button
the replacement buttons worked great, but no instructions included so, here is how you do it.1. insert a tack through the inner part of the jean (to the left or right of the hole from the old button)2. on the outer part of the jean, insert the button over the tack3. on a hard surface insert the rod into the hole on the button. Using a hammer pound the tack down connecting the button and the tack.If that wasn't clear enough, google how to replace a jean button. It is super simple.
B**W
Important to Know.
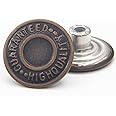
I think the problem from reading the previous reviews is that people are not using the right tools and setting it up incorrectly. This is why they're getting bad results. There are 2 sides to the round anvil. 1 flat and 1 with a conical shape in the center. The conical side is for another kind of rivet not included in this kit. The tack flat end should be sitting on the round anvil's flat not conical side inserted through the material. This preferably on a hard immovable surface like a concrete floor-very important. Put the button on the tack point through the hole in the bottom of the button. Then insert the setting tool rod into the hole in the button. Using a small hammer hit the setting tool a few times. This should cause the tack to mushroom in the button and set it in the fabric. The setting rod can be wiggled out fairly easily. It does pivot a little after being set which is Ok and not a problem. I've measured the tack and it's the same size as the one I replaced. If you try to put it in the same hole it came out of and the fabric is worn it will probably pull through. It should be relocated to the nearest area of sound fabric. All in all it's a good value, and as sturdy as most of the others.
M**Y
Poor quality and break too easily
I was very glad to try these with a good review Star average and thinking that they must be great value coming with the small anvil and punch parts. I was wrong.These don’t come with any instructions, so you’re left hoping that you can find correct tutorials on YT that apply to this design. There seem to be about 4-5 different types of these jean\suspender bachelor buttons, so you’re taking some on faith there.These come in the look and quantity advertised. They are extremely flimsy though. If the small backer pin doesn’t bend sideways on you rendering it useless, then the front button might warp in any direction even with very controlled taps with a light hammer. The metal clinch portion snapped off on 3 of mine.Bottom line is that a) I went through most of these just trying to get 6 installed and sticking for now, and b) other competitors on Amazon have much better independent reviews for not much more money. After trying them on for half a day, another two buttons snapped with only moderate wear.I would not recommend buying this brand of bachelor buttons even if there is a discount or lightning flash sale. Not worth it in my opinion.
C**R
Easy pants / shorts button fix for dudes that hate sewing
Let's face it. Pandemic is messing with our waist lines. We are busting buttons but hate sewing. Now just grab a hammer to fix your shorts! Works something like a rivet and seems sturdy. It is so easy I added a second button 1.5" from the primary button in case I needed a little tighter waistband and / or popped the first button hehehe...
P**D
Doesn't seem as strong as ones that come on jeans. Watch install video.
Some people note that there is no instructions. At least at this time, there is an instruction video here on the product listing. The video says to be sure it is straight, and this is important. You can bend the staking pin at an angle.The round base that you put under it for hammering must have been designed for some completely different purpose. The side you put face down to the ground has a pencil-point, for no apparent reason.I specifically did not want the screw on kind, because I thought they might accidentally unscrew. I wanted permanent attachment. But the assembly definitely seems weaker than what comes with jeans. That said, its holding for now.My regular pants generally come with sewn-on basic plastic buttons. I often have to replace them and figured something like this might be good. I will see how long it lasts.
V**R
Great tool, some tips
Tool is easy to use, just make sure to have a towel or some fabric between the button and hard surface when you hit it with your hammer. If not the face of the button will have small dents and scratches on it (more noticeable than you’d think). Also don’t go crazy with the force you use thinking it’ll make it last longer because the rivet (the small piece on the back of the button) will actually snap.
N**K
Worked perfectly for what I needed
Had a jacket with loose buttons that were falling out, used the punch to fasten it back in, and it worked beautifully! Be sure to use the metal cylinder the proper way, flat side for flat fasteners, the beveled side for snap fasteners.
A**E
very lightweight, takes some practice
I bought style #5 of these, the ones with the flower. Mine worked just fine once I got the hang of it.The very first one was a little wonky and I bent the flat back of the pin, but I wasn't holding the rod firmly enough (that's what she said).Press the pin in through the back of the fabric, and place the flat back on the flat side of the included base. Put the button on top and then the rod in the center. Here's where it takes some practice. Press down on the rod with an even pressure to keep the pieces steady on the base, and keep it as vertical and level as possible. I used my index, middle finger and thumb to hold, while using my pinky on the floor to steady my hand. I was also sitting on the floor- being above your project to be able to look down and make sure you are keeping the rod straight helps a lot. Hammer a few times and check that it's connected. It doesn't take too much force. They are VERY lightweight which is the only bummer, and the diameter of the button is just slightly smaller than the ones I was replacing. But they do work!
TrustPilot
1 个月前
2 个月前