🔧 Elevate your garage game with cables that work as hard as you do!
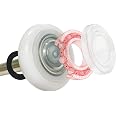
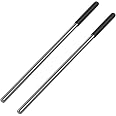
This pack of two heavy-duty garage door cables, made from corrosion-resistant 304 stainless steel, is engineered specifically for 7 ft residential garage doors. Measuring 8 ft 6 in in length and 3 mm in diameter, these rust-proof cables ensure smooth, reliable operation and easy installation, providing a durable safety upgrade that extends the lifespan of your garage door.


| Manufacturer | BURIUS |
| Part Number | PGD-C007 |
| Item Weight | 6.3 ounces |
| Product Dimensions | 8 x 6 x 0.75 inches |
| Country of Origin | China |
| Item model number | PGD-C007 |
| Is Discontinued By Manufacturer | No |
| Size | For 7 Foot Garage Door |
| Color | Steel |
| Style | 7 Foot Garage Door Cable |
| Material | 304 Stainless Steel |
| Shape | Racket |
| Item Package Quantity | 1 |
| Included Components | 2 Pack Garage Lift Cable |
| Batteries Included? | No |
| Batteries Required? | No |
J**H
So I was initially very very unhappy - things changed - turns out the cables were innocent.....
YouTube says this is about a 15 minute job. That do not turn out to be my experience.I have been renovating homes for over 30 years - I have some knowledge in that area.Assuredly like most of you looking, I had a frayed lift cable(left in my case) on my seven foot tall garage door and I bought this replacement pair to fix the issue. I am in the middle of a much larger separate home project, so I opted for the safe but short path, as the right cable showed basically zero signs of wear, to just at least initially swap the left cable. I swapped the left cable without to much difficultly, reloaded the door and the result was the door ceased normal function. It is operated with an opener and it began binding, stopping, retracting, and ultimately refused to close at all unless you nursed it through the binds and physically held open the line slack safety and even then would not strike the garage floor level. (Just for thoroughness I mention my opener and line slack safety are both on the left.) So - so far not a good result at all.As nothing is better than the full story let's back up to the start. Our house was built in the 80s and while they are not as common now, it had what I consider a true double garage door at 18' x 7'. We are in the hurricane zone and the original door took pretty serious damage in Katrina. I un bent and patched it with angle iron enough to work - we had bigger problems to handle at the time. Twelve years back as part of a larger reno I installed a double-sided insulated Clopay steel door in its place. This door is very heavy for a residential door and as a retrofit the closest(within reasonable cost) I could come to a wind resistant door. I say all this because for residential door this is may not be, due to size and weight, the most difficult residential door to get to function well - but IMO and experience it is up there. And function well it has. We have been very happy generally with the door - still looks great and multiple storms later unaffected by wind thus far. Along with the door I replaced the ceiling mounted opener with a shaft mount Liftmaster Elite. Other than a broken right spring at two years old, which I chalked up to a manufacturing flaw, we have had really no issues whatsoever with the door/opener combo until this cable replacement.Back to present, I am facing a very heavy door that is racking in the garage door frame because I simply swapped a frayed left hand lift cable. I further notice the new cable itself installed is now more slack than the cable it replaced which explains the slack line safety trigger which stops and reverses the opener. I elect to simply swap in the second new cable to the right side thinking this replacement may be slightly longer than the original cables and applying both new cables will get us levelled out again. I do this and not only does this not improve the situation it makes it worse. The second new cable(right) is tighter than the original making the overall racking worse. I pull both the new cables believing that not only are these replacement cables not equal in length to my originals but are not even equal to each other. I create a small quick jig in my shop and measure them comparatively and overall. The results? The cables are, within any reasonable error(+/-1mm), identical to each other and also effectively spot on the advertised 8.5'.So I am left simply truly confused and no longer unhappy with these new cables. They cable peeps did their job. If you simply care if the cables are good - IMO absolutely they are - you could stop reading. But I still have a big problem and maybe some chance you ran into to a problem too. If so read on.I have had an effectively fully functional door for twelve years but for these new cables is where we are. The original left cable is unfortunately whereabouts unknown at that exact moment so I am left with nothing but the right cable and the spring tension lift assembly to investigate. And that is what it takes to solve it. There are mirror image cast spools at either end of the spring rod that the cables roll up on as the door rises. I notice for the first time that the groove the lift cables notch into at are about 120 degrees off from each other side to side. Having spent a bit of time around engineers and having installed the door myself I felt certain all else equal these would and should have been in perfect alignment with each other. Clearly they were not even close. I went and spent the time to find the left cable and put it and the original right cable in the same jig I used to compare these new cables. They original cables were over 2 inches different in length and they had simply been removed and had served a fully functioning door for twelve years. So the only thing I can assume is they went in the box that way. I will not cover the entire order of installing this Clopay garage door but simply put, unless the difference in length exceeded volume capacity of the spool itself, unequal lengths of these cables will have no effect on a successful install. They did not in my case. They will have a big effect if you are replacing those unequal cables with equal length cables.If you have made it this far, maybe you need the solution I followed. As the grub screws that hold the Clopay spools in place on the tension rods are UNDER the cables once the cables are installed and the door is in its unloaded(up) position easy safe repositioning of the spools on the tension rod are limited. Because of this and I did not want to go back to ground zero(door on floor, springs unloaded, etc) to rest the spools on the tension rod, I did the following. I shot a level line across the tracks and marked a level point on each side, I moved the door up the track to the most slack position on the right cable and clamped the door at that location on the right. I measured from that clamped location to level reference mark on the right track. I moved to the left side, measured up that equal distance and clamped the left side to match the height. So both sides of the door are level to each other and clamped in place. I removed the left cable entirely to access the grub screws and just by eye matched the angle on the cable slot on the left to angle of the cable slot at the right - again a swing of about 120 degrees. I tightened the spool down(3/4 of a turn past initial contact of the grub screw to the tension pipe), replaced the lift cable and lowered the door by hand to find no binding. Re-engaged the opener and with no other adjustment it works fine.These cables are, in at least one way, superior to the the originals supplied in the box AFAIC. Further if you are now reset to an equal baseline at your spools, the cable swap assuming new equal length cables does actually only take a few minutes. HTH
C**I
Slightly different but still works great
I have a Raynor Pilot garage gate. The torsion cable began to fray on one side and I purchased this as a replacement. It's a very inexpensive option compared to calling a repairman and you can find videos on YouTube detailing how you swap them out. For that reason I'll let you look for the demo on your own and just supplement the video(s) with my observations. Before starting, I used a marker to indicate where the axel of the last roller on the gate was normally positioned with the gate fully open. I didn't wear gloves because I was working in a tight space and I knew I was going to have to feel the cable fall into the channels on the spool. I removed the damaged cable and compared the the old damaged one with the new replacement. The new cable was maybe four inches shorter than the original, so to avoid complications I replaced both left and right cables. This item was sold as a pair so that was ideal. The lead anchor slug soldered to one end of the cable was different in design from the original (the original was more like a cube and the new one was more like a barrel shape. The barrel didn't seem to lock onto place as positively as the cube did. Kind of a given because the hole on the spool was designed for a cube shaped slug. Irregardless of the shape, the tension on the cord helps keep it locked in place. I did need to bend the cable a little to get it to turn in the right direction while threading it. I used an extra long needle nose plier to finally pull the slug through the anchor hole. Once I had wound the cable around the spool, because the new cable was shorter than the original, I rotated the spool by hand to get the extra length I needed to put the cable loop on the anchor peg on the gate. Rotating the spool was not that difficult. There wasn't a huge amount of resistance. I followed the same procedure on the other side and I was done. I disengaged the gate from the chain/latch and closed/opened the door manually a few times to make sure everything was working right. I reengaged the chain/latch and used the motor to open/close the door. So far so good. I've been using the gate normally for a few days now and all seems well. And the final good sign... despite the cables being a slightly different length, the gate stops exactly where it did when I began the process. All in all I'm very satisfied with these good, affordable replacement parts. If I had to, I would buy them again.
D**K
Fits 7 foot door.
When you measure your door and it reads around 7' nota bene you will require a 8'-6" cable. I learned the hard way in purchasing a "7 foot door cable" from the Big Box store and found the cable after installing the door was short about 12".Equalize the drum starting point and make certain to maintain tension for at least 4 turns.
S**Y
Easy DIY replacement cables
These are exact length of the ones on my garage door. I had to replace as one of them snapped.Easy to install as I watched a video on YouTube on what to do. I also had to replace the other side as well since it was crooked when only replacing just the broken one.
D**Y
Garage door cable
Great
J**R
Stronger than original.
These cables were easy to replace. I think it took about 20 minutes to replace 4 of them. The old ones were 35 years old. Since these are heavier made, I should be done with this task!
R**D
Perfect fit
These are as thick as the OEM cables I replaced. The old set failed and the connection point of the loop. This area appears to be better reinforced. Length was spot on and the cables fit into the groves on the drum without issue.
L**R
Great for heavy doors.
Heavy duty cables. Perfect fit and no issues.
TrustPilot
1 个月前
1天前