Desert Online General Trading LLC
Dubai, United Arab Emirates
Desert Online General Trading LLC
Dubai, United Arab Emirates


🚀 Elevate your Tundra, dominate every trail.
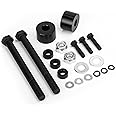
The KSP 3"F+2"R Tundra Lift Kit is a precision-engineered leveling kit designed for 2007-2021 Toyota Tundra 2WD and 4WD models. Featuring a 3-inch front spacer and 2-inch rear lift block made from aircraft-grade aluminum and carbon steel, it offers enhanced ground clearance and rugged durability. The kit includes extended heavy-duty U-bolts and a unique Cross Gusset Plate Locked design for superior rear support, ensuring safe and stable driving even in extreme conditions. Easy to install with a required alignment post-installation, this kit transforms your Tundra’s stance and performance with trusted quality and a 12-month parts warranty.


| Brand | KSP PERFORMANCE |
| Auto Part Position | Rear, Front |
| Material | Aluminum, Carbon Steel |
| Included Components | 2x front struct spacers, 4x u bolts, 2x rear lift block, 1x installation instruction |
| Manufacturer | K8016TN-3-2 |
| UPC | 889489220877 |
| Automotive Fit Type | Vehicle Specific Fit |
| Maximum Lifting Height | 3 Inches |
| Model | 3” front and 2" rear tundra lift kits |
| Item Weight | 19.25 pounds |
| Product Dimensions | 13.78 x 6.69 x 6.69 inches |
| Country of Origin | China |
| Item model number | K8016TN-3-2 |
| Is Discontinued By Manufacturer | No |
| Exterior | forged |
| Manufacturer Part Number | K8016TN-3-2 |
A**H
Good Product: Read This Before You Purchase and Install in Your Tundra
Bought this kit for my 2005 Tundra quad cab 4x4. Leveling blocks are good quality CNC aluminum about 1.125" thick. A lot of the reviews talk about the ease of installation. Maybe for some truck models, but not so easy for the Tundra. Here are some pointers to make the job go easier and faster:1. First things first, once you remove the strut assembly and before you install the spacer you will need to grind approximately 3/8" off of each of the strut mount bolts on the top of your strut so that they will sit flush or below the top of the spacer which bolts back into the upper strut mount in the wheel well from the top.2. Everything I read said to drop the rear mounts of the lower control arms to make installation of the lower strut mount easier. BS. This cannot be done on the first generation Tundras without first removing the steering control arms as the rear bolt on the suspension control arm cannot be removed unless the steering control arm is first removed. You do not need to remove either nor do you need to remove the skid plate (saw a number of sites saying to drop the skid plate too. Needless hassle all the way around).3. Instead, you will need to remove the four bolts that attach the ball joint assembly on the lower control arm to the wheel hub. This, along with unbolting the outer bolt of the upper control arm, tie rods and other little bits holding the suspension assembly together (including unbolting the ABS sensors), will enable you to move the wheel hub assembly to one side while you leverage the lower control arm down. I literally had to stand on the passenger side and press with all my might while my wife fought to get the lower mount bolt installed. However, this is the secret to getting the movement and leverage you need to get the lower strut mount reinstalled following bolting the assembly to the top mount. Notably, none of this is easy as this little spacer block maxes out all available vertical space between the upper strut mount and lower strut mount, plus some.4. When unbolting the ball joint assembly you will want to place your floor jack under the ball joint bolt under the lower control arm and jack up the suspension several inches to relieve the tension on the assembly. Once unbolted you can remove the jack. Now the lower control arm has it's maximum range of motion AND you can get the hub and brake assembly pushed over to the side so that you have more work space and a better angle to work from. Reassembly will go in the opposite order, but first there will be a herculean effort to leverage the lower control arm down far enough to get the lower strut mount back in the mount on the control arm while a second set of hands installs the strut mount bolt. I had my wife quickly place a 3/8" steel punch partially through one side of the mount to hold everything in place. This gave both of us the opportunity to rest a little and the punch made a nice lever to help her line everything up and finesse the bolt in from the other side. Once all that is done you will need to use the floor jack again to jack up the outer portion of the lower control arm so that the ball joint assembly can be re-bolted to the hub assembly. You will need to raise this up a good 4-6" to get the two assemblies to line up and be close enough for the bolts to thread. Since this is a vital part of the trucks steering and control you want these bolts as TIGHT as you can manage when reinstalling. I laid down to ensure I had as much leverage as possible when tightening.5. Regardless that you did not drop the control arms you will need to have the truck aligned right away as the spacers affect vertical tow, angling the bottom of the wheel inward by a good inch or so.If you follow these instructions you'll save yourself hours of grief. Took me about three frustrating hours of playing with spring compressors and all sorts of other nonsense on the first side before I happened on the idea of ubolting the ball joint assembly from the hub. Other side took me less than one hour start to finish with no busted knuckles (busted a bunch trying to figure out the first side). Happy wrenching!
T**M
Good Product
So far, so good! It's reasonably priced, and l'm hoping it holds up well in the long term. Thank you!
A**
This was a present for my son and he is happy with it.
My son is happy with this product and it works good.
J**O
Solid Kit but Instructions Leave Out Important Step That Requires a Special Tool
Great kit w/ quality components. Gave my truck a nice boost. Back blocks are a breeze to install; no surprises. Front spacers will throw you a curve ball if you're not prepared. The four factory bolts fixed to the top of the strut that originally connected the strut to the mounting plate now connect the strut to the new spacer (factory nuts are used to attach strut to new spacer). The bolts included in the kit are the new strut-to-mounting plate connection, HOWEVER you have to rotate the top of the strut 1/4 turn to allow for the new spacer holes to line up w/ the mounting plate holes. In order to do this you need to compress the spring to take the load off, then rotate the top of the strut 1/4 turn. I used a compression tool to compress the springs. I also left the compression tool on while I rotated the top to try and align the holes (the new bolts come from the top down and thread into the spacer). If you compress your spring, twist the top, release the compression tool, then seat the strut in place and the spacer holes aren't lined up, you have to keep repeating this step. Leaving the spring compressed will allow you to twist the top in place and align the new spacer holes w/ the mounting plate holes. No additional mods needed (grounding strap/brake lines/etc. were fine). I twisted the brake line brackets on the back end in order to prevent the lines from resting on the leaf springs but no line extensions were needed. Kit was installed on my 2014 Tundra TSS Off Road.
J**9
A little bit more involved but not hard to install.
They are very strong
B**
Works Just as Advertised
I have a 06 DC SR5 4WD. I installed these myself within 3 hours. And that included installing new struts which requires compressing the springs. (Not necessary if just installing spacers)I see a lot of reviews complaining about how hard it is to install. This was a breeze! All I did was remove the 4 ball joint bolts and the sway bar link and I had enough range in the lower control arm to push down with a pry bar and install the lower strut bolt, all of which I was able to do myself. Re-installed everything and it sure does lift the front of the truck up! You do have to trim a little of the existing strut studs as everyone else said, but that is super easy! You will definitely want to get an alignment on the front end after installing.This did end up lifting the front just a tad more than the rear, but my truck is getting close to 200,000 miles so who knows how sacked out the rear leaf springs are. Please refer to photos. Just a good excuse to install another leaf spring in the rear!Great Kit, Great Price! Recommend 5/5.
2**A
Great Fit
Leveled the truck to the back on 33s. Recommend shop installed due to realignment.
M**S
Easy install !!
Easy install and my.truck looks great!
TrustPilot
4天前
3 周前
2 周前
1天前