We remain fully operational. Our teams are working around the clock to ensure your deliveries continue safely.

下载应用程序


⚡ Upgrade your laundry game with precision sensor power!
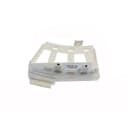
The LG 6501KW2001A Sensor Assembly Hall is a genuine OEM rotor position sensor designed to restore optimal spinning performance in a wide range of LG washing machines. Compact and lightweight, it offers a perfect fit and easy DIY installation, ensuring your washer runs smoothly and quietly again. Trusted by thousands with a 4.5-star rating, this sensor is the essential upgrade for any LG washer owner aiming to avoid costly repairs and downtime.
| ASIN | B00AYBL3GU |
| Batteries Included? | No |
| Batteries Required? | No |
| Best Sellers Rank | #482,258 in Tools & Home Improvement ( See Top 100 in Tools & Home Improvement ) #3,239 in Washer Parts & Accessories |
| Customer Reviews | 4.5 4.5 out of 5 stars (331) |
| Date First Available | July 30, 2008 |
| Is Discontinued By Manufacturer | No |
| Item Package Quantity | 1 |
| Item Weight | 0.704 ounces |
| Item model number | 6501KW2001A |
| Manufacturer | LG Electronics |
| Part Number | 6501KW2001A |
| Product Dimensions | 3 x 3 x 1 inches |
| Style | Modern |
| Warranty Description | This is a genuine OEM replacement part. |
P**H
It Fit and Works Perfect for LG Washer
My LG washer stopped spinning and stared growling. We diagnosed the problem to the haul/motor speed sensor and orders this part, which fixed everything. The part fit perfectly. It’s an easy job for a DIY’er. It’s a good idea to takes pics of the wire harness before disassembling, which was my only snag.
J**N
Works as expected and easy to install
I bought the part 2002A by mistake before realizing it wasn't the right part. Then I bought this part and it worked perfectly, let's see if this last one is as durable as the original part
R**D
Worked perfectly !
Great and cheap replacement part for my washer. I got the same model as the one that broke on my LG washer. How did I know this was the broken part, I honestly didn't know for sure other then what I gathered through some research on you tube videos. Basically my washer stopped spinning in one direction. It would spin one way but not the other, and when it did spin it had a loud humming noise. I said, well I can spend 50+ dollars on someone to tell me whats wrong then charge me even more for the parts and labor, or I can take the washer apart myself (you just need a bit of elbow grease and a very very small amount of brain memory) and get a 13 dollar part and fix it myself. 13 dollars later and some elbow grease, washer is working perfectly again. Just a tip, make sure you align the three notches from the part with the three notches on the washer first before you put this on because it can be a pain to try to take it off to put it on right. From what I have read if you don't get this thing put on properly , meaning aligning the notches correctly, you will still have issues with your washer spinning.
D**C
Super simple fix for LG Washer "LE" error!
If your LG washer is showing an LE error, it thinks there's a problem with the motor. Often, the motor is fine and it's just the sensor or a broken wire in the wiring harness. I recommend starting with the sensor, and removing the wiring harness and manually inspecting it for broken wires. While you have the stator off, you can check it by testing with an ohm meter. There are three contacts, and the resistance of all three combinations (1 to 2, 1 to 3, 2 to 3) should be between 5 and 15 ohms. Mine all tested at 7 ohms. There are a number of videos on YouTube showing you how to do this job. You'll need a Phillips screwdriver and 17mm and 10mm sockets, and a blade or scissors to cut one zip tie. That's it! It's great to fix a washer for $20 rather than have to buy a new one for $1000. :)
A**Z
Perfect fit and function for my washer with an LE error.
My washer was experiencing and LE error, so I tore into it to find the issue. The service tech manual didn't say what the issue was for this error so tracking down the issue was difficult but for anyone else in this situation here's what happened to my washer. Washer would start and seemed normal during first few seconds of washing but after watching it I noticed that the wash drum would only spin easily in one direction but, even in the direction that was acting the best, it would make a lot of noise at high speed and then error out. At first I took everything apart (and I mean virtually everything), cleaned all the funk out, and made sure that everything that should move did so freely. This did nothing really; it was just doing the same thing but with less gunk in it. Did some investigation and saw that people online were having this issue and fxed iit by replacing this hall effect sensor. I replaced this sensor in about 15 minutes and it works like new now.
T**R
Works in my LG WM2016CW
I tested my old Hall sensor and it was bad. I bought this one because it states OEM in the description, though I'm not sure it is LG... It came in a plastic zip lock bag and not in an LG box or anything. This is why I took away a star because it is hard to tell if it is or isn't really OEM. I previously bought a cold water valve that stated similar and came in similar packaging only for it NOT to be LG and leaking less than a year after replacing it. I got a real LG one and it came in an LG box. Anyway, got this sensor installed, cleaned up the coils, and the LE error went away and the washing machine works again. Next up, the shocks!
K**P
An easy repair for anyone marginally handy.
My WM2077CW washing machine stopped working one day. I would set up a load of laundry, press "play", and it would fill with water as per normal. However, instead of spinning up nicely, the drum would just shiver and the display would start to read "LE". I did a little bit of research and determined that the problem was probably a worn out rotor position sensor, also know as a Hall effect sensor. I could not find a tutorial specific to my machine, but I figured that the low cost of this part, and the money I would save if sucessful, was worth the risk of it not working and having to call a professional or replace the machine anyway. Well, the good denizens of the Internet were right and replacing the sensor turned out to be an easy and satisfying DIY project. The most difficult part was mowing the machine so I could get to the access panel on its rear. After that I only had to remove 11 screws/bolts. There were two wire harnesses that I had to disconnect, one for the sensor, which was easy, and one for power to the motor coils, which was tricky. Then, I pried off the old sensor (it fastens with plastic tabs), snapped on the new one, and put everything back together in reverse order. And now I have clean underwear again! I feel a little odd about giving this product five stars, but only because you don't really have a choice if you need this part. It only comes in one flavor, as it were. Perhaps I should really write a review for the machine. I suppose there are washers that are more difficult to repair.
D**Z
Lasted 6 months before going bad.
Literally only lasted 6 months before going bad and needing to be replaced again.