We remain fully operational. Our teams are working around the clock to ensure your deliveries continue safely.

下载应用程序


Buy anything from 5,000+ international stores. One checkout price. No surprise fees. Join 2M+ shoppers on Desertcart.
Desertcart purchases this item on your behalf and handles shipping, customs, and support to SINGAPORE.
🛠️ Build Strong, Stay Grounded — Stability That Lasts
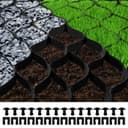
The VEVOR Ground Grid is a 27 ft by 4 ft, 2-inch deep permeable stabilization system made from recyclable HDPE. Designed for DIY enthusiasts and professionals alike, it supports heavy loads up to 1885 lbs per square foot with a 3D honeycomb structure that prevents erosion and stabilizes gravel, soil, or grass surfaces. Its flexible, cuttable design allows custom sizing for patios, driveways, parking lots, and more, ensuring quick installation and long-lasting durability in all climates.


| ASIN | B09SL7JB7N |
| Best Sellers Rank | #13,473 in Patio, Lawn & Garden ( See Top 100 in Patio, Lawn & Garden ) #50 in Garden Edging |
| Brand Name | VEVOR |
| Color | Black |
| Customer Reviews | 4.4 4.4 out of 5 stars (333) |
| Item Type Name | for DIY Patio, Walkway, Shed Base, Light Vehicle Driveway, Parking Lot, Grass, and Gravel |
| Item Weight | 7.7 Kilograms |
| Manufacturer | VEVOR |
| Material Type | High Density Polyethylene (HDPE) |
| Product Style | Patio |
| UPC | 810087874841 |
E**S
A fan but there’s a caveat…
This is a 6 month review. I am a big fan of this product. It’s exceedingly cost effective and blindingly simple to install. The quality is on point for the price, and I am buying more of it. When I first laid it down and filled the cells with gravel, one or two tamps made the cell lock up like a 4” concrete curb. I have had everything from a caterpillar to a well drilling rig drive on it like no big deal. I’m happy. That being said, there’s a few things you should know to be happy with it. First off, the little plastic clips that come with it are so useless to the point of being counter productive. Use them ONLY to hold the ends together while you bolt them together with galvanized 1/4” bolts with washers. The edges and seams are weak, so make sure you support them, especially anywhere that will take a load. The material will not hold up without it. I put road cloth down under it, which is keeping the gravel from sinking out. It can be placed over a surface that has not been leveled, but it’s much easier when you start with a flat level area. I started with 10” of mud in march, and had a layer of gravel dropped on top. A few runs of compaction, then the road cloth and finally the geocell. The neat part is that the cells work like a gold sluice. Once the cell is full the gravel glides over it to the next. I did a large portion of spreading the gravel with a rake and a hand tamper. So far it’s very water permeable and resilient. We’ll see how it works out with the snow this winter.
H**F
Great mechanism for erosion prevention
These are so helpful to prevent erosion. I used them on a fairly steep grade with #2 & 3 gravel. The sections are sturdy & for 2 years, so far, have held up with ATV traffic. The sections MUST be installed properly with stakes at the edges!! I highly recommend placing extra stakes for stability & strength especially if any vehicles would be running over the area.
F**1
Good erosion control option near house
To help minimize erosion from water below our cabin porch, we used the ground grid to help break the water. Overall, this grid was easy to use and install, making for a more stable area to take water. We used class 5 to fill the grid add to the stability of the install. Overall, I would say that quality is good but did have a couple areas where the grid came apart due to poor heat adhesion from the manufacturer. Overall, the edging stability has last well for the last year.
D**D
Good product
Works great. A little cumbersome at first, but we very happy with it.
C**A
Geo-Grid works as intended.
Used along a retaining wall, on a slope, to retain gravel. It worked well and to date ( 6 months later ) is holding up.
S**.
Works great …BUT check these before you start!
These work great once they’re filled. However: If your project is like ours make sure you plan ahead. You can’t connect them and lay them all out and THEN fill because you can’t be on them until they are full or they collapse. So plan accordingly. Make sure you buy stakes or pins to keep the edges secured because it doesn’t come with them. ****And most importantly**** Check for the connection holes before you start! We laid out 2 of these (in separate areas) and filled them, then got out the next 2 to connect, only to realize that only ONE of the 4 grids had the holes in the edges to connect them. Since 2 of them were already laid and we were in the middle of our project we couldn’t return them. We had to drill holes in each individual edge piece on the ones already laid out (making sure not to move the landscape pins or lift them and let gravel through the bottom). On the one not yet used it was a little easier because you could at least drill a few at a time. But this whole process took so much time an effort and left rough edges that made connecting them even more difficult. It made our project much MUCH more difficult than it should have been and took FOREVER. I so badly wished I could stop and return them but it was too late by the time we realized they were flawed. I’d like to leave a 5 star review because they really are great once they’re in. But the time I lost and effort I had to go through with these things really ruined it for me.
1**D
Holds wood chips, and enables Bermuda grass growth.
I already have one of these filled with relatively fine wood chips as a trial on a slope where errosion was previously unmanagable due to concentrated road and driveway runoff. Bermuda grass is spreading into the grid from the lower end, which, given it is filled with wood chips and not soil was unexpected but wonderful. Grass has now firmly established itself in about a third to half of the covered area. This should both stabalize the soil, and help anchor the grid itself. I'm confident it will continue, and have ordered this second grid to extend the success on up the slope.
K**3
Très bien fait le job installer depuis plusieurs de 9 neufs et n a pas bouger du tout
A**O
Facile da posare in opera e resistente
S**Y
Clay area that was a slippery mud pit for my horse turned into a healthy pea gravel area. What I learned when using this: Dig out 3” for the grid material plus however deep your finished top level will be to the surrounding ground area for a smooth surface. It doesn’t need to be level, it needs to be relatively flat to lay the grid down evenly. Use landscape pins on the edges to hold it down while you start to fill. They look like long U shaped metal pins. This will make your process easier. Fill with 3/4 crush material. (Drain rock with lots of sand in it) Wet down and use a tamper to create a solid base. Bedding sand on top of this. Tamp down with a little bit of water. 3/8 round pea gravel on top. No tamping required. I was able to drive over the grid in a skid steer once the crush was down with no issues. We will see how this holds up for the winter!
N**A
Excellent product. Arrived on time. Needed for a very steep gradient and really does the job. We had to obviously put pegs of steel bar driven into the ground to hold it in place. We used 15 to 20 mm round gravel and they have filled the pockets perfectly. We put weed barrier underneath before lying the ground grid. We plan to plant shrubs and ground cover plants. The 10 inch opening will be wide enough for the plant root ball.
R**.
Appears to be fit for purpose. In the process of covering the cells with granite chips. Good price and fast delivery!
TrustPilot
1 个月前
2 周前