🎶 Elevate Your Ride with Bass That Moves You!
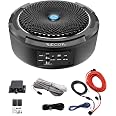
The RECOIL SL1708 is an 8-inch under seat slim amplified car subwoofer designed for powerful sound in a compact form. With 240 watts peak power and a super shallow design of just 3.1 inches, it fits perfectly in any vehicle. The subwoofer features smart connectivity options, adjustable sound settings, and comes with a one-year warranty, making it a reliable choice for car audio enthusiasts.


| Model Name | SL1708 |
| Speaker Type | Subwoofer |
| Special Feature | Bass Boost |
| Recommended Uses For Product | For Cars |
| Compatible Devices | Projector, MP3 Player, Laptop, Desktop, Television, Tablet, Smartphone |
| Subwoofer Diameter | 8 Inches |
| Unit Count | 1 Count |
| Controller Type | Bass Volume Remote Control |
| Surround Sound Channel Configuration | 1.0 |
| Color | black |
| Included Components | 8" Subwoofer Unit, Installation Wiring Kit, Bass Volume Remote Control with Cable |
| Product Dimensions | 9.9"D x 9.9"W x 3"H |
| Item Weight | 10.4 Pounds |
| Is Waterproof | FALSE |
| Warranty Type | Limited |
| Number of Items | 1 |
| Control Method | Remote |
| Speaker Size | 8 Inches |
| Power Source | Corded Electric |
| Woofer Diameter | 8 Inches |
| Vehicle Service Type | Car |
| Package Type | Standard Packaging |
| Audio Driver Type | Dynamic Driver |
| Audio Driver Size | 8 Inches |
| Subwoofer Connectivity Technology | Wired |
| Connectivity Protocol | RCA |
| Includes MP3 player? | No |
| Specific Uses For Product | Car Audio |
| Style | Active 8" Underseat Subwoofer & Wiring Kit |
| Manufacturer | RECOIL |
| Item Weight | 10.4 pounds |
| Country of Origin | China |
| Item model number | eggreh-607 |
| Manufacturer Part Number | eggreh-607 |
| Special Features | Bass Boost |
| Wattage | 240 watts |
S**M
Honest Review + Detailed Install Instructions
Hello Amazon,I drive a 2005 Xterra.This is my honest review, as well as a summarized breakdown of my installation in instructional format for those of you new to this or unaware of what you’re getting into.I am a certified low voltage electrical technician, so my instructions are trusting.Firstly, the review post install.The subwoofer in its entirety took me about 4 hours to install. This included having to splice into my speakers, finding the firewall grommet, hanging and mounting the power wire, and pulling up trim to hide the wires.After using for roughly 2 weeks, I unhooked the subwoofer for about 4 days. It was under my seat on a little platform I built to keep it off the carpet. It was getting so hot that it began to melt my carpet. I didn’t think it was the product as all fuses were performing their job and power testing showed no wrong numbers or percentages versus the manufacturer specifications.The gain on this device is absolutely heavy. Please be precautionary with messing with the gain, bass boost, and LPF. Adjust only a 16th of a turn once a day or once per hour of music.Once I adjusted my settings lower than initially set, my sub is self containing temperature levels at a medium warmth instead of a danger hot.The subwoofer delivers incredible sound quality and heaviness to the hits. Completely transformed the music experience in my car for all 4 passengers.You will need to do some work and have supplies that the Chinese instructions don’t soecifiy-Supplies needed:You will need a micro flathead/electronics screwdriver flathead to adjust the master knobs.You will need an 8 gauge splicing kit. Just get an 8 gauge wire crimp coupler, and some 8 gauge heat shrink.You will need a 3/4” drill bit.I recommend you purchase a trim removal tool kit for $10 off Amazon to assist in removing trim around your vehicle for wire management and access.You’ll need philips and whatever else is required to take nuts and bolts off your vehicle.You will need 20 zip ties.You will need 20 blue/orange/grey wire nuts.You will need HIGH QUALITY SPEAKER WIRE.Start by connecting the end of the red cable to positive on battery terminal. Begin to move the power wire around your engine bay and imagine the wire ziptied to the harness as seen in the photo. You want to go ahead and lay this out so you know how much slack to cut before you run it through the firewall.Next, go under the driver side dash, pull carpet and insulation back, look for the same black squishy rubber grommets as seen in my photo where the red wire is coming from. Take your drill and drill through the rubber pancake. This will make a hole to slip the wire through.Give yourself an extra 18” of slack on the wire you will connect to the battery. Cut at the extra 18 inch mark. Twist the copper strands and feed through the firewall access.Now connect your wires back together with the coupler.Feed the wire through the trim to the seat you will be hiding the speaker under.Take the blue and grey 4 wires and leave them under the seat.Take your high quality speaker wire, and 4 colors of electrical tape, open your bezel on the dash and access the radio wire harness.Cut 4 inches back from the radio into each speaker wire and simply splice the new wire into the cut, wire nut it, tape it, and label the tape Front left Neg, Front Left Pos, Front Right Neg, front right pos. Fish these wires to the leg well and then under the trim by your driver door.These will then respectively connect to the blue and grey wires with wire nuts.This will plug into the sub.Take your knob controller and drill the screws and controller somewhere comfy for you. If no where plastic like the console is available, I’d subject screwing it directy onto something plastic on your seat that’s accessible. Or you better be committed to being safe with a loose knob controller.Test the radio on a dubstep or bass heavy YouTube station like UKF, Kevin Gates, Billie Eilish, Trap Nation, Skrillex, etc.Adjust your EQ to preference first. I suggest setting it to standard POP or Bass Heavy.Now, and I’m dead serious or you risk dangerous heat and possibly destroying your subwoofer, adjust the master knobs with the tiny flathead by a 16th of a turn maximum. Only adjust again and Bassboost after first install enough until the subwoofer is activated. After that point, wait until tomorrow and adjust and listen.Reduce or increase LPF for heavy echo This is that bone vibrating feeling.Reduce or increase gain for power allowed to the subwoofer. This affects the punch and intensity.Bass boost knob controls the “juiciness” of that makes sense.Adjust the gain and boost courteously. LPF is overwhelming at a 16th turn so go light.
M**Y
Easy install
This product does well for what it is. It’s relatively easy to install and sound is decent. The fact that it’s self contained and amp is built in takes a lot of the wiring complications out of the install process. Since the quality and types of stereos vary, keep in mind that you will probably have to adjust the different screw type dials on the unit to increase the decibel output (initially I got no sound out of the unit and panicked). I installed this in my daughter’s Toyota celica and the seats were too low for the unit to fit under the seat. Because the car is so small, I first tried using the trunk/hatch area for its location, but it just didn’t have the punch that far back. I ended up replacing the provided speaker wire with good quality RCA wires and relocated the unit into the back seat floorboard area and the sound was very good. The only problem I had was that it sounded too good with the volume cranked up and I’m pretty sure I blew out the stock back seat speakers that I hadn’t replaced yet (I had already upgraded the door speakers). So I’ll have to upgrade the rear speakers soon, but so far my kid hasn’t complained because I don’t think she is cranking up the volume as loud as I did. Overall this is a good product that relatively easy to install and provides good sound from under (or in my case behind) the front seat.
C**.
Better than I expected.
Fits great in my Ford Maverick.Way more powerful than I was expecting.The sound is deep and clear.The remote controller give me good bass volume control.The whole system was really easy to install get up and running.I am really happy with it.
M**C
Perfect for keeping the bass inside the car
I read another review for this sub where the reviewer used the speaker connections instead of rca and they stated the gain adjustment was very sensitive. Because of this I thought I had a defective product, because my gain adjustments were not as sensitive and I wasn't sure if the speaker was outputting any sound. With my new JVC touchscreen deck outputting through RCA, I actually had to turn the gain pretty high before it was noticeable. After tuning all of the levels I ended up with the external level control at max, 75% gain, 50% bass boost and the LPF all the way clockwise. On the radio side I have sub volume at max and LPF set to 60HZ, and HPF set to 60HZ for my front and rear door 6x9/6.5's. This is the perfect amount of subwoofer for most music styles I listen to in my 2010 Xterra. (80's, 90's and Today)The installation was super simple and if I had to do it a 2nd time it would probably take me 30 minutes. My Xterra already had a factory battery accessory bolt that fit the size of the power cable's O-ring and a big firewall grommet that was easily punched through, and since I put the sub under the driver's seat the wires to the radio just had to be pushed into the sides of the center console without having to remove anything. I recently put in the new radio so I just had to pull the dash piece off again and connect the rca's and remote wire. I initially wanted a bigger sub for the back area but since it's mostly a grocery getter I didn't want to mess with my wife's square footage for groceries. As other reviewers mentioned, the installation kit does not include the rca's so make sure you plan for that.Cons (I guess?)1. The power cable is terminated on both ends and there is no way you're getting either end through a firewall grommet. Previous kits I've gotten usually come unterminated so I guess it just felt weird having to gut the cable in half and rejoin the ends after passing it through the firewall.2. The Auto On button was not intuitive to me. The instructions say that ON is for auto-sensing signal coming from the rca's and OFF is for using the blue remote wire at the back of the radio. It warns that you should not set it to ON while using the remote wire because this could overload something and blow the world up...or maybe just the amp/fuse. If it's really that important I would recommend first that the setting is changed to a flush mounted switch rather than a little button that is easily activated accidentally, and 2nd that it's renamed something like Remote/RCA. Auto ON seems like it needs to be ON and I totally would have turned it ON had I not read the instructions.I've researched compact subwoofers with integrated amps for weeks and there is no way you are going to get anything better than this for under $100.
TrustPilot
1天前
1 个月前