Desert Online General Trading LLC
Dubai, United Arab Emirates
Desert Online General Trading LLC
Dubai, United Arab Emirates


🚗 Elevate Your Ride with Confidence!
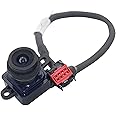
The Genuine Rear View Backup Camera OEM Part # 56054058AH is designed specifically for 2011-2014 Dodge Charger and 2011-2013 Chrysler 300 models. This high-quality camera ensures seamless integration and easy installation, taking less than 30 minutes. With a robust 5-year service life and compatibility with multiple OEM part numbers, it’s the perfect upgrade for safety and convenience.
B**L
Factory OEM. Works fantastic and very affordable.
Used this for a 2014 Dodge Charger and it worked perfectly.
N**L
Bought this camera to replace original factory reverse camera
I bought this camera to replace the original factory camera, part number 56054058AF. Before you buy this camera, go to Mopar.com to make sure that the new camera's part number replaces the part numbers that are listed on Mopar's website. The symptoms of a failing camera are blurry images, flickering screen, vertical ghost lines on the screen (you can see through them), and the red, yellow, green guidelines no longer appearing on the screen. The dealer part from Mopar was $300+ with a discount. If you add labor to install, you're looking at over $500. If you're slightly mechanically inclined and patient, you can DIY.The camera came in a Mopar box and has the same sticker as the original camera, except the new camera has the new part number that replaces the old one per Mopar's website. Once installed, I crossed my fingers and turned on the car. I was very pleased to see a crystal clear imagine on screen with the reverse guidelines. It's only been about a week, but I have no complaints. I think it's worth the money and recommend.Installation is fairly easy. You DO NOT have to remove the entire brake light to change the camera. I actually advise against doing so, because if you tear the gasket around the lens you could risk getting water inside. Unscrew the trunk handle inside the trunk on the top right (facing the trunk with trunk lid up). Using a pry tool, pull out the plastic push pins to peel the inside cover back. You don't need to remove the entire liner. Unplug the camera from the connector by pushing in the tab that keeps it in place. Make sure that tab is pushed in before you pull the cable out of that connector so you don't break the tab off. Then use a T10 hex tool to unscrew the two very small screws that hold the camera in place in the brake light unit, leaving the entire brake light unit in place on the car. Be careful to not drop the screws into the crevices in the trunk lid as the screws come out. I used masking tape to cover those crevices near the camera so that the screws will not fall into a black hole. Pull the camera out of the brake light slowly. To install the new one, just reverse the steps and you're done. Congratulations! You just saved yourself several hundred dollars and got your reverse camera working again.
C**H
Camera replacement
Have a 2014 Chrysler 300, bought this camera to replace the current camera that's slowly dying (distorted colors, works when it decides to want to work, etc). Camera model I replaced was 56054058AF. The new camera came in a mopar box. So far, everything checks out, camera works. All in all, this was a simple plug-n-play replacement. It took about 15 minutes to do. You can replace the camera without taking out the entire center light fixture but it's a bit tough to get to the screws. If you do take out the center light fixture, just be cautious as there's a rubber seal on the fixture.
T**R
Couldn't be happier! Exactly as advertised.
Couldn't be happier with the quality and price! This was $500+ cheaper than going through Mopar. As a previous reviewer mentioned, received the camera in a Mopar box so it does appear it as a genuine OEM product. It took all of 10 minutes to swap out the camera in my daughters 2013 Chrysler 300 and the image quality is as good as the original camera (when it was working).
D**R
5 minute job and works great.
My application was in a 2011 Chrysler 300c. When in reverse the screen was black with "check entire surroundings" or something similar at the top. For remove/replace of camera I used a 1/4 inch drive ratchet with a 1/4 inch socket and put in the socket a #10 torx bit as that is the screw head type holding the camera in. This also bypasses having to remove the entire lens assembly to replace the camera and risk damaging the seal.This worked well for me and only took about 5 minutes total. Camera picture looks as good as factory.
D**S
OEM so it's compatible
I knew it should work because it is OEM, and it does. I am waiting for dark tonight to validate the night viewability, but a T-15 Torx for the trunk handle, pop the 4 plastic retainer clips with a forked remover tool, a T-10 Torx for the 2 screws on the camera (no need to remove the backup light assembly and compromise the seal), and the the electrical connector, and the old one is out. I recommend a little di-electric grease on the connector and reverse the order to install the new one. 15 minutes tops. Oh, the Torx bits are security bits (they have a center hole to accommodate the center security pin in the screw heads).Works fine, my instinct was that it was a bit less colorful and a bit lower resolution than the factory camera, but if so not much.
G**G
Nope
Installed this myself..pretty easy but the picture is still backwards. Took it to the stealership cause I thought it might be a software thing...nope.. its the camera I just installed. Great now it's return/exchange time. We'll see how that goes....
N**0
Perfect fit
The product fit and worked as it should. The image quality was awesome. Highly recommend
TrustPilot
1 个月前
3 周前
2天前
3 周前