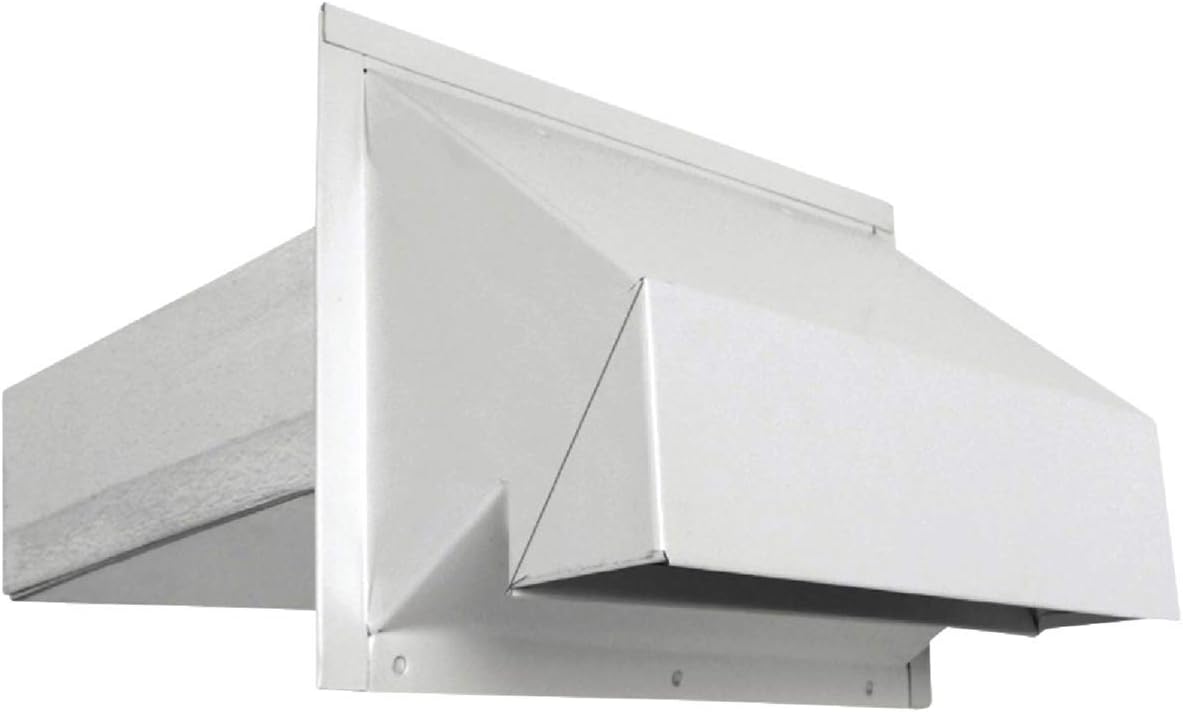
Imperial 3-1/4" x 10" R2 Premium Range Exhaust Hood, White, VT0500
Product ID: 9008281
💨Weighted damper blocks backdraft
⚙️3.25" x 10" precision fit
🛡️Durable galvanized steel
Desertcart purchases this item on your behalf and handles shipping, customs, and support to SINGAPORE.
🏡 Upgrade your kitchen’s breath of fresh air — built tough, works smart!
The Imperial 3-1/4" x 10" R2 Premium Range Exhaust Hood is a top-tier, energy-efficient wall-mounted vent hood crafted from durable galvanized steel. Featuring an air-tight design and a weighted damper to prevent backdrafts, it ensures optimal ventilation and long-lasting performance. Ideal for professional-grade kitchen setups, it offers easy installation and maintenance-free reliability, making it the preferred choice for discerning homeowners and managers who demand quality and efficiency.


| ASIN | B002FB65JW |
| Additional Features | Energy Efficient |
| Best Sellers Rank | #1,037 in Appliances ( See Top 100 in Appliances ) #193 in Range Hoods |
| Brand | Imperial |
| Brand Name | Imperial |
| Color | White |
| Controls Type | Push Button" or "Push button |
| Customer Reviews | 4.7 out of 5 stars 665 Reviews |
| Finish Type | Painted |
| Finish Types | Painted |
| Global Trade Identification Number | 00063467853527 |
| Included Components | Screws, Backdraft Damper |
| Manufacturer | Imperial Manufacturing |
| Manufacturer Part Number | VT0500 |
| Material | Alloy Steel |
| Material Type | Alloy Steel |
| Model Number | VT0500 |
| Noise | 64 Decibels |
| Noise Level | 64 Decibels |
| Special Feature | Energy Efficient |
| UPC | 063467853527 |
| Vent Hood Design | Wall Mounted Canopy Hood |
| Ventilation Type | exhaust |
T**S
Best vent you can buy on Amazon
TL;DR: This is hands down the best exhaust vent you can buy (especially over what’s available in the big box stores). The sheet metal is a thicker gauge than most vents and the weather stripping with weighted vent door makes this very good product. I highly recommend, if installing on vinyl siding, that you take the time to install it behind the siding. It will last for the lifetime of the house, (probably) maintenance free. Install notes (doesn’t include any instructions for the microwave - consult your manufacturer’s instructions): As others have decided to do, I installed this exhaust vent behind my siding. Overall, to complete the project, it added a day’s worth of work and $50 for tools & supplies. Check out the HouseImprovements YouTube channel for any questions on removing siding, cutting siding or installing j-channel. Note that this project doesn’t require window lap drip trim. 1. Materials: Tyvek (housewrap) seal tape, Malco SRT2 siding removal tool, 1 1/2” roofing nails, 1/2” or 5/8” white vinyl J-channel (depending on your siding thickness, 1 1/2” wood or sheet metal screws. 2. Tools: tape measure, hammer, razor blade, keyhole (manual) or reciprocating saw, extra long drill bit, speed square, pencil, aviator/sheet metal snips, 6” and 2’ carpenter’s level. 3. Per your manufacturer’s instructions, mark out the interior dryall per the specifications. Designate the exact center of the rectangle once drawn. 4. Drill a hole through the exact center of interior rectangle with extra long drill bit, taking care to keep the drill level and plumb. 5. Remove exterior vinyl siding with SRT2 tool, as needed (3 rows, total: row with hole, above and below. 6. Cut out the designated interior rectangle drywall, remove excess insulation, and install the microwave with wall vent adapter per manufacture specifications. 7. Measure a rectangle on the exterior housewrap exactly 3.5” x 10.25” (1/4” tolerance above exact measurements), based off the exterior drill hole. 8. Cut the Tyvek/housewrap per the exterior measurement above and cut out the measured rectangle with saw. 9. Measure depth of exterior hole in wall to the base of the microwave wall adapter (not the lip of the adapter, but the edge that touches the back of the he microwave ). 10. Reduce (cut) the exhaust vent shaft to the exact measurement as above with aviator/sheet metal snips. 11. Insert wall vent into exterior hole, carefully guiding the shaft onto the microwave adapter. When set correctly, you’ll feel it lay freely and the back of the trim of the vent will lay flush with the wall. Secure with sheet metal/wood screws. 11a. You can verify the adapter seated itself into the vent shaft by taking a photo with your phone inside the vent, with flash on, as shown in the attached photo. 12. Tape the trim of the vent, covering the screws, with housewrap seal tape, starting with the bottom, then the sides, then the top. Conservatively overlap all edges with each previous piece of tape (as shown in the attached photo). 13. Cut and attach J-channel to all sides of the vent trim, covering the trim completely (including screws). 14. Tape the top j-channel piece, covering the screws. Build up additional tape layers by two, for a total of three taped rows. 14. Trim siding as needed and reinstall. 15. Turn on microwave exhaust fan to verify functionality. Overall experience: Honestly, do yourself a favor and don’t cheap out. There’s a reason you’re looking for this vent - you recognize the problem with cheap, readily available materials at the big box stores. Take the time to do it right and you’ll have a great, leak-free experience with this wall vent for the lifetime of the house (or at least the microwave). Hopefully you’ll even have your wife say “Wow, that looks like it was always there!”. I will update this review after I have a chance to test its functionality and durability
M**E
Top of the line vent hood exhaust cap
I bought this to install with my new Chef PS18 range hood. The existing hole in the wall from the old vent hood for this cap was already the same size so removing the old one and installing this one wasn't too difficult. This exhaust cap is a premium product, there is nothing cheap about. The metal is thick and the length of the square duct part of it that goes inside the wall is 10 or 12 inches, long enough to go through the thickest wall. I have regular 2 x 4 walls so I had to cut it down to the right length with a hack saw. The painted surface on the head has a good layer of paint on it and isn't easily scratched, it's was probably primed before being painted. The damper inside is also well balanced and opens easy with a little draft, and closes snug when there is no air flow. Since my new range hood also had an exhaust damper on it I decided to remove one of them so the exhaust fans didn't have to force two dampers open. I removed the one from the range hood and left this one for three reasons, one I wanted the damper as close to the outdoor exit as possible to keep critters out, two - if this damper ever gets stuck, I can easily work on it by reaching up the exit opening outside, where if the damper on the range hood got stuck it might be quite an ordeal to get to. Three - this damper was the better made and most likely to remain trouble free of the two. Some things that I would suggest to anyone installing one of these vent exhaust caps is to use the damper in this cap, and remove any other damper in the path such as one that may come installed in the range hood. I would also put a good layer of long lasting caulk or silicone around the inside of the the galvanized rectangle end of this cap where they join and this one slides over the rectangle piece on the back of the range hood. This will seal the two rectangle exhaust pieces together and prevent any accumulation of grease, smoke or other smell from accumulating in the wall.
R**K
perfect replacement
I have a mobile home and the microwave vent was warped and not closing - this is a perfect fit , comes with tabs to close the door in winter, door works well, easy to install, no more drafts
R**Y
Great build quality
This exhaust is built like a tank compared to the super thin and cheaply built unit you would get from Home Depot. The damper design is also superior as it is fitted at an angle to ensure that the vent is sealed when there is no airflow but at the same time, it is balanced so that the airflow doesn't have to be super high to lift the damper.
G**I
Nicely made, poor packaging
The product is made in canada and well built. The white powdercoating is a nice touch. The flap is well balanced. The only gripe i had with the product is that when trying to install it thesurround piece slid out of the pressed collar and it was difficult to slide back into place. The shipping was fast but the item arrived dented and the powdercoat was scraped. It was thrown in a box with one air packet and UPS did the rest....
B**R
Perfect venting!!
This item was easy to install, and it worked perfectly. The quality was excellent and would definitely would recommend this item!
E**C
Great range hood vent
Great vent for my range hood. Much better quality than the thin metal junk they had at Lowe’s or Home Depot. Those were so flimsy they would bend even picking them up, but with this you can really feel the difference. Very easy to slip through the wall, cut to length with aviation snips and attach my range hood. The damper on this is great so far, it has a decent amount of weight to it so it firmly shuts when the hood stops blowing.it looks good on the outside of the house as well, I just put some while caulk around it and it blended into my white siding perfectly. I’d definitely recommend this vent and I’m glad I came across it on amazon, absolutely worth spending a few extra dollars and getting a quality product.
M**L
No more loud dogs or kids!!!
Oh man! So i bought this and let it sit in the box for about a month until i finally found the energy and time to replace it and wow what a differece. My old one was flimsy and did not have any real type of seal, just a very loose hanging flap inside that was meant to keep out backdrafts but failed miserably. It also even let in sunlight somehow? So i ended up ripping out the old one and preparing my house for the new one. The way i did it was with aviation snips, channel locks, and a hammer and chisel. My house is made of brick so i just used the hammer and chisel to clean off the old sealant that was used. Just angle the chisel at a sharp angle to avoid damaging the brick and with a few light taps the sealant was scraped right off. I used tuff stuff spray insulation foam to seal up big gaps which worked out great. The sprayed some more to be sure any remaining gaps are filled. I put in plastic anchors to hold in the 4 screws for this thing as well as sealant to make it air and water tight. A nice bead of sealant on the backside and a bead of sealant on the edge once it was screwed down tight. Then on the inside i used foil tape to seal it all up against the drywall. I took the opportunity to seal up the fan area on the range hood to help it direct more air outside. I also used 1/4" wide strips of weather stripping around the exhaust side of the range hood to make sure it has an airtight seal. Now that it's all done. My house is sooooooooooo much quieter! No more banging of the flimsy flap from the old vent, i can no longer hear the loud wild neighbor kids, i can no longer hear their small yappy dog and now when we cook, the smell of the food no longer permeates the entire house. I highly recommend taking the extra steps to make sure it's air tight on the range hood side. I have a good feeling that this one will last a long time.
K**N
Exhaust vent
Sized just right damper works right and well made but high price
R**Y
Great
This is a good quality vent. The spring loaded flap is great, no complaints.
J**.
Solid product
Fit perfectly with the kitchen hood
M**.
Awesome
As described strong material works perfectly!
Trustpilot
3 weeks ago
1 month ago