Desertcart purchases this item on your behalf and handles shipping, customs, and support to SINGAPORE.
🎯 Nail every stroke with Wagner’s Control Spray Max — your shortcut to pro-level painting!
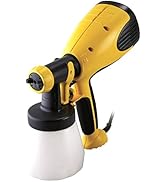
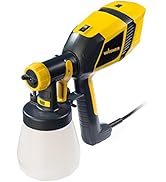
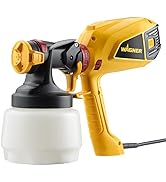
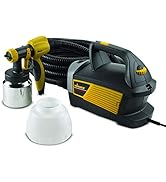
The Wagner Spraytech Control Spray Max is a corded HVLP paint sprayer featuring a powerful two-stage turbine and adjustable pressure and flow controls. It offers versatile use with various materials including thinned latex paints, stains, and primers. Equipped with a 20 ft hose and multiple spray patterns, it ensures precision and comfort for large or detailed projects. Designed for easy cleanup and minimal overspray, it delivers professional-quality finishes ideal for DIYers and pros alike.


| ASIN | B003PGQI48 |
| Best Sellers Rank | #142,984 in Tools & Home Improvement ( See Top 100 in Tools & Home Improvement ) #389 in Power Paint & HVLP Sprayers |
| Brand | Wagner |
| Brand Name | Wagner |
| Color | Yellow/Black |
| Customer Reviews | 4.3 out of 5 stars 4,024 Reviews |
| Global Trade Identification Number | 00024964194964, 10024964194961 |
| Hose Length | 240 inches |
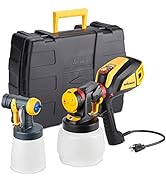
| Included Components | 20 ft. Hose, Cleaning Kit, Control Spray Max HVLP Sprayer, Instruction Guide, Metal Cup, Nozzle, Plastic Cup |
| Item Dimensions W x H | 12"W x 18.5"H |
| Item Type Name | HVLP Stain Sprayer |
| Item Weight | 5.1 kg |
| Manufacturer | Wagner Spraytech |
| Manufacturer Part Number | 0518080 |
| Manufacturer Warranty Description | 1 Year |
| Material | Metal, Plastic |
| Material Type | Metal, Plastic |
| Maximum Pressure | 2.63 psi |
| Model Name | Control Spray |
| Model Number | 0518080 |
| Number of Items | 1 |
| Power Source | AC/DC |
| Recommended Uses For Product | 20 ft. hose, Adjustable flow control with 3 spray patterns, Superior nozzle, Use with a variety of materials, Variable aire pressure control Recommended Uses For Product 20 ft. hose, Adjustable flow control with 3 spray patterns, Superior nozzle, Use with a variety of materials, Variable aire pressure control See more |
| Style Name | HVLP Stain Sprayer |
| Tank Volume | 1.5 quarts |
| UPC | 172304346044 872182815730 080850317329 100177418544 021112826692 763615760683 716080067405 072080017353 024964194964 051020034193 752913147326 651256045354 191120025209 151902999838 351428773442 803982727404 172302816594 |
| Unit Count | 1 Count |
M**S
Great Sprayer for the DIYer
I bought this quite awhile back (a little over a year ago), so I have used this item a lot. I now have a more expensive (10X the cost) HVLP rig, but I have found that this little Wagner gun is so MUCH more VERSATILE and EASIER to use, that I use this one more often than the expensive one. I can spray oil-based paints and primers, as well as water-based products, with hardly any effort. Cleaning up is fast and easy, too. You CAN get a 100% perfect, professional finish IF you take your time, read and re-read the manual, and you practice with it, first. Do not expect to pull it out of the box, fill it, spray with it, and have perfect results. I suggest that you gather lots of cardboard and buy a can (quart or gallon) of cheap paint (the same type as your first project requires (water- or oil-based)). Then, buy the appropriate diluent (read the paint can), the compatible additive (i.e., Penetrol for oil-based paints and Floetrol for water-based paints). While you're at the paint store (or you are on Amazon.com) pick up some medium size (pertaining to particle filtration size, not overall size) disposable paint filters. My two spray painting mantras are, "Practice does make perfect!" and "Paint additives can make ALL THE DIFFERENCE IN THE WORLD between a professional-looking paint job, and just an awful looking paint job!" That's it in a nutshell, but I've written at length about the first time I used this sprayer. If what I learned can help you get great results on your first project, it may be worth the time it takes to read: My first project was not the smartest one to choose as a first project to paint with a spray gun. It was the wainscoting and trim in my dining room. But, it came out so perfect, that even after a year, the glassy, smooth, sprayed surfaces still impresses me so much, I cannot believe I did them! But, back then, I didn't know any better, so I thought I would just start right in with the painting, buying the exact same paint and color (Sherwin Williams Alkyd) the installers had used. I lightly sanded all of the wainscoting and trim, as best I could, to scuff up the surfaces. I also used a liquid deglosser, since sanding detailed trim is thankless, tedious work. But, most of all, I spent a lot of time caulking (using PAINTABLE caulk) areas that had pulled apart from "settling," or that were not properly caulked by the installers in the first place. I let the caulk dry thoroughly. Actually, it was all the cracks and crevices in the joined edges of the woodwork caused by improper (or complete lack of) caulking, and some due to settling, that had caused the need to paint the trim and wainscotting. Next, I started in with the viscosity tests. I used paint thinner first, but then I read up on additives. So, I switched to using a combination of paint thinner and Penetrol (by Flood, purchased at Lowes). I can't recall the exact ratio of paint thinner to Penetrol I ended up using, but I think it would be safe to say about half and half. Of course, paint thinner was what my product called for as a thinning agent. Paint additives, like Floetrol and Penetrol, help produce a smooth, glassy finish. The additives can help make up for a multitude of sins! For example, if you did not properly adjust your air/paint flow, you could end up with a painted surface that has an orange peel texture (a common problem). If it's not too bad, the additives themselves can make that problem completely disappear! But, that's not too surprising, because one of their purposes is to reduce, or eliminate, brush marks! Once I had all of my paint thinner and Penetrol added in order to achieve an acceptable viscosity test, I was alarmed at how much I had diluted the paint! I had definitely diluted it beyond what the manufacturer had recommended (as stated on the can). Thankfully, I was worried enough that I decided to practice on some cardboard, rather than on the dining room walls, first, as I had planned on doing after reading all of the positive reviews here, thinking I could just spray the walls and get great results! And, although it didn't take long before I was able to get a nice, smooth coating on the cardboard, I am really thankful I did! I would have been scraping and sanding walls, for sure! I also stood the cardboard up vertically, like the surface I would be spraying (vertical surfaces are much harder to spray without getting drips and runs), so I could get a feel for how much paint I could apply before getting runs. It wasn't very much! I had to keep the gun moving relatively quickly. But, by then, I had to send my husband back to Sherwin-Williams for another can of paint, just to be sure I would have enough paint! Before getting to the viscosity tests, though, I had basically turned my dining room into a giant spray booth, but without an explosion-proof fan mounted in the window! I covered the windows, ceiling, and upper walls with plastic, masking off all of the edges. I also taped plastic over the two doorways, masking around all of the edges of EVERYTHING. I used thick plastic drop cloths on the floor, but I goofed by not taping them down as securely as I should have. So, I had to stop and do some clean-up and remedial taping when I saw that the air coming out of the nozzle was blowing up the edges of the plastic! Naturally, I used a respirator, and was covered head-to-toe in disposable painting attire. The air was thick with paint mist when I did paint. But, I expected that in the enclosed space. I put on a total of four coats, as I thought with all of the diluting, they would be thin coats. They were, but I wouldn't say that was a bad thing! I don't own a mill gauge (something I just recently learned about!), so I couldn't tell you how thick each coat was, but they were thick enough to cover bare wood without being transparent enough to see the wood grain show through, but not so thick that it would cause runs or drips. I always sprayed a small piece of cardboard, leaving it in the dining room, but near the opening, so I could easily check when the paint was dry enough to recoat, without touching the trim or walls themselves. It dried much quicker than I had anticipated, given all of the dilution. I did get a couple of runs, but I just sanded them off when the paint had dried enough to produce a powder when sanded, and not rub or rip. Of course, I sprayed these areas again. Even with the massive amount of prep work required (most of it would have still been required if I was brushing-on the paint, such as all of the caulking), the amount of time It took to spray, clean-up, dry, spray, clean-up, etc., was only a fraction of that time that would have been required for me to brush on all of the coats! The results were, as I said, spectacular. Today, the wainscoting and trim still look as fantastic as they did the day II had finished painting them. I was worried the dilution of the paint would have affected the wear or appearance of the surfaces, but it did not. So, I would never be afraid to dilute paint more than stated by the manufacturer on the can. Not being a paint professional, I do not know how they arrive at those figures, but for myself, I would always dilute the product according to what is recommended in the sprayer manual (using viscosity cup and timing the flow), and not what is stated on the can. But, I always read the can of the product I am using, because it tells me what to use in order to thin the product (the diluent). For oil-based PRIMERS, I use only the recommended diluent or solvent, and I omit the additive (Penetrol). To date, I have not used water-based PRIMERS, but I would probably only use distilled water for the diluent (unless the can stated to use another type of diluent, that isn't water). A shellac-based PRIMER would probably call for denatured alcohol as the diluent. Again, always defer to the can/manufacturer for the diluent to use, but defer to the sprayer manual for the proper dilution rate (using the viscosity cup). For water-based paints, I use a mixture of one part distilled water and one part Floetrol (50-50) to dilute the paint. I also use a medium filter for all paints and primers, and it is the last thing I do before I spray paint. Disposable filters are cheap, so I use a fresh, new filter when I fill or refill my sprayer cup. If I fill the cup three times during a project, I've used three filters. I always gather some cardboard to use to warm-up on, and, most importantly, to help me fine-tune the settings on the sprayer, so that I achieve the best finish possible. If your paint is properly diluted, and your spray is properly adjusted, I just don't think you will be ever be unhappy with the results. Thoroughly cleaning up your equipment as soon as you are finished painting is also extremely important. If you have a tiny, dried, speck of paint in the nozzle, you will not get good results. I have found those really thick pipe cleaners (oh, excuse me, I mean CHENILLE STEMS) are invaluable as an aid to cleaning out the inside of the slanted plastic tube that is inserted into the paint cup. Some other tips I've learned include spray painting early in the morning, when there is less likely to be a breeze, if I am painting something outside. Avoid spraying in direct sunlight, too. Finally, if there is a result that is not to your liking, Google it to find a solution to the problem. I have learned so much from doing this, and watching Youtube videos, too. If all else fails, call the manufacturer because there is always a small chance you could have a defective part that needs to be replaced. Dilute and practice with your cheap practice paint. If you can achieve a great finish on your cardboard (make sure the cardboard has a smooth surface to begin with, too!) using your cheap paint, you will surely be able to get an amazing finish with your higher quality paints and finishes.
S**N
Very nice sprayer, easy to use, easy to clean, but watch for over spray
I have never used a paint sprayer before. I have used spray paint in the past but never had good luck with it because I always ended up with uneven results that had runs. I installed some new baseboard over carpet and wanted to paint it after it was installed. This would be an extremely difficult task using paint brushes, hence my desire to purchase a paint sprayer. Wagner makes several paint sprayers with mixed reviews, although the vast majority of people liked this sprayer including myself. I got some masking paper and used a drywall taping knife to carefully tuck the paper between the carpet and baseboard. I then got ready to spray a very thick primer which had the consistency of pancake batter. I added the equivalent of 16 ounces per gallon of distilled water (no conditioner). It was still very thick but this unit had no problems spraying it. I completed over 60 feet of 6 inch baseboard in less than 30 minutes. I had no issues with runs and it was very easy to apply the primer evenly. During the painting, the hose came off the hand unit a couple of times causing a small stream of paint to land on the ground (not the baseboard fortunately). It would be nice if the manufacturer could make the connection tighter. The one issue I did have that I was not aware of was with a particular type of over spray. I always thought over spray was when the paint overshoots the target area and paints the adjacent area. With respect to this type of over spray, there was very little of it as the over spray was less than 6 inches on either side (I used a wide spray pattern). There is a second type of over spray that occurred. There were fine paint particles that did not adhere to anything and dried in the air. When I completed the project, there was a fine film of dry paint dust throughout the room. The dust was heavy and settled quickly and did not spread to other areas of the home. The dust was easy to vacuum (I used a HEPA vacuum to avoid re-spreading it), although I had to re-wash my bed spread and pillow covers. This was totally unexpected but then again I have never used a paint sprayer before. Therefore, goggles and a dust mask are a must as well as covering all furniture and belongings that can't easily be removed. Cleanup was extremely easy. After priming, I applied a coat of paint and diluted it to the equivalent of 8 ounces of distilled water per gallon per the paint manufacturer specifications. I also strained the paint. The paint was still thick but I had no problems spraying it. The finish result was nice but not as good as the results a professional painter can get using a high power airless sprayer and oil based paint; however this machine is very inexpensive for what it can do. I also would never rent a high power airless sprayer because they are dangerous and can cause injection injuries. The latex paint had a mild spray texture to it (not like the orange peel texture described by another reviewer) which is fine for baseboards but probably not as ideal for crown molding which are much more visible. For the crown molding, I want the finish to be as smooth as glass. I will likely use the sprayer to apply the primer and the first coat of paint (as the sprayer works much faster than I can hand paint) and will possibly do a finish coat using my Purdy paint brushes and latex paint with paint conditioners added to slow the drying time to get that final smooth finish. Per the manufacturer Q&A, this machine can be used indoors with latex paint even though the sticker on the unit states it is for outdoor use only.
S**R
Good Performance and Value for the Money
I'm a do it yourself homeowner and woodworker and I often need a sprayer for my home and other projects. After being frustrated with using my Wagner piston type sprayer for about 15 years, I finally got fed up and wanted to try something new. My old Wagner piston type has never worked well as it was always clogging and I spent more time cleaning it than I did painting. I never did figure out the secret to making the thing work right. I started a new project of replacing my rocking chair front porch railing and it would require me to paint about 300 spindles and posts with at least 3 coats of paint. I decided I needed a new sprayer for this project. I read the reviews on this sprayer and decided to give it a try. My first impression out of the box was that it was cheaply built with all plastic parts subject to easy breakage. The quality is about what you would expect for the price. I wanted to see if and how it would spray with un-thinned latex paint and it just wasn't flowing enough to make the quick coverage I was hoping for. I thinned the paint by only about 10% it was perfect! The coverage was good and the amount of paint applied was just right. The more I used this sprayer, the better I like it. The coverage was good, the quality of the finish was great, it is light enough to easily handle, it is quiet enough not to disturb the neighbors and cleanup is quick and easy. To clean it I would keep a bucket of soapy water close by and use the smaller container that comes with it to scoop up some of this water and attach it to the sprayer and spray until the unit was clean. That's all there was to cleaning it! After using it for my project I still have that impression of it being cheaply made, but I was careful not to abuse it so nothing broke. You don't want to be dropping this off of ladders, stepping on it or handling it roughly. Even if it only lasted long enough to do this one project, it would have been worth more than the cost in the time it saved me by not having to use a brush. I think this will last me for years through many projects if I take care of it. Anyone should have no problem creating a great finish to any project with this sprayer. You will have to know the proper "side to side" spray painting technique though to get good results with ANY sprayer. Just pointing the sprayer at the object to be painted and pulling the trigger isn't going to get you a good finish. It is easy to set up this sprayer for even a small project. Any project like painting a fence, furniture, garden items or anything difficult to paint with a brush is a perfect candidate for this sprayer. Some reviewers suggest not to paint a large structure with this sprayer, but I will be painting my 8' X 200' privacy fence with it as well as my 28' X 32' 2 story workshop and my 44' X 16' deck. I wouldn't use it as a tool if I were a professional painter, but for the homeowner who has an occasional large job, I think it will do the job. I would rate this sprayer a little higher if it were not all plastic. I would recommend this sprayer to anyone and I have already recommended it to a couple of friends. It is MUCH easier to use than my old Wagner piston type model. I'll probably throw that old thing away! Buy this one if you do much painting! UPDATE 12/01/2012 - I've used the sprayer for several more projects, including the 8' X 200' fence mentioned above, several pieces of furniture and more. The sprayer is still working great! I finished the entire fence in about half a day. It took about 15-20 minutes for one side of each 8' X 8' section. I was putting on a new coat since the fence had been painted before. I did have some sections that were new (storm blew a tree down on four sections and destroyed them). It took about 30-40 minutes for one side of those sections since I was applying at least two coats on bare cedar wood (cedar really sucks up the paint). I was well overlapping each pass of the sprayer. I went back immediately after doing one section and put another thin coat on. It was actually like I applied at least two full coats on the fence. I could do about two 8' X 8' sections with the larger (1-1/2 qt.) container filled with thinned paint. With the paint tinned and applying several coats to the furniture, the finish came out perfect; smooth, no blotches or runs and the coats were even. I found experimenting with the thickness of the paint pays off. If I didn't thin it enough, spraying was slow. Not a lot came out, but it did come out thick. If I thinned it right, spraying went very fast. I found that the optimum amount to thin the paint depended on the paint. I was using Home Depot BEHR Premium Plus on the fence and thinning it about 15% water and 85% paint produced good results. I was hoping I could spray the paint without thinning, and you can, but it just doesn't come out with enough volume to make the job go quick. It would be okay for a smaller job, like a door or a piece of furniture. One thing I like best about this sprayer is how easy and quick it is to clean! I haven't had any problems with anything breaking or not working properly. I would and have highly recommended this sprayer to anyone who would have an occasional need for a sprayer, like a home owner, handy man or small business. The price is right for how much work you can do with it in a short time, the convenience and the good finish it produces. If there is something better on the market for these applications, I'd like to know what it is!
D**.
My arm and shoulder would like to thank the fine folks at Wagner
The wife and I bought a 2,000 square feet "fixer-upper" and had all new eaves and cedar siding installed. After getting the quote for staining the siding and eaves ($10k) I decided to save some money and stain the siding myself. How hard can it be, right? After scrubbing the siding with a little wood brightener (a must-do for cedar siding), and taping off the windows and trim, I started applying stain with a brush. Ten hours later, I had completed about 15% of my siding. Wow, only 85% more to go. Looks like I'm not going anywhere on vacation this summer. In addition to the time, my arms and shoulders were fatigued and I certainly didn't relish the thought of doing the same thing the next day. I immediately went inside, started researching sprayers, and settled on this unit. The unit is very easy to set up. It takes less than a minute and requires no tools. I can't speak to how the unit works with latex paint, but it works like a dream with stain. You have to spend a little more time taping and masking EVERYTHING that will be near the sprayer. The overspray is pretty well constrained by the unit but you will definitely get a little spray that misses your target area. Taping and masking is a must! Don't expect to just put a 2" piece of painters tape on the edge of the trim closest to the siding. You will have to cover the entire window AND seal the edges with tape. If you have any prize-winning azaleas in front of your house, cover those too. That being said, once your done taping/masking, the actual spraying takes about 1/5 to 1/10 of the time that a brush takes. And it is sooooo much more fun than using a brush. AND SOOOOO much less fatiguing than using a brush. There's no pushing stain into corners or going over the same spot 3 times with a brush. The sprayer just lays down the stain. You WILL have to back brush a little. This means that you will spray on the stain to saturation and smooth the stain into wood with brush. It fixes the inevitable drips, puddling, sags, etc. It sound like you're doing twice the work but trust me, you're not. SMOOTHING out stain with a brush takes about 1/10 of the effort and time as APPLYING stain with a brush. The paint/stain container used on the sprayer seems small when you look at it and it does empty out fairly quickly. The reason it empties out quickly is because you coat so much of your project so fast that OF COURSE its going to empty out quickly. The reason a gallon of paint/stain seems to last longer when you're using a brush is because you aren't moving fast enough to use much. My only (very minor) complaint is that the hose did pop out a few times. No big deal, it pops right back in and doesn't hurt anything in the process. In my opinion, clean up takes the same time as using a brush. Unless you're using disposable brushes and just throwing them away at the end of the day, you have to clean your brush just like you have to clean this sprayer. For the oil-based stain I was using, I simply saturated a paper towel in mineral spirits and wiped down the machine. After that I emptied the remaining stain from the sprayer's container back into the can and filled the container about 1/3 full with mineral spirits. After vigorously swishing the container, I turned on the sprayer until the spray ran clear. Finally, I took apart the spray head (by hand, no tools necessary, takes about 10 seconds) and put them in some more mineral spirits. After wiping down the parts, I put humpty-dumpty back together and shoved him in his box. One last thing (and remember, I can only speak to using stain with this sprayer), no thinning was required. I just poured the stain directly into the container, attached it to the unit, and away I went. I HIGHLY recommend this machine!
S**.
I love it!
I got this yesterday and immediately went to work! I refinish furniture for a living and have been hand painting. I'd been eyeballing a sprayer for a while and wanted to make sure I got one specifically for latex paint. I tested it on cardboard as recommended. I thinned the paint as recommended by manufacturer and felt while testing that the max settings on both the turbine and handle worked best for me. The spray was pretty even but not super fine. However, after a second sweep it evened it up. After testing it out I got to work on two large jobs, three large dressers, a desk, and a mirror for one of the dressers. It cut paint time a minimum of a 1/3 of the time. What would have taken nine hours only took six. I went to check on it all this morning and the finish looks great. It almost feels like cheating now. I love this and will use it for every project that requires latex paint. I'm actually walking around our property looking for things to spray it's so much fun! I told my husband I could paint our detached garage! This is a great sprayer for newbies. I've never touched a spray gun in my life. The closest I'd come was a can of spray paint. This was fool proof. I definitely would recommend this. I think I'll come back after a few more jobs to update. Edit: August 6th, 2013 - I used this with a paint + primer that said to not thin and it still worked great. The spray was thinner since it had to work harder I'm sure but after two or three sweeps it still covers nicely. I'm still in love with this thing. I'll be using it to spray polycrylic soon so I'll come back and let you know how that goes! Edit: August 9th, 2013 - I used it today to spray a few pieces of furniture with polycrylic. Wow! What can't this thing spray. I wondered how well it would work because it's not supposed to be shaken but it sprayed on a perfectly smooth finish. I can't believe how much time this thing has saved me and the paint and finish always look perfect. It has already paid for itself twice over! Also, I failed to mention how easy this thing is to clean. There are no brushes to rinse! No paint pans to rinse, you just rinse the tube and gun and swirl some water in the cup. It is SO much easier to clean that I don't even mind. Before I've ruined so many brushes because it just takes forever to rinse all the paint off of them. I will only be using brushes for detailed work from now on. I will buy this again if this one dies and I would without a doubt recommend this to ANYONE! My three year old niece could probably work this thing!
P**L
My first experience was a good one.
I bought this sprayer for a specific project and I want to write about my experience with it. The Project: paint 6 sections of a cedar lattice fence with white, flat paint. Each section is about 8' long x 7' high and has an 'open' lattice section above a 'closed' lattice section. The fence is 8 years old. The paint was chipping and moss had formed on the lower part of the fence. The fence was power washed to remove the dirt/moss and most of the paint chips. I bought a Craftsman paint sprayer several years ago and resisted using it on this project because of my past experiences. It is one of those self-contained sprayers that was heavy, made lots of noise, was difficult to adjust and clean. I have never enjoyed using this sprayer. After researching sprayers, I decided to try the Wagner 518080 HVLP sprayer. (Thanks to the Amazon reviewer community for steering me towards this great product.) I am 63 and have had my share of painting projects. Although I enjoy painting, I was not looking forward to this project. I was hoping it would not stretch beyond a day's worth of time. With manual brushing, I knew it would be at least a two-day project, tax my patience, and my rotator cuff. A good sprayer could possibly save me a lot of time and grief. I used Behr Premium Plus Ultra (Paint + Primer), exterior flat white latex. The fence was ready to paint. Here's my experience: Filling the plastic spray bottle was easy and attaching the spray gun, hose, and spray unit was a no-brainer. Would I need to adjust the viscosity of the paint? According to Behr, I could add up to a pint of water per gallon of paint. However, I found that this was not at all necessary for this formulation. The paint sprayed at just about all settings with no problems. This was a relief, as I had feared that I would have to dilute the paint to get it to a sprayable viscosity, as I had done with my old Craftsman. I got a large piece of cardboard out so I could practice spraying and fine-tune the settings. Well, I found out this sprayer/paint combination is very forgiving. You can set the air pressure at just about any setting and get a nice spray pattern from the nozzle. I breathed a huge sigh of relief. This could actually end up being fun! The lattice work on this fence is challenging to paint. There are several surfaces at different angles. The spray gun lets you adjust the spray pattern into a horizontal, vertical, or circular pattern. This is easily accomplished by rotating a ring around the nozzle head....and you don't get paint all over your hands! I used the different spray patterns throughout this project; and it really saved me time and paint when I determined the best settings for each phase of the project. I kept a paint brush handy to tackle any hard to reach areas, drips, sags, etc. That brush was not used during the entire project, as the sprayer reached all the areas without paint sags or drips. After I 'perfected' my spraying technique, I timed myself as I painted one of the six fence sections. It took me between 40-45 minute to completely paint the fence section (not including the side facing the neighbor's yard). The whole fence was finished in 4.5 hours. Clean-up time was less than 30 minutes. Afterwards, I watched the Kentucky Derby with my wife, while I enjoyed a Scotch, and thought about the next project I would undertake with my new sprayer. Your experience with this sprayer may differ. But I can honestly say that this is a well-designed sprayer that can save you loads of time and give you near professional results. It is light-weight and applies the paint efficiently. I painted the whole fence (roughly 350sq ft) using 3/4 of a gallon of paint. The only problem I had was having the air hose pull out of the spray gun (numerous times) or the spray unit (once). I hope this doesn't indicate that the connection will loosen with further use. The build quality of the spray gun is okay, but it is made in China and lacks a feeling of quality. If I can get it to perform on a few more projects I have in mind, then I'll be happy, considering what I paid for this device.
T**G
Works reasonably well, but has a tendency to overheat
This is the first paint sprayer I have purchased. Based on the previous reviews, and given the relatively low price, I set my expectations accordingly. I expected it might be difficult to get the right paint viscosity and expected clean-up to be difficult and time consuming. My initial project was to prime (INSL-X Prime Lock) and paint (Benjamin Moore Advance) 12 new cabinet doors and 8 new drawer fronts constructed from paint-grade maple. I chose the primer and paint based on advice from the BM dealer that these were less viscous than some of the alternatives, improving chances for success with an inexpensive sprayer. As expected, there was a learning curve on the first day. Straight from the can the primer was too viscous, resulting in droplets, even at maximum air volume and minimum paint stream. By trial and error I was able to thin the primer with mineral spirits and eventually found a consistency that sprayed uniformly and provided adequate coverage. I took my time, turning off the unit regularly between panels and when adding thinner. In all, I was able to complete the 20 panels in about 2 hours, using the sprayer about 50% of the time (typically on 5 minutes, off 5 minutes). I must admit I was pleasantly surprised by the clean-up -- it was not as bad as I expected. Even though the primer was oil-based, requiring cleanup with mineral spirits, I was able to clean the parts as recommended in about 15 minutes using about one cup of spirits. After drying, I sanded the doors and drawers with 220 grit paper and they cleaned up well, even those early drawers that had a lot of droplets. The second day I was ready to apply the base coat of BM Advance. I had all 20 panels sanded and lined up in assembly line fashion. I thinned the paint with water to achieve a viscosity similar to the one that was successful with the primer. I filled the 1.5 quart plastic canister and was ready to "go into production". Things proceeded well through the 8 drawer fronts and the first 3 door panels. Then the unit entirely stopped. I confirmed that the outlet still had power, but the unit would not restart. Suspecting it had overheated, I unplugged it and took it inside. Unfortunately part of the cleanup procedure is to spray clean thinner or water through the valve, something that is not possible when the unit is dead. I called the tech service line, but it was Saturday and support is only available Monday through Friday. So there I was with a half-completed project, and messy sprayer, and a dead turbine. After about 45 minutes, the unit would run again, confirming that it was probably a case of overheating. I will "baby" it in the future -- elevate the turbine so it can cool on the bottom surface, have a fan blowing on it, and use it intermittently. It's disappointing that the unit doesn't seem capable of running more than about 20-30 minutes continuously, but I guess that's what you get with a $100 unit. P.S. I am no longer living in Qatar, but I haven't yet figured out how to change my profile in Amazon.
G**R
Best in class
This a great sprayer for small to medium sized jobs. The adjustable spray control and adjustable volume give this a sprayer an ease of control that is just perfect for novice's and those with modest experience in painting. This sprayer is NOT: - For indoor use or for enclosed spaces - For large projects (houses) unless you like frequent breaks to refill the paint cup - For high viscosity materials. Thick "pudding paint" MUST be thinned - A heavy duty sprayer to throw on a lot of paint fast This sprayer IS: - A high function, easily controlled sprayer for novices on small to medium jobs - Lightweight and very easy to setup - Very easy to clean Notes: - The thicker the material, the more likely you are to have the splatter issue and less likely you are to create a smooth mist of paint - Because this is a "bleeder" sprayer, it blows air onto the surface with the paint causing paint to dry relatively fast. If you or your paint can't adjust to this, this isn't a good sprayer for you. - While over-spray is minimized by the design, it still exists in a very limited amount; sorry, that's the nature of the beast but can be minimized by using a piece of stiff cardboard as a portable shield. - Cleanup is pretty simple as the sprayer head easily unscrews into several pieces which can easily be scrubbed. I recommend a stiff toothbrush and/or kitchen scrubber brush. Cleanup of the sprayer head should take about 15 minutes, unless you made an extraordinary mess. - If you have no experience with gauging the viscosity of a liquid, you should probably invest a few dollars in a viscosity cup such as this one: Earlex SG244 Liquid thickness/Viscosity measuring Cup Ford #4 - If you are worried about inhaling fumes, invest in a good quality respirator such as this one: MSA Safety Works 817663 Multi-Purpose Respirator - Please DO NOT use a cheap painting mask; they only make the manufacturer richer and do little for the health of your lungs. - My experience is that an 8x10 surface takes about 15 minutes to paint a single coat, and although you'll probably still need 2 coats of paint, you'll probably be able to re-coat in about an hour. Summary: If you need a good sprayer for the occasional small to medium sized job, this is an excellent choice but is probably not a good choice for large jobs, such as painting a house, or for enclosed spaces with poor ventilation. Along with the recommended additional products, I would also recommend that you not waste your time looking to purchase this sprayer locally and/or for a lower prices as I already wasted my time doing that and came up with zip at all the local and big box hardware stores.
R**L
Great customer service
A pleasant experience with seller. I do recommend the seller and the product. Thanks
M**E
Very Good Product for the price!
Very happy with this sprayer! Im always painting something and alot of different things and this does the trick! Saving so much time now compared to using a brush or spray paint. Painted vinyl siding, wood funiture, metal garage doors! The long air hose makes moving around easy! Would recommend for anyone just starting or even painting fanatics that don’t want to pay alot of money for expensive airless sprayers.
V**A
Me tardé en decidir mi compra
Tenía una barda muy alta y con terminado rústico , llevaba un cuarto pintado con cepillo y estaba gastando mucho material y el cansancio terrible pfff. . . Me animé a comprar este artículo y estoy " más que satisfecho y contento" con los resultados ; inicie previa preparación del material y en menos o igual de tiempo que hice una cuarta parte , termine la barda . Gracias Wagner por tu producto y seguiré adquiriendo más accesorios .
N**K
I really don't want to send this back, but....
I live in the UK and couldn't find this model of Wagner Sprayer for sale here. Went ahead and purchased one, but obviously it isn't designed for the UKDM. I have now had a chance to test it (after writing an answer to another potential buyers question) by using an American to UK travel adapter. It powers up, but not comfortably. The UK voltage rate is far too high and I don't want to risk damaging it. The thing is, though, I really don't want to have to send this back as it's the one that I want, so will look into getting a transformer to step the voltage down first. Hopefully then it won't run hot. Would I recommend getting a Wagner Sprayer? Yes, definitely. Would I recommend getting one not designed for the UK? Sadly, no.
O**R
Sufres por qué quieres ..
Llegó a tiempo y en buen estado. Es un excelente producto, es muy fácil de usar y sobre todo de limpiar, no hace tanto ruido Lo recomiendo ampliamente deja un acabado muy fino una vez que ajustas el chorro. Me tarde más en preparar el cuarto que en pintar con está herramienta
Trustpilot
2 weeks ago
5 days ago