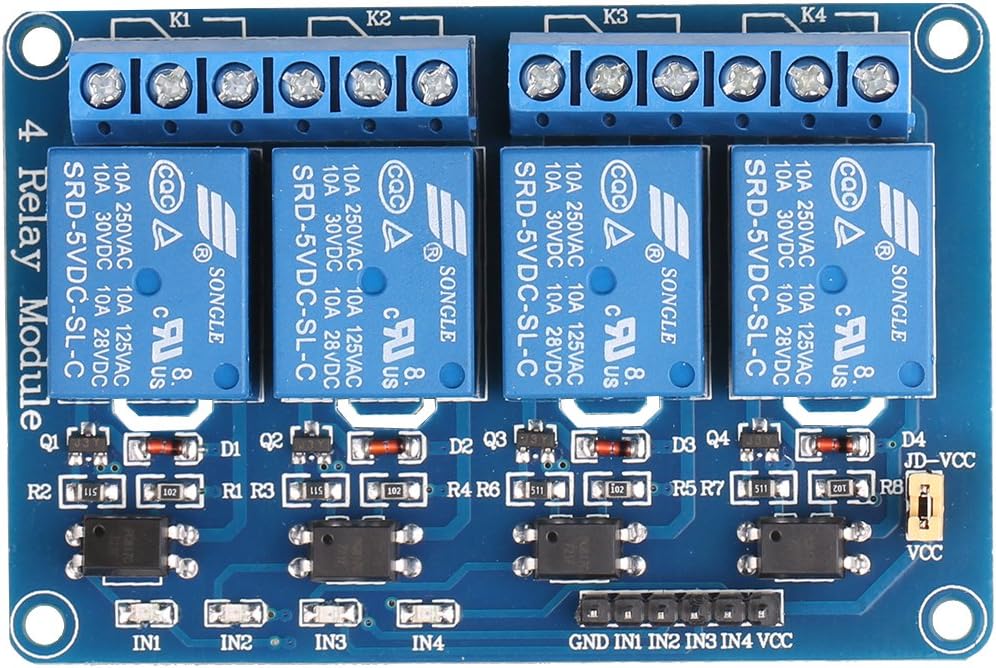


⚙️ Command your smart world with 4-channel power — because control is the new cool!
The 4 Channel DC 5V Relay Module by JBtek is a compact, PCB-mountable interface board designed for seamless control of high-current devices up to 10A at 5V. Compatible with Raspberry Pi, Arduino, and a wide range of MCUs, it features four independent relays with LED status indicators and built-in coil buffering for microcontroller protection. Ideal for smart home automation, industrial PLC control, and DIY electronics, this module offers plug-and-play convenience with robust performance.
| ASIN | B00KTEN3TM |
| Best Sellers Rank | #1,221 in Single Board Computers (Computers & Accessories) |
| Brand | JBtek |
| Coil Voltage | 5 Volts |
| Connector Type | Through Hole |
| Contact Current Rating | 10 Amps |
| Contact Material | Silver, Copper, Or Alloy |
| Contact Type | Form C Or Spdt |
| Current Rating | 10 Amps |
| Customer Reviews | 4.6 4.6 out of 5 stars (599) |
| Date First Available | June 6, 2014 |
| Is Discontinued By Manufacturer | No |
| Item Dimensions LxWxH | 2.56 x 1.97 x 0.79 inches |
| Item Weight | 0.32 ounces |
| Item model number | 4450182 |
| Manufacturer | JBtek |
| Maximum Switching Current | 10 Amps |
| Minimum Switching Voltage | 5 Volts |
| Mounting Type | PCB Mount |
| Operation Mode | Automatic |
| Product Dimensions | 2.56 x 1.97 x 0.79 inches |
| Specification Met | Ma |
| UPC | 520361134553 |
M**T
This board + Raspberry Pi + good power supply = A great combination!
Excellent board for Raspberry Pi. Assuming you have a solid power supply, you can run this board off the +5v provided on the pin header (Pin #2). The relay board is fully buffered, meaning that the relay coils are not directly driven from the GPIO pins which protects the Pi and means that this board is plug and play. If you're going to be doing a lot of work with the RasPi, I highly recommend a USB voltmeter/ammeter combo so you can monitor your power usage. At full load, you want to ensure that your voltage on your USB port is as close to 5.0VDC as possible, anything less than 4.65VDC will cause problems with the Pi and stability. Your amperage should never exceed the USB power supply's capability. I use a 2A (2000mA) power supply and with full load (all relays on), the board + Raspberry Pi B+ only gets to .56A (560mA) so I'm well with spec. With all relays off, I pull about .24A (240mA) HOW TO HOOK IT UP: The board has a six pin header labeled GND, IN1, IN2, IN3, IN4, VCC and a two pin jumpered header labelled VCC/JD-VCC. Leave the jumper installed. For GND, you can connect to any of the GND pins on the Pi's header (Pins 6,9,14,20,25,30,34,39). For VCC, connect to pin 2 (+5V). Connect each of the IN pins to a GPIO pin (I used GPIO 8,9,10,11 which are pins 24,19,21,23 respectively). HOW TO CONTROL IT: Use Python (should be available in your RasPi distro) along with the RPI.GPIO library. You'll need to run your scripts with sudo as manipulating the GPIO pins requires root access. You can set the GPIO pin using GPIO.output(PIN, True) to turn off the relay, and GPIO.output(PIN, False) to turn it on. My only nitpick is that the logic is backwards. Driving a GPIO pin high (TRUE), should turn on the relay while driving the GPIO pin low (FALSE) should turn it off, but it's easily fixed in software. Pros: Plug and play, just works. Will be getting more of these. You don't have to worry about building interface circuits, transistors, load calculations down to the mA or anything overly complicated. Basic research into the GPIO library for Python, a couple of GPIO pinouts for the RasPi and I was up and running within minutes. Cons: Logic is backwards, you have to send a GPIO pin LOW to turn on the relay but this is a very minor thing and can be easily fixed in software. Verdict: If you are looking to be able to control equipment using a Raspberry Pi, this is the board to use.
C**V
Nice construction with clearly marked connections
With low side input voltage the board is great for 3.3 and 5V micro controllers or single board computers (e.g. Raspberry Pi). The board has been in service for a year without any problems (switching 2 to 8amps)
C**H
Great little relay module
Great little relay module. Wired it right up and it worked on the first firing. This is the first time I've ever used a multi-channel relay board with an Arduino. The build seemed to comparable to brand-name Arduino card. It's mechanical so there's a click -- you can hear it in the video. All pins were well marked, each channel has its own SMD to let you know when it's active. Terminals screwed down tight. Nothing about it was an issue. I saw some complaints before I ordered it so I was a little nervous but most of them regarded the lack of documentation. It does require a certain knowledge base. There's an Instructable: [...] I'm probably going to order a few more just to have on hand.
A**L
No documentation but otherwise solid board
1 star off for no documentation but otherwise a very cost effective relay board. Provides optical isolation and some degree of physical isolation. I would judge this board suitable for light-duty AC Mains usage. The unit works well with my Raspberry Pi 2 and Pi 3. I will be buying more. Addendum for Pi users. When the Pi first boots the GPIO pins are not yet defined as outputs. The LEDs on the relay board are dimly lit which suggests there are pull-down resistors in operation. However, once you define the GPIO pins as outputs the relays immediately switch on. You can turn off the relays by sending the GPIO output high (GPIO.output(xx, True) where xx is the corresponding pin number). To resolve these issues I decided to add inverters between the GPIO pins and the relay card. For this I chose a quad, 2-input schmitt NAND gate device (4093B). I also added pull-down resistors (47k ohm) to the 4093B inputs because when you cleanup the GPIO library (under Python) or shutdown the Pi, the GPIO pins are floating - this leads to undesirable relay chatter without the pull-downs. You can power the 4093B from the 3.3V power supply on the Pi's interface. You can probably substitute a 4011 Quad NAND for the 4093 but I haven't tried it. The picture shows my inverter card which solders direct to the relay card. Using GPIO pins 23 through 26 the code to initialize then turn on relays 1 and 3 would look something like this: import RPi.GPIO as GP GP.setmode(GP.BCM) GP.setup([23,24,25,26], GP.OUT) GP.output([23,24,25,26], [True, False, True, False]) ... to turn on / off relay 2 would be: GP.output(24, True) GP.output(24, False) ... GP.cleanup()
C**D
Worked great!
This is a solid board that is easy to use. It can be triggered by either 3.3V or 5V Arduinos and probably most other controllers. (3.3V setup is different than 5V setup) I used this board with an e-cig cartridge and high amp batteries to create a steampunk hat that puffs "steam". Simple Setup (using Arduino UNO): Connect the VCC to the 5V power supply Connect the GND to the ground on the controller Connect IN1-4 to DIO pins on the controller Leave the JD-VCC to VCC jumper Connect your common to the center pole on the relay and your feed line to the left pole for Normally Open (off) and right pole for Normally Closed (on). Program your controller to digitalWrite(pin, LOW) when you want the relays to switch. Pros: Simple design 10A relays are good for most requirements Compact Cons: None
C**N
Funciona perfecto
C**E
la tarjeta no trae nada de información, aunque puede ser intuitiva la manera de conectar, siempre es útil que se proporciona
Trustpilot
2 days ago
2 weeks ago