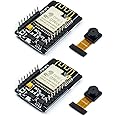
🚀 Elevate Your Projects with Hosyond's ESP32-CAM!
The Hosyond 2Pcs ESP32-CAM is a cutting-edge development board featuring a powerful ESP32 chip and OV2640 camera module. With a dual-core 32-bit CPU running at 240MHz and a robust 600 DMIPS computing power, it supports various interfaces and is perfect for a wide range of IoT applications, from smart home devices to industrial wireless control.
| Brand | Hosyond |
| Manufacturer | Hosyond |
| Package Dimensions | 12.8 x 10.49 x 2.49 cm; 18 g |
| Operating System | FreeRTOS |
| Processor Count | 2 |
| Mounting Hardware | NO |
| Number of items | 2 |
| Batteries Included | No |
| Batteries Required | No |
| Wireless Type | 802.11n, Bluetooth, 802.11b, 802.11g |
| Connector Type | Bluetooth, Wi-Fi, I2C |
| Manufacturer | Hosyond |
| Item Weight | 18 g |
N**T
ESP-32 CAM which works - but you need to pay attention
I'm working on a project, and I required a camera for the project, and this ESP-32 CAM solution worked great. I have purchased other ones in the past, and this was my first with this vendor. I ordered 3 sets (6 total ESP32's), and I went through 4 of these units, and NONE of them would take a firmware upload. I reached out the vendor and asked for advice. In the few hours it took to get their reply, I kept at it, and discovered that these ESP32's will ONLY take a firmware upload, IF you use the 5V pin and the GND pin directly below it along with the TX and RX pins to function. IF you use the GND pin under the TX/RX pins, they will NOT. Since this is not mentioned anywhere on the product description, or reviews, I figured I let the vendor (Hosyond) know this and to share that with their product description. Hopefully, this will help someone else who is going through the same headaches. Also, don't forget to short the GPIO-0 and GND pins to put the ESP-32 CAM into "receiving" mode, so that you can upload your firmware, etc. Cheers-
S**Y
Decent, but one failed (was replaced)
These frankly are great setups, but if you don't know what you are doing, the esp32-cam is NOT for you. (You can learn, but it will be frustrating.)YOU WILL NEED A SERIAL CABLE THAT IS 3.3V DATA (Most are, but check, as 5V level will kill it) OR ONE OF THE PROGRAMMER BOARDS FOR IT.I had 1 of 2 fail, and it took a bit to get a replacement. However, That came and the seller was responsive. (Doing a bit of testing, it was the board that was bad, not the camera. So cool a spare camera (which pretty much only works with this.))They are good chips, if you program them with Tasmota, you can easily adjust the setup for them. They can be setup pretty easy, but the first flash can be a problem the first time you do it, and I did have Tasmota corrupt it's settings, not want to work with the easy gui tools and had to go back and use the esptool.py to flash it clean. (As far as I tell that's Tasmota's issue. Worked fine flashing with the esp32-cam example program in Arduino, then back, if you do use the esptool.py to flash the *factory* bin to clear the settings, the normal precompiled ones leave the settings intact.)Pros:CheapResponsive SellerCheap wireless camera that only requires a 5V power source!Extra pins for SD and/or other sensors (presence, temperature, etc. Just about anything that Arduino supports works.)Cons:1 failed, was replacedInitial setupEven with the failure, There's not much that's in the same price range. It's pretty good, though you trade framerate for quality or vice-versa. (only a few fps at 1600x1200, or 1280x720 (720p) to 60 at lower resolutions) So I'll give it 4 stars.
G**B
Easy to flash when you know what pins to use
To upload firmware do not use the GND pin next to U0T/IO1 and do not use the 3.3/5V pin next to U0R/IO3. Use GND next to IO0 or IO12. Use 3V3 or 5V at the bottom of module.To put in bootloader mode, make all connections and apply power. While shorting IO0 and GND, press onboard reset button.
A**R
Good boards and very good seller
At first I could not get the Arduino IDE to communicate with either of the esp32 cam boards so I contacted the seller. On both occasions I got next day responses. Turns out the issue was my FTDI adapter went bad. With a new adapter all worked fine. In the Arduino IDE choose the AI Thinker ESP32-CAM and follow the standard wiring scheme for FDTI adapters. Don't forget to short IO0 to ground on the Esp board while uploading code then remove when done.
A**R
It's amazing what these can do based on price.
I just a beginner electronics DIYer and I'm so impressed with what these little guys can do. And once I get a little better with Arduino coding the possibilities are limitless.
Trustpilot
1 week ago
5 days ago