Desertcart purchases this item on your behalf and handles shipping, customs, and support to SINGAPORE.
✨ Elevate your space with crystal-clear modern luxury 💎
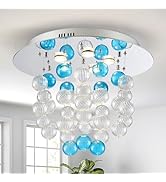
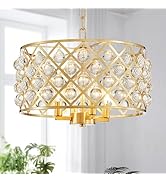
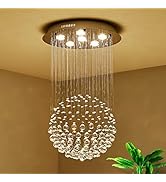
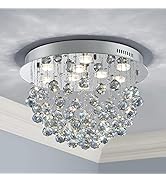
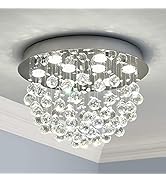
The Saint Mossi Modern K9 Crystal Raindrop Chandelier is a 9-bulb flush mount ceiling light fixture featuring energy-efficient E12 LED compatibility, delivering 4050 lumens of bright, dimmable white light. Measuring 11 inches in height and 20 inches in width, it combines premium K9 crystal raindrop embellishments with a sleek chrome finish, perfect for enhancing dining rooms, bedrooms, or living spaces. This modern pendant lamp offers app and touch control functionality, backed by a 2-year warranty for dependable style and performance.


| Asin | B074TTYTRY |
| Best Sellers Rank | #224,725 in Tools & Home Improvement (See Top 100 in Tools & Home Improvement) #980 in Chandeliers |
| Brand Name | SM Saint Mossi |
| Brightness | 4050 lumen |
| Bulb Base | E12 |
| Color | Sm-dy-16061 |
| Control Method | App |
| Controller Type | Push Button |
| Customer Reviews | 4.7 4.7 out of 5 stars (1,774) 4.7 out of 5 stars |
| Embellishment Feature | Crystal |
| Finish Types | Chrome |
| Fixture Type | Non Removable |
| Indoor Outdoor Usage | Indoor |
| Item Dimensions L X W X H | 20"L x 20"W x 11"H |
| Light Color | white |
| Light Fixture Form | Chandelier |
| Light Fixture Installation Location | ceiling |
| Light Output Maximum | 4050 lumens |
| Light Source | Incandescent / CFL / LED / Halogen |
| Lighting Method | Downlight |
| Manufacturer | Saint Home |
| Manufacturer Part Number | SM-DY-16061 |
| Manufacturer Warranty Description | 2 years warranty. |
| Material Type | Crystal, Metal |
| Model Number | 07a32521-d590-408e-920c-052ebe69f98b |
| Mounting Type | Flush |
| Number Of Items | 1 |
| Number Of Light Sources | 9 |
| Other Special Features Of The Product | Dimmable |
| Power Source | AC |
| Recommended Uses For Product | Indoor |
| Room Type | Living Room |
| Shade Material | Glass crystal |
| Shape | Round |
| Size | 11 x 20 |
| Specific Uses For Product | Home |
| Specification Met | (unset) |
| Style Name | Modern |
| Switch Type | Touch |
| Theme | Modern Elegance |
| Unit Count | 1 Count |
| Voltage | 110 volts |
| Water Resistance Level | Not Water Resistant |
| Wattage | 200 watts |
User
My experience and tips...
I just installed this so I am writing this review with it fresh in my mind.- Yes this is a very pretty chandelier, it looks classy and it fits well in my dining room. My old chandelier was hanging and somewhat large which made my room look small.- I installed this myself, I needed a second pair of hands for only one step (installing the chandelier onto the mounting plate, you will need someone to hold the chandelier as you connect the three wires). I do not think you need to hire someone to install this, it's pretty straightforward.1. The mounting plate has 4 screws which attach to the chandelier. One issue is that the screws are not in a fixed position so they will not line up to the chandelier unless the screws are as far out as possible on the mounting plate. Attaching the chandelier and lining up the four screws was the hardest part of assembly, my arms got really tired doing this because I did not initially have the screws on the mounting plate at the right position.2. You need to use the four drywall anchors that are supplied, I screwed on the mounting plate onto the junction box, then I drilled four holes for the drywall anchors using the mounting plate as a guide, then i pushed the drywall anchors into the holes and I drilled the screws directly into the anchors and through the mounting plate (in one step). This seems secure3. I didn't find it too difficult to attach the strands (A-E) because one of the sides of the strands has a clip where you can just hook and click onto the loops.4. For attaching the globes, I used the included chandelier hooks that bend, you can also directly attach the globes without using the bendable chandelier hooks. It isn't as tedious as some people are saying, it wasn't really that bad if you have someone passing you the strands and globes. I didn't bother using gloves, because with gloves it's kind of hard to attach the hooks, although I did avoid touching the crystals especially on row E. You can't really avoid touching the globes to attach them.5. I replaced my switch with this dimmer switch, it was very easy---Lutron Diva LED+ Dimmer for Dimmable LED, Halogen and Incandescent Bulbs with Wallplate | Single-Pole or 3-Way | DVWCL-153PH-WH | White6. I used these bulbs:Dimmable E12 Candelabra LED Bulbs 40W Equivalent, 2700K Warm White, 4W Filament LED Chandelier Light Bulbs, B11 Vintage Edison Clear Candle lamp with Decorative Candelabra Base, Pack of 127. The dimming is perfect without flickering, very smooth and adjustable.8. We are using the light for studying and reading, I actually wouldn't mind more light, perhaps I should have used 60 watt bulbs, but also I picked the warm white temperature bulbs, maybe the bright white would have been a better choice for reading and studying.9. I bought the "used-like new" version, which was about 40-50 bucks cheaper. It was like new, everything was there and it seemed like an unopened box.10. I was concerned the chandelier would be too small, but it's a good size. The quality of crystals seems nice, especially the crystal balls are quite beautiful. I am happy with the purchase and the chandelier looks more expensive that what you pay for it.
User
Amazingly Beautiful!!!!
I love this light with the right LED's that are compatible with my dimmer. I like that it only hangs down 15 inches from the ceiling so it works well in an open room with only an 8 foot ceiling. I used nine 4-watt, 3000 color LED's, a color that matches halogen bulbs and it is plenty bright and at the same time allowed dimming to night level brightness. It is spectacular to look at and I love just looking at it. Now the negatives. Took lots of time to install. If you have drywall ceiling, you will have to drill 4 holes and mount it with drywall anchors. But no easy way to put the wiring into the J-box because the plate covers the J-box, so the wires had to be below the J-box inside of the chrome ceiling piece. Each step of the way requires you to get it perfect the first time as once it is installed, it will be very impractical to go back. I soldered the wires before putting on the wire nuts and then taped the wire nuts so no way they could ever come apart on their own. I used temporary wire hangers I made to hold the fixture below while I did the wiring, then removed the temporary hangers and mounted the fixture with the supplied hand installed nuts. Next it took some hours to hang all of the crystals as I had to go up and down the ladder one by one to hang each one and there is more than a hundred to hang. Having a second person to help would have been a big asset. The directions are very lacking in detail and it took days of looking at them to get oriented before I had it all figured out and attempted to install this. So much work that I would never want to consider removing this someday when I move away and I would never want to remove this to paint the ceiling. The end result is definitely a 5-star and really great value. I hope I never have to clean it. Don't put in a kitchen where frying food emits greasy particles into the air that could collect on things like crystals. I am hoping for most cleaning, about once per year, I plan to use a blower from the vac from a distance to blow off minor dust that might accumulate. Also hoping dust does not much accumulate on things close to the ceiling like ceiling fans and such. After I installed the light fixture and before I installed the crystals, I spent an hour with clean microfiber clothes removing all traces of finger prints. I used the included clean cotton gloves to install the crystals to keep finger prints off them as well. Finger printed crystals would attract dust more than clean crystals would. So try to not handle the crystals with bare hands. Most of the weight of this comes from all of the crystals, it weighs around 20 to 22 pounds including crystals. I was able to replace one of the 4 drywall screws with a long strong sheet metal screw that anchored the bracket directly into the roof rafter, so this will never come loose on its own. This is by far the fanciest decoration light in my house and really upgrades my dining room. The main issue with this is trying to figure out how to do it. Once you figure that out, it is rather easy and very satisfying to look at as you add more bulbs and crystals and stand back and look at the progress and watching it progress like doing a painting. A needle nose pliers helps at lot in attaching the buckles on the crystals to the fixture as gloved fingers makes it difficult to manage the tiny buckles.
User
Love this light - so elegant & classy !
It’s so beautiful ! It’s not the standard set up for installation so a little more challenging- however it was doable and I am so happy with it. It is in my closet and know that this is the perfect light for it!
User
Beautiful and excellent quality for the price
My goal was to find a festive light fixture for our foyer. This light fixture exceeded that goal. Our foyer doesn't have a high ceiling, so the overall distance from the ceiling to the light's bottom was a major factor in my selection. At just 13", this chandelier was perfect. Plus, the 20" diameter of this fixture was larger than any of the other options I considered.When it arrived and I opened the box, I was impressed with how well it was packaged. Each crystal ball was in its own individual cut-out, all of the leads were in individual plastic baggies. The balls had a nice heftiness to them, unlike some of the inexpensive crystal options I've used in the past. Yes, there is some assembly required: the balls have to be attached to the leads. This isn't difficult.A few tips from my over-exuberant experience: Follow the order of operations, exactly as described in the directions. This isn't a project where the steps can be rearranged. Don't get distracted by the shiny balls and decide to attach them first. They are attached last for a reason.The light bulbs are installed second to last. This was my first time using this type of bulb and they were annoying. My husband was able to install them much better than I was.Lastly, the metal edges of the circular holes for the lightbulbs on the shiny silver plate are sharp. As I insinuated, I couldn't resist connecting half the crystal balls, before I installed the shiny plate to the base assembly on the ceiling. When I carried the plate and balls up the ladder, I used the holes to help balance the plate. Between the heft of the attached balls and the sharp edge, I lacerated my fingers pretty badly. (Completely my fault for not doing everything in the correct order.)The final result is beautiful. The odd LED light bulbs are very bright. The light refracting through the crystal balls' facets, gleams spectrums in every direction. The mirrored plate doubles the effect.
User
Love this chandelier
This is really an awesome fixture and I would not hesitate to purchase it. There is no way I would have ever been able to install this without my electrician. He put in the frame and got it wired correctly and then I spent the next few hours hanging the crystal balls and strings. There are 91 strings to hang. It is very tedious but its so worth it since the light is stunning. I also hooked this up to a WEMO dimmer which works with Alexa. You can make the light brighter or dimmer with voice activation with Alexa. I love WEMO switches and have many in my house. This light should be on a dimmer switch since it is so bright. I also purchased LED 4 watt bulbs that work with a dimmer switch. When it is on the brightest setting, it is unbelievable how much light is produced. Also, the lower settings have a beautiful ambiance. This light fixture is so worth the money and has really made the room come alive, especially at night. The packaging for this light was amazing as well. I was really impressed and nothing was broken. Take your time when you hang the crystals and do little bits at a time or you will be frustrated. I highly recommend this and am exceptionally pleased with it and St. Mossi in general.
User
Beautiful fixture!
I am editing my initial review as I discovered the problem was not with the fixture, but with the bulbs! They were too fat to fit in the holes even though they are described the same as other bulbs. I tried another brand before returning the fixture (this time went with Phillips). I could easily install them in the sockets and they turned and locked - none have fallen out. So much more light and a real eye-catcher.Here is my original review:The light is lovely and was easy to put together and install, however there is just one way to place the plate over the base that attaches to the ceiling. It will fit a couple different ways to bolt it together, but only one so both the bolts and the bulb holes line up - we ended up having to take it all apart and turn it to get all of the bulbs in it. Then the GU10 bulbs were very hard to install - turn too hard and the prongs break off, don't turn enough and they don't stay in. I was able to get 7 of the 9 slots filled, then after turning off the fixture after several hours, two of the bulbs FELL OUT - thank God not on someone's head. If it turns out to be the bulbs, I will adjust my review because it is really beautiful.
User
Stunning Light!
Got this light for my closet and it’s ADORABLE! Perfect size, beautiful crystals and light shadows. It’s a bit tedious to assemble but once you get in the rhythm it gets easier. I haven’t had to dust it yet, I’m sure I will eventually and it will be a struggle, but so worth it!
User
Amazingly beautiful
I was a little hesitant to buy a chandelier on Amazon just not knowing what the quality would be. This is such a stunning piece and such a good value. It looks so much more expensive than the price. I asked my boyfriend to guess how much the chandelier was and he was guessing about six times as much as I paid for it. It looks expensive and it works beautifully with a dimmer switch. I don’t know how hard it was to install because I had my handyman do it for me but he had it done in a couple of hours (that time also includes installing a dimmer switch.) he didn’t seem to have any problems so it was pretty straightforward from what I could tell. I took my dog out for a walk and when I got back in all the crystals were up and I was just in awe. The picture is with the lights dimmed. I purchased 40 W dimmable LED bulbs in warm white I would definitely recommend getting a warm colored bulb. Definitely buy this one if you’re thinking about it. I think this is my first time ever leaving an Amazon review and I buy stuff on Amazon every day or every other day. This is the first product that I have just been absolutely blown away by. Perfect 10 :)
User
This light is absolutely stunning!!
This light is elegant and opulent. The pictures do not do it justice!! The quality is amazing and the crystal shine like Swarovski crystals. Great value for the money. Very difficult and time consuming however to assemble and install. But well worth the effort.
User
Stunning results, but takes some patience to put up.
Let me start by saying the unit is beautiful. And the fact that there are 9 light sockets allows for quite a bit of light. I paired the unit up with 9 LED candelabra LED bulbs of 4.5w each (60W equivalent), producing 500lm each, and 3000K color (got them from local big box store). The amount and quality of light is awesome, exactly what I was looking for.The unit is completely disassembled. You need to install a frame on the ceiling (which is included), which will support the chrome base to the ceiling with 4 screws.Then all the crystals are separate and not connected. Very well protected. And all the center pieces (40+ pieces) you need to attach the teardrop crystal to a string of crystals. They strings are labeled in nice packs as "A", "B", "C", etc... each is for a different ring of crystals. Starting from center, you have 1. Then you have 6 around that, then 16 around that, and 18 around that, before getting to the flat style ones that are on the outside. For the ones where you attach the teardrop crystals, there are 2 different style hooks (one on each end - see attached pic). The hooks are a little different at each end. One has a little tail on it. That one is intended to be attached to the base. The plain hook is to attach the teardrop crystal before attaching the string to the base. This would have been nice to clearly identify in the instructions. The CENTER crystal chain, you attach to a nut at the center of the base. The nut has a small hole going through it, and before attaching the crystal, you attach an included small round key-ring, and then attach the crystal hook to that (this is not identified int he instructions either).The white gloves included in the package, I originally through were gimmicky. But I ended up using them, as I installed the crystals. I kept only one on my left hand, and as I installed the crystals onto the base, and I would touch the base, I would use the glove on my left hand to wipe any fingerprints I'd leave behind. A lot easier than trying to get a rag in there after all is installed.Before putting the base onto the ceiling, make sure that all the nuts on the back side that hold the light sockets in place are secure. I had 2 or 3 that were a little loose, and it annoyed me that when installing the bulbs, they would move. So I took it down, and secured them. Minor issue, but easier to just verify before putting it up, than having to take it down again :)For an an advanced DIYer, this is not hard to install. Time consuming, but not too hard. However for a beginner, this can be quite frustrating.Either way, the final results are stunning.And hats off to the company. Within days after receiving my unit, they reached out to me, to ensure I wasn't missing anything, and if there was anything they can help me with.
User
Gorgeous!
Packaged very well. Lots of spare parts. I have the shiny brass base with clear Crystals. The base doesn't look cheap & has a slight rose gold hint; very nice. The electrician took less than 1/2 an hour to put up the base. It's a bit finicky. I polished each Crystal before hanging. Took about 6 hours to complete hanging & polishing process. Very easy to hang crystals. It is definitely a job for the extremely patient! I purchased 40 watt LEDs. Only using 6 of 9 sockets. Very bright. Next time would go with 25 watt LEDs. Well worth it! Stunning!
User
Spectacular chandelier…
Very pretty, makes my dining room look luxurious. It takes some time to install but not difficult. It’s all worth it, for the finished look. I used the soft light bulbs, I tried the white light but it was too bright. It would definitely be overwhelming for a small space; either way, you will not be disappointed.
User
Great light fixture
Arrived fast. It was easy to install but time-consuming as expected due to the many fine chrystals. However, it was well worth it. I've installed in my laundry room and it looks great. We love it. The chrystals are of excellent quality and I highly recommend them.
Trustpilot
2 days ago
5 days ago