Desertcart purchases this item on your behalf and handles shipping, customs, and support to SINGAPORE.
๐ฅ Fuse Your Filaments, Not Your Patience!
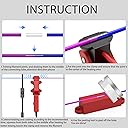
The VIT SPORT Filament Connector is a professional-grade splicer designed for 1.75mm and 2.85mm filaments including PLA, ABS, PC, PETG, and TPU. It offers easy, heat-based welding that ensures strong, seamless filament joins, reducing waste and improving print quality. This all-in-one kit comes with a durable tool and a year of dedicated customer support, making it an essential upgrade for any serious 3D printing enthusiast.


| ASIN | B091Y9WSH6 |
| Additional Features | Filament Joining Capability, Easy Operation |
| Best Sellers Rank | #48,887 in Industrial & Scientific ( See Top 100 in Industrial & Scientific ) #780 in 3D Printing Filament |
| Brand | VIT SPORT |
| Brand Name | VIT SPORT |
| Color | Red |
| Customer Reviews | 4.0 out of 5 stars 871 Reviews |
| Item Diameter | 1.75 millimeters |
| Item Weight | 150 g |
| Manufacturer | VIT SPORT |
| Manufacturer Part Number | 5267 |
| Material | Polyethylene Terephthalate Glycol, Polylactic Acid, Thermoplastic Polyurethane |
| Material Type | Polyethylene Terephthalate Glycol, Polylactic Acid, Thermoplastic Polyurethane |
| Model Number | 5267 |
| Number of Items | 50 |
| Special Feature | Filament Joining Capability, Easy Operation |
| UPC | 734257461375 |
| Unit Count | 1 Count |
A**1
Compared to the Black Model
Red VS Black Red doesn't use parchment paper. This may prove to be a bad thing after extended use, due to build up of filament on the clamp. Having said that, using parchment paper with Black is a little tricky. I now know why so many reviews comment on needing the 3rd hand. It takes a bit, but after a few attempts, I was getting it with minimal trouble. Black comes with standard paper clamps which are essentially useless, they tend to slip and release the filament, messing up the weld positioning. I'm surprised the manufacturer didnt 3d print some small U clips. Took me 30 minutes to draw something and have it printed. These work MUCH better than paper clips. Red has a stand. VERY convenient, especially considering the filament is spooled up and keeps pushing the black over. Not having the clamp level is a bad thing. The filament coming out of the sides gets hot enough to easily deform. I'll design something similar for Black that holds it in position. Black worked quite well with the settings listed (at least for PETG), whereas Red overheated the filament coming from the sides. After the cool down period, the filament had folded almost 90ยฐ. This should be an easy enough fix, just have to tweak the timing. Black came out "cleaner" whereas red needed more clean up. This is probably due to the parchment paper. Red comes with 3 files, Black only has 1. Red came with a timer, which was much more convenient than using my phone. Black seems to be built slightly better, but that might just be due to the size difference. Red is cheaper. In my opinion, there isn't a clear winner. They both work as advertised and with a little bit of practice, I think will have similar results. If nothing else, there shouldn't be buyer's remorse wishing you went the other way. HAPPY PRINTING!! Revision: After more experimenting, I'm growing fonder of Red. The omission of parchment paper just makes its SOO much easier. Tip - I coated the business end of Red with a Plastic Repellent product available from Slice Engineering. Hopefully using this stuff will add longevity to Red, as I had my initial concerns as to the parchment paper providing a line of defense. I tried to coat Black with the same product, but I still had some filaments adhere to the clamp, which scared me into resorting back to parchment paper. Only time will tell how many splices I can get from either type, but for now, my go to will be RED. Just easier to use, and it doesnt hurt that its cheaper.
G**G
The โFill Inโ for loose and end of spool filament
I love this thing and it is as easy a 1-2-3! It is a great value . It will pay for its self just in the fact it will let you save this last grams of filament and let you use them. No frills, but more fancy than other โhold your lighter upโ and burn yourself. This is worth it! Do yourself a favor and grab one!
V**N
works well
Pros: - easy to use - firm clamp strength - one button operation with indicator for preset timing There is a little learning curve but overall I think it's a good idea. I spliced together 4 batches of starter PLA and started with the first 60 sec setting. Seems fused but I think I would like it to be roughly 10 secs longer and it'd be perfect. It hasn't come apart but the seam could be more fused in my opinion. The 90 sec setting is too long it seems for PLA. It warmed up and thinned out some spots but it sure fused. I didn't try the highest setting which I imagine that's more for ABS and such. Honestly, it help save some waste. My tip for PLA is set it for the initial 60 sec and then turn it on again for another 10-ish sec before shutting it off again. PETG, is closer to the 90 sec. Anything other than PETG - I haven't tried yet.
Z**R
Small learning curve
I love this thing! It is relatively easy to use. Some things to help you I think: you will get breaks because of moisture and filament issues and it can get frustrating, keep trying I only had to give up on one after 5 failures. Check the metal plates placement, I had a small issue with the molten plastic getting between the clamp and the heat plate pushing it out of the way. Once I realized what was going on I was able to push the plate back in place while the heat is on to fix the issue. I have expanded on their steps a bit. 1) make sure you put the PTFE tube on one of the ends before you press it together, especially if you have two large amounts you are joining. 2) turn on the clamp for 2 minutes to heat up. while this is happening I work to straighten out the first foot or so of each spool to cut down on extra stress during the heating process. I start a timer once I turn on the clamp, the entire process takes as little as 8 minutes 3) At the 2 minute mark, turn off the clamp. Open it up and place one filament approximately in the middle of the metal plates and close the clamp. 4) Keeping the clamp closed and holding the other filament in place, push the other length of filament through the other side of the clamp until you feel the resistance of the other filament. Press the sides together slightly to ensure they join and press the clamp closed to cut down on clean up as much as possible. This is when you want to check the metal plates, look at the back of the clap area at the two metal plates. make sure they are both pressed all the way into the clamp mouth or the notches wont line up. I use the back side of some tweezers to push it back in, all while the clamp stays closed. 5) this is a step I added, turn on the heater again for about 10-20 seconds, should be done by the time your timer hits 3min. This should help to ensure the filament gets hot enough to fully fuse, at least in my head it does. 6) wait 5 minutes for everything to cool naturally before opening the clamp, or wait until your timer gets to at least 8 minutes if you are keeping a running timer. It is ok if it sits longer. 7) Remove from the clamp and clean. To help remove and minimize the risk of breaking, once I get the clamp opened I turn on the heating element to start heating. That helps loosen the filament without getting hot enough to mess up the joint, just be sure you are pulling it out as it heats up or it could get too hot. Use the cutters to cut away any ooze and the sandpaper to get it down to size. Once the PTFE tube can pass by the seam without issue it is all done. I hope this helps someone!
S**P
Doesn't work at all
My coworker bought an older version of this, one without the need for the plastic sleeves, and it works phenomenally every single time. I have not gotten a successful join with this new version. The one time I did get filament joined, it broke in half in my 3d printer and I had to disassemble the whole machine to fix it. It isn't just a "learning curve" as I've tried dozens of times with different filaments and nothing has worked. Don't waste your money on this unless they change back to the old style. Completely disappointed.
C**R
Works okay in a pinch, but other options are easier
I've successfully fused filament with this device about 50% of the time. Unfortunately, if you don't get a really clean joint, it will jam somewhere in the filament path. The trick to getting it to come out clean is to make sure you give it at least 5 minutes after you turn the clamp off before you remove the filament from it, and then use a blade to shave off the flash on the sides followed by some light sanding to get a really smooth joint. I've personally found it easier to switch filament "on the run" by feeding in the new filament while the printer is running. It's probably not the BEST way to handle the need to change filaments, but with an open frame printer it's fairly easy to do as long as your print speed isn't crazy high.
T**.
I'm glad I got this - it's not that hard to use and works really well if you do it right.
I own a 3D Printing business running 30 printers pretty much non stop 24/7. I've been wasting a TON of filament as most of the products I sell use more than 50g of filament. So when a roll get's low I just chuck it. while I do have a lot of prints that use less, it's just too big a hassle to swap out a running roll for a roll that is low for a short and quick print. Over the last month I've been setting aside the low rolls with the intention of figuring out a way to reuse them. In the last day I was able to take the scraps and turn them into 2 full rolls ready to go. This was the solution. Not only does this save some money, but it's sooo much better for the environment. I've tried other DYI methods of splicing filament and am a bit familiar with how it works so I knew what I was getting into with this. I was pleasantly surprised with how well and easy this worked. I'm using mostly Duramic PLA Pro that prints well at 215-220C, and that's what my experience is based on so far, but I suspect my method will work for any filament that prints between 200-220. Here's how I do it: Turn on the splicer and let it warm up for 3 minutes. while it's warming up, cut both ends of the filament to be spliced nice and square and straighten out the ends of the filament with about 1" straight on both. Once 3 minutes is up, turn off the splicer and immediately open the clamp and put one end of the filament in the middle of the clamp (in the center of the metal heating part). Close the clamp and then push the other filament end into the other end of the clamp till you feel it touch the clamped filament. With both hands push both ends of the filament together about 1mm, you'll feel them mushing together, you don't need to push mush, just making sure they're well contacted. Now let everything rest and cool. Be sure the clamp doesn't move around (I just use a vicegrips on the base to weight it down and position the rolls so they're not pulling on it, this takes a little fiddling but isn't hard). Cooling is the key, let it cool for like 8-10 minutes. Then just open the clamp, pop out the line and you can tear off the little wings that might be there with your fingernails. Then a little sanding (I use 220 grit) and you're good to go. So far this has worked great for me. I'm hoping the splicer holds up, and will update the review if it doesn't.
R**R
An impulse buy pays off
I am working on a job going through about 20 rolls of the same ABS filament and had a stack of them with about 20-30g left. All of my prints are over 200g so I timed a few prints to load new filament as the old spool ran out but that doesn't always work. I searched for a filament splicer and found this and the $10 manual version on Amazon. I liked the idea of this one, but the price seemed high. Well, I took a chance, and it paid off. The first splice I made worked perfectly, as did the second third and fourth. Now, I have one spool with 180g that I'll keep adding to instead of a bunch of short spools. This will save me a lot of time. I will report back if I have any problems with the spool running through the printer. For ABS I left the splicer on for 2:30 min and off for 5:00 min before taking the splice out.
F**L
Excelente
Este empalmador funciona excelente, unรญ dos filamentos y con la herramienta de lijado queda bien unida y al grosor estandar del filamento. Estoy muy satisfecho con este empalmador
ใฉ**ใ
ใจใฆใใใ ไฝฟใๆน็ฐกๅ
ๅใใฆไฝฟใฃใใฎใงใกใใใจใใไฝฟใๆนใใใใใใใชใใฃใใใไปๅฑใฎใใฅใผใใฎไธญใซใใฃใฉใกใณใใๅ ฅใใๆๅใซใใผใใฌใณใงๅใใชใใใใใซไปใๅใใใชใใๆบถใใใใใใใใใฎ่ตคใใฏใชใใๅผใซๆใฟใ120็งใง่จญๅฎใใฆๅฎ็งใซใธใงใคใณใใงใใพใใใๆๅใใใฏใชใใใงๆใใงใใงใใใจใใใใใใใฎใใๆนใฎๆนใไธ็บใงๅคฑๆใใใงใใพใใใ
J**Y
Works Very well
Honestly not sure what i expected with this. It works beautifully. Nearly perfect weld every time. not once has the weld points given me any issues through both my prusa 2.5, and my bambu p1s via ams. Super easy to use, and just use a razor blade to cut off the silicon cover after welding and letting it cool slightly
R**D
Yes it works
The VIT sport is a good product it's ni easy to work with, duct tape it to your table and experiment with the heating times. So far I like it. It's going to save me time and money. Just to let you guys and gals know that the VIT sport stick together well.
ใฑ**ใ
็ด ๆดใใใ
ๅ็ซฏใซๆฎใฃใใใฃใฉใกใณใใใใใใซ็นใใใใพใใ ใใฎๅพๅฐๅทใซไฝฟใใพใใใใๅใใใใจใๅผใฃใใใใใจใใชใๆฎ้ใซไฝฟใใพใใ ใใฎๆฎ้ใซใๅคงไบ๏ผ
Trustpilot
1 week ago
1 month ago