


Static Frosted White
Product ID: 287353
Details
- MaterialVinyl
- BrandBest Home
- ColorWhite
- Size3 ft x 6.5 ft
- Product Dimensions36"L x 78"W
- Installation TypePeel and Stick
🌞Blocks 95% UV rays
🌡️Rejects 80% heat & glare
🛠️Static cling, no adhesive
Desertcart purchases this item on your behalf and handles shipping, customs, and support to SINGAPORE.
🪟 Transform your windows, transform your vibe.
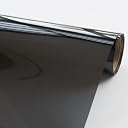
Static Frosted White is a premium static cling window film measuring 36" x 78" that offers 10% visible light transmission while blocking up to 95% of UV rays and rejecting 80% of heat and glare. Designed for easy, adhesive-free installation and removal, it provides excellent daytime privacy with a sleek frosted finish that diffuses natural light. Ideal for protecting interiors from sun damage and reducing energy costs, this durable film maintains a bubble-free, peel-resistant surface for long-term use.


| ASIN | B073H1PJXK |
| Best Sellers Rank | #2,166,685 in Home & Kitchen ( See Top 100 in Home & Kitchen ) #1,796 in Window Films |
| Brand | Best Home Fashion |
| Brand Name | Best Home Fashion |
| Color | Suncontrol |
| Customer Reviews | 4.3 out of 5 stars 932 Reviews |
| Global Trade Identification Number | 00842927110437 |
| Included Components | 1 ROLL WINDOW FILM |
| Installation Type | Static Cling |
| Item Dimensions L x W | 36"L x 78"W |
| Item Type Name | Non-Adhesive Sun Control Window Film-Black-36"W |
| Manufacturer | Best Home Fashion Inc. |
| Manufacturer Part Number | WINDOW_FILM_SUNCONTROL-36-BLACK |
| Model Number | WINDOW_FILM_SUNCONTROL-36-BLACK |
| Number of Items | 1 |
| Product Dimensions | 36"L x 78"W |
| Size | 3 ft x 6.5 ft |
| UPC | 842927110437 |
| Ultraviolet Light Protection | UV ray |
| Unit Count | 1.0 Count |
M**K
Wow! Transformed Our Windows - Easy to Install. Very nice aesthetics.
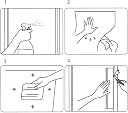
We just moved into a townhouse and one of our rooms has a row of 3 small windows that we really like. Trouble is, our neighbors can see right in (not cool). The previous residents covered them with thick black curtains and while that no doubt solved their privacy problem, it also blocks out the light. Instead of curtains or blinds, we decided to try this frosted privacy film. Just installed today (see photos) and we are very happy with the end result! They are easy to install BUT measuring takes time (and patience). Like others have said though, it sure is worth it! Visually, the aesthetic is quite nice. They let in soft, diffuse light - the kind of light you would get on a cloudy day, while at the same time providing virtually complete privacy day and night. Here's some tips (that have been shared in other reviews but bear repeating): 1) measure your glass then use a ruler and cut out a newspaper template, and use it to cut the right size plastic privacy film. The challenge is you really want to measure very carefully - and - cut very carefully so as to get the right size. This was (by far) the most time consuming part for us. Once you've got the plastic cut to size, the rest is EASY! Simply: 2) Separate the privacy film from the backing ... THEN ... spray water (A LOT of Water) on your glass, and apply the plastic sheets. HINT: if you use a lot water first, it is very easy to move the film around once it's on the glass, and get it positioned just right! If you really mess up, you can even pull off the film and start over (just be sure and spray glass with more water). The more water you use, the easier it is. As you're applying the film, don't worry to much about bubbles as they're extremely easy to remove. Instead, focus on your positioning. 3) Once you've got the plastic film positioned, use the included squeegee to remove the bubbles, working from the center on out. I was quite surprised how well this worked. Far easier than putting on a screen protector on a phone. Working from center outwards, you should have no trouble removing any and all bubbles (no matter how big or small). IF you are having trouble, peel the film back and add more water. (Yes, the water will run down the glass but you can catch that with a paper towel). 4) Enjoy your new privacy windows! Privacy: these really work great. We tested ours daytime and night time and the level of privacy they give is outstanding. If someone tries to look in (even if they put their nose to the glass) - they're not gonna see much of anything! On the inside, anyone (or anything) that is 12 inches or so away from the window is rendered virtually invisible. The only exception might be if you have a strong light that is shining, and you're standing between that light and the window, in which case there may be some shadows visible from the outside but that's about it. Test it if you're really concerned (we did) and we are quite impressed with the level of privacy this gives. Even at night with all our lights on we couldn't see in! Yes, it takes some time to put this on - but the end result makes it more than worth it. (see photos). UPDATE: the next day I noticed a very small area near the edge of one of our windows where the privacy film was bubbled. I had not cut the film quite right there, and so it was over lapping the frame (just slightly), causing it to bubble up. EASY FIX! I simply cut a thin sliver off with an X-acto knife, sprayed a little water and used the squeegee to touch it up - took less than 60 seconds and now it's perfect! Update #2 (30 days later): it's now been over a month and are really happy with this purchase! No bubbles, no peelings. Just soft, diffuse light - exactly what we wanted!
M**G
Easy, affordable and satisfied
I was initially skeptical to pursue frosted window films in general but after reading many good reviews on this I thought I would give it a try since I had two windows at the time I placed my purchase that I wanted to apply this to for privacy but to still have enough light come through. The film is pretty durable and is very easy to install. It came with a squeegee to allow for pushing bubbles out that is created during installation. IMPORTANT NOTE: Make sure that you apply enough water to the window prior to film installation as this would make it much easier to get the bubbles out and not have them appear days later after installation. The instructions called for cutting the film roughly to size and leaving about an inch in excess on 2 of the adjacent sides. When I performed the 'final' cuts I didn't make them very accurate and there are very noticeable separation between the film and my window frame. To put it in perspective if light was shining through you can see where the light isn't diffused by the film because of said gap. After experiencing this I decided to do my own thing for window #2. My instructions assume that you are applying this to a square/rectangular window. If you don't feel comfortable cutting essentially into your window (I elaborate in #2 below) then please don't follow along. 1) What I did for my second window installation that was MUCH easier was to use the factory-cut edges for at least 2 sides of the film (take the left side and top for instance) and an inch-or-so excess on the right and bottom sides of the size of your window. BEFORE MAKING ANY CUTS, move the film into place that puts it flush with the top and left sides (remember, these are the factory cut sides I just stated above). Be careful not to cause bends and folds in the film when maneuvering. Also, be sure to get rid of any protruding deficiencies out from the edges of the window and the window-frame or else over time it will cause your film to pull away from the window drying out the water that was behind it. It would then make it difficult to cling back to the window later - for instance there was adhesive that protruded out from the bottom-right window corner that I cut out carefully. Another example was that there were tiny 'shards' sticking out from my window frame that I had to remove, again, BEFORE applying the film ). 2) When you have your film in place take a sharp utility blade (PLEASE USE A NEW BLADE) and put it in the top-right corner of the window, take the squeegee and use it to create a straight-edge for cutting. Your blade should be at an angle that gets your cut as close to the edge of the window and window frame as possible; I held my blade at a 45 degree angle from the surface of the window placed in the crack where my window meets the window frame. The blade MUST BE SHARP because you don't want the blade to snag the film and you don't want to have to apply much pressure for cutting. 3) PLEASE TAKE YOUR TIME! When cutting I HIGHLY RECOMMEND having a second person hold the film while you (or someone else) does the cutting! What also happened on Window #1 for me was that while cutting the film slightly shifted on me and my cut wasn't accurate. Lesson learned. As you begin to cut move the squeegee down at the same time SLOWLY. Be sure to keep pushing the squeegee into the blade so that it continues to cause the blade to be flush to the edge of the window and window frame (shooting for straight cuts here). When you get to the bottom-right corner, roughly finish your cut slowly and carefully so that the excess film doesn't pull the film you want to apply to your window off. If the film shifts just put the factory cuts sides back into position again. This 'finish cut' should be done so that you are not ruining/wasting film, if at all possible. For instance, when my cut made it to the bottom-right corner of my window I made a diagonal cut away from the window corner that removed the access from the right-side of the film; removing this access makes the bottom cut much easier! 4) Make sure that your film is still in position and use the same cutting technique to finish your last cut needed for the bottom of the window. Once finished there should be no noticeable gap between your film and window frame. 5) Last but not least, use the squeegee for its intended purpose to 'roll' out any air bubbles under the film. Have some kind of liquid absorbent material ready to prevent the excess water from running down your door/wall. I will add that it is normal for your film to move while squeegeeing. I recommend continuously re-positioning the film as to not have it get too out-of-place; may be overly obvious but just to be clear, you can do this very easy by simply putting both hands flat on the film at the same time and apply pressure TOWARDS the area you want it to go. 1/14/14 UPDATE: I applied the film in February '13 and it STILL looks fantastic with no visible bubbles or any separation of the film from the window/window-frame. 10/22/14 UPDATE: Film was applied 20 months ago and still looks great! No newly introduced bubbles, no peeling or drying out. As stated looks great! 12/18/14 EDIT: Made instructions easier to read 3/18/15 UPDATE: If you don't feel comfortable cutting into your window by any means you MAY be able to get away with cutting out cardboard, or some other material, to the exact size of your window (see my response to a comment in this review) - then one could just use scissors if need be. Even with applying very little pressure while cutting you will most likely still cut into your glass. With having the blade angled and getting it up in the crack where the window meets window frame would at least remotely hide such potential imperfections than if you were to cut holding the blade perpendicular to the window. Just a thought.
C**O
Worked fine for inside-of-house privacy glass
We have two French doors comprising a total of 20 small window panes that lead to our master bedroom. We wanted to add a bit more privacy to these, so after reading Amazon reviews, purchased this product. The size of the sheet we received was actually 3" wider and a few inches longer than advertised. Due to the repetition of the window panes being applied to, I eventually very carefully cut out sheets to the exact size of the panes to allow easier installation. Notes: + As others have already said, more water does help with bubbles (we had trouble with bubbles, but they are very hard to see on these inside windows fortunately). Don't go short when spraying water on the windows. + Unpeeling the backing can only be done at the corners, and sometimes takes a bit of patience. It is very easy to take off and reset any area that does get bubbles once it's cut properly. + Trimming on the window with a razor blade was harder than I expected it to be. It helps to use a straight edge while doing this. + I'll also second that it would be very helpful if the manufacturer would place grid lines on the backing, to allow an easier manner for doing straight cuts (for now, I used a right angle). + The privacy is complete. Light comes through fine. Behind the sheer curtains we have it's hard to tell this is even there, except there's no way to see anything inside. + It is nice that if you ever decide you don't like this, removing it won't take long. Nothing permanent if the "look" doesn't turn out (ours did fortunately).
M**8
Probably one of the best Amazon purchases I've made
I purchased a "new" home where the first level basement has a door with a beautiful oval window. The problem was - I plan to use the basement as a study and am up at all hours of the night. Any one could easily walk up and see what I'm doing. Not cool. Enter - The frosted privacy film! The material itself is a nice thick film and I love how it uses "static cling" (aka sorcery) to secure to the window. I'm used to the films with an adhesive backing that forces you to use a soapy watery mix to work with. All you need is water which is awesome. This also means once you remove the film, there really won't be any residue! Easy on and easy off, definitely deserves five stars. If that's not enough to get you off, the free squeegee has to score some brownie points! This product is perfect for renters. I was able to do the oval window by myself fairly easily using these steps (applicable to any window): 1. Measure the window you want to film. Measure it again. (You know, measure twice cut once). The oval window I wanted to film had a deep layer of garnish surrounding it, so I had to add 2" to ensure I could get a clean cut. 2. Using a straight edge and an exacto cut the dimensions. 3. Using some applicator, apply water to said window. I put some paper towels at the base of the door to keep the carpet clean, and used a handled sponge (for cleaning dishes) to slather a LOT of water onto the window. 4. Use the squeegee to press the film down, start from the center and work out. This will get a bit messy as the excess water will start to run. Due to the static cling I could get about 85% of the film to stick hence why it's easy to do solo. 5. The tricky part, at least for an oval window. I started at the top and worked my way down to the right first. Use the squeegee to first press the film completely onto the top of the window. Once firlmy there, use the exacto to pierce the film. Slowly start moving the squeegee down (whichever direction) pressing the film completely onto the window, and follow with the exacto knife. Make sure there isn't too much slack in the film, and make relief cuts when necessary. 6. Probably the most important step. Over the next two days monitor the window for extra air bubbles. Use the handy dandy squeegee to push any out to the edge. I didn't have any new air bubbles form past the 18 hour window but be vigilant! I plan to do this to my garage windows next, as it has a series of 4 windows and I keep a lot of goodies in there. I will still use the excessive 2" measurements (probably reduce to 1") even though they're "square". Due to age some of the wooden panels have been warped a little bit, so I'd like to make that custom fit rather than trying to get the exact measurements and fit the film. On the slight downside there is a fairly significant reduction in light that passes through. The basement typically gets a lot of direct sunlight so it's not much of a problem for me. At the exchange of such a high increase in privacy, I'm a happy camper.
J**N
Great film that keeps privacy and let's light in!
I've been looking for a solution for my bathroom for a long time. I've tried multiple window tints - and none kept it completely private. I turned to Amazon because I saw this recommended at Lowes - but they didn't have it in stock. It took a few minutes to put up - which is a record for window film. It has grids on the paper backing to help with cutting - but I noticed they weren't straight. Maybe the roll wasn't cut right at the factory. I used a razor blade to easily cut it, and a metal ruler to get a close finish to the corner of the window. It easily was applied with water in a spray bottle and the included squeegee - but do not spray too much water or it'll slide out of place. Results were great! I love how much light it lets in, but be advised it seems to still let heat through. At night, you see light, and might show a small sillohette if someone is 1-2 ft from window. Otherwise it's completely invisible. The outside picture - I had my buddy stand in front of the window about a foot away. Do you see him? :) A+ and I've already recommended it to my family. The roll was plenty to do a small window with a ton leftover!
A**G
Good price, good quality, does what it says it will
I do love my privacy, so when it came to a glass front door with no option to put up a curtain, I wasn't having it. But I didn't want to sacrifice lighting in my front room, so I went to my local home improvement store (orange letters) to see what type of window film they had. They had few choices, and even fewer within the price range I was looking for. "$45 and it covers how much?!" Well, I bought it. Got home, happy that my comings and goings in my front room and livingroom wouldn't be exposed to everyone and their mom anymore. Long story short, the thing was sticky, difficult to work with, and forget about taking it off once its on the glass. It went back to the store, cut and all. So in comes Amazon and this amazing find. Simple, quick, covers well, and super easy. I measured the glass, and gave the cut piece an extra 1/2 inch all around just in case. Put it up wrong a couple times but not issue because it comes right off, and goes right back on just as easy. Good size for the price too. Anyway, I'm ordering more. Love it!
N**E
Great Privacy - Not So Great Application
I needed privacy film to cover the bottom window in my living room. Our condo is on the 2nd floor of a 5 story building and I was tired of the ratty old window film the previous owners/renters had on that bottom window. I have recently covered the top window with a beautiful stained glass design but I would have needed to buy 3-4 rolls just to cover the bottom and that wasn't cost effective so I shopped around for a frosted glass design. The reviews on this product are what got me to select this one over the myriad of other choices for frosted glass window films. Application: It was as horrible as other reviewers on here have mentioned. The measuring/cutting is a pain no matter what product is being used because that's just a tedious job so I can't fault this particular film for that part of the application process. The first thing I did wrong was to forget to peel the backing off. The backing on this product is clear, unlike the white paper backing found on the stained glass window film I used yesterday. Installing this with the backing on was super easy and only took me (I was working alone) 10 mins. But once I discovered I forgot to peel the backing off that's when the job became a two-person hellish journey. This stuff sticks like glue once it lands on the water/soap solution. I was unable to just slide it into place, instead I had to peel and lift off the window with the help of my husband in order to get it straight and as even as possible on all sides. Unfortunately, even with two of us, we managed to install it too long on the bottom left so there is a teeny tiny gap on top. I measured and cut correctly because when I applied with the backing still on everything was perfect. It's just that without the backing it became difficult to maneuver the film. The Bad: Bubbles. No matter how much I tried, I could not remove all of the air bubbles. Squeegeeing it several times over the last hour and a half and I still have bubbles. I've given up trying to completely remove them. I remind myself that the film is for privacy and light, not for decoration. Not here to get my windows into some architectural/design magazine. So the bubbles stay. Privacy: Having just applied the film today, I can only personally confirm that during the day you get tons of sunlight into the home but standing outside and looking in, you cannot see anything. I placed a bright green stuffed animal 10 inches from the window and I could make out a tint of a green blob from the street but there was no shape so it was impossible to discern what it was. That was 10 inches from the glass. Anything past that is completely invisible. Think heavy fog where you can see an item if it's inches from your face but anything past that is enveloped by the fog and undetectable with the human eye. That's how this film looks during the day with sunlight hitting the window. I will go outside tonight with my condo's lights blazing to see what I can see from outside but I trust the other reviewers who stated that you can't see anything even at night. ***UPDATE*** - It is now dark outside so I put the bright green stuffed animal in front of the window as before, this time about 5 inches from the glass. From outside with the living room lights blazing inside, you can see the shape of the stuffed animal but not the color. My husband's big armchair that sits in front of that window casts a shadow over the window due to where our lighting sits so you can see the outline of the chair but it's not the chair itself, it's the shadow of the chair. The chair is about 3 feet away from the window but the shadow is cast much closer so that is what you can see from the outside. The rest of the living area is completely faded out and impossible to see. Unless someone or their shadow is sitting inches from the window where an outline is visible from the street, the film gives total privacy for items and people sitting further away. I can see some spooky ideas forming in my head for Halloween based on this information! Conclusion: I couldn't give this a full 5 stars simply because the application of the film was unnecessarily difficult and air bubbles seem to be a permanent fixture no matter how much squeegeeing I do. I would highly recommend this film to anyone simply needing some privacy without sacrificing daylight but who doesn't care about the beauty or lack thereof of the film itself. For those who are looking for something decorative, I recommend Artscape's Clematis Window Film. I have a review for it on its Amazon page. It's super easy to install by yourself. It only took me 10-15 mins and there are NO air bubbles. UPDATE 5.21.16: We bought four more rolls to cover our floor-to-ceiling sliding glass door living room windows. We live on the second floor of a condo and need privacy. The curtains we had were covered in cat fur and a pain to keep up. We just installed this same film today and so far we love it! It's still on that smaller window that I made this review for initially. I'll upload some pics of what our sliding door looks like now.
A**R
Perfect Privacy
This is a great product. I used it in my bathroom windows to provide some privacy while still letting light in. It was really easy to install, although on one of the windows I wasn't able to get all of the bubbles out. I could probably take it off and reinstall it, but I was too lazy. It's great that it's non-adhesive and doesn't damage the window. I had to redo one of the windows because I cut it the wrong size (measure twice, cut once!) Also, I was really surprised with how much you get for the price, there was definitely enough leftover to do another two or three windows (in addition to the two I did in my bathroom). The squeegee thing it came with was great for smoothing out the bubbles and providing a guide for cutting the excess off once on the window. Overall I'm very happy with it!
T**A
Five Stars
very easy to install !!!!
A**A
Good product. Proper Application is key
I am happy with this product. The one thing that should be stressed is that the window needs to be TOTALLY clean and all bits of lint, dust etc. must be gone to get a great application - otherwise tiny bubbles will appear which can't be squished away. I used this film on the bottom half of the street facing windows in my living room to get more privacy when I don't want to pull the curtains. Overall, I'm happy with the product considering the reasonable price.
Trustpilot
4 days ago
2 weeks ago