Desertcart purchases this item on your behalf and handles shipping, customs, and support to SINGAPORE.
🦷 Snap on confidence, flex your best smile!
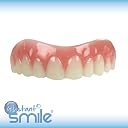
Instant Smile Comfort Fit Flex Cosmetic Upper Teeth offer a natural shade, heat-moldable upper veneer designed for one-size-fits-most comfort and extended wear. Crafted from soft, pliable materials, these veneers provide an affordable, quick, and non-invasive solution to cover missing, stained, or crooked teeth—empowering users to regain confidence instantly without dental appointments.


| ASIN | B07TYGB64C |
| Active Ingredients | silicone and high-quality, pliable polypropylene |
| Active ingredients | silicone and high-quality, pliable polypropylene |
| Age Range Description | Baby |
| Benefits | Cleansing |
| Best Sellers Rank | 6,204 in Health & Personal Care ( See Top 100 in Health & Personal Care ) 911 in Dental Care |
| Brand | Instant Smile |
| Brand Name | Instant Smile |
| Country Of Origin | France |
| Customer Reviews | 2.8 out of 5 stars 10,654 Reviews |
| Flavour | Unflavoured |
| Included Components | 30 effervescent tablets |
| Item Dimensions | 8.9 x 15.2 x 3.2 centimetres |
| Item Form | Flexible |
| Item Weight | 19.9 Grams |
| Item form | Flexible |
| Manufacturer | BIlly Bob Teeth, Inc |
| Manufacturer Part Number | 12206 |
| Material Features | Natural |
| Material Type Free | Artificial Flavour Free |
| Model Number | 12206 |
| Number of Items | 1 |
| Number of items | 1 |
| Product benefits | Cleansing |
| Set Name | Natural Shade |
| UPC | 658890122069 |
| Unit Count | 1.0 count |
K**N
Wouldnt advise
Not very good , if they had held in place where they nearly stuck to my teeth during moulding they would have been great. Wouldnt stay in mouth afterwards, would never be able to wear out , waste of money for me
D**E
Look great if you take your time with the application process
I'm currently waiting for dental treatment after a 9 year wait for an NHS dentist. I have missing front teeth and will need top dentures but this is a long process (had a consultation and xrays and now awaiting the next appointment in a few months). I've been using these insta smile veneers for the last year or so with great results. I had previously tried cheaper versions but the teeth on them looked super fake and looked like a set of Billy Bob teeth. Due to the amount of gaps/missing teeth/partial teeth, I use the insta smile along with some white thermal plastic beads to create a full top denture over my existing "remaining bits". I put the original kit in a mug of boiling water. I add a little red food colouring paste to the white thermal beads to match the original pink plastic that comes on the veneers. then put additional thermal beads and food colouring into another mug of boiling water and leave them to melt for a minute or two. Once I've moulded the original kit to my mouth, I then add the additional thermal beads around the inside area to create a full top denture set. You need to remove them quickly during the fitting process whilst the plastic is still warm. If using to cover remaining teeth, my tip would be to wiggle backwards and forwards a little bit as you remove the kit to make the "tooth holes" big enough as the plastic seems to set slighly tighter than when it is when still flexible meaning you could have issues removing them (yes, it's happened to me when creating a new set). I find chipped enamel causes a lip on which the veneers can get stuck when trying to remove them. If you do get them stuck, get some water (as hot as you can handle in your mouth) and hold that water in your mouth to melt the plastic enough to remove. If this fails due to not being able to have the water hot enough, I found sticking a flannel/cloth in boiling water and holding/biting it in the stuck area will help melt it enough to remove. I can eat with them in and smile without covering my mouth once moulded correctly. I find in order to be able to eat with them in and not have the teeth falling off the moulded plastic/getting chipped or damaged etc, I need to mould the kit so that the pink strip tapers and meets the inside lower edge of the veneers teeth and if possible, around the top and side edges of the veneers. Whilst they're never going to look like "perfect" teeth, they're totally passable and other people don't realise they're not my teeth (including my partner of a 8m, were both going through dental treatment for dentures but he's never seen my actual teeth). These veneers look a darn sight better than the stumpy damaged mess that remains in my mouth. It affected my mental health and self confidence massively walking around with missing teeth. I felt so terrible as a middle aged woman walking around with the messy mouth is. These top veneers have saved my sanity. I've been wearing them for so long. Each set last me a few months before I meed to replace due to discolouration from smoking/spicy and coloured sauces etc. In all the 9 sets I've previously had, only one set has ever become damaged and a tooth split off the original plastic they're fitted to and that was caused by pressure on the "tooth" whilst eating, leaving just the pink plastic behind it and the rest of the veneer in place. This is what then made me taper the thermal plastic to the edge of the teeth and around the back edge side of the veneer kit. Since then I've never had issues with the teeth coming off. As my teeth are already set for removal and awaiting treatment etc, its just going to be a long wait and process to get denture sorted. In the meantime I do wear the veneers 24/7 but remove and brush both my teeth and the veneers several times a day to minimise damage/staining/stuck residual food after eating and more if I'm smoking more than usual etc. I then soak the veneers in steradent tablets to deep clean them while I shower and then pop them back in. These will cause damage to existing teeth due to holding whatever you've eaten/drunk around your current teeth so if you're planning on saving teeth rather than removal, do make sure you remove the veneers and only wear them when necessary to minimise risks to your current teeth. If like me, you're set to have them removed, what difference will it really make as they're already beyond saving! These can be such a great product, just take your time with the application process and get the veneers up to the correct position so they look as natural as possible. You can remould them by popping into hot water again as many times as needed to get them fitted just right. I found if one side feels perfect and the other a little tight, I've held the side that needs tweaking back in the water whilst keeping the correctly moulded side out of the water helps to get the fitting just right. I'm looking forward to the day I get my permanent dentist provided set of dentures as I know they'll be better in terms of both looks and functionality but until that happens I'll be using these veneers and am able to eat unlike without them where I struggle to chew etc. I'll try to add some pics/videos of the process the next time I mould a new set in case it helps anyone else in my position to be able to get these to work for them. Give them a try, they could just change your life and give back some probably much needed confidence. We all know how people missing teeth etc are viewed by others, so it's great not to have that instant judgement from other people.
J**L
Doesn’t look good ontop of own teeth and lifts top lip
After reading the reviews and watching YouTube reviews I thought this would be great to cover my current teeth and receding gum issues, however the teeth/gum are thicker than expected and on top of my teeth, look just like fake teeth sticking out as they also push my top lip out. As it’s called flexi fit I assumed the gums would mold better but even after in boiling water they don’t adjust shape as I expected. Sadly I think it’s money down the drain, theses would likely work well for someone who is missing their front teeth or far set back teeth, however sadly look goofy on me :(
M**N
hapoy
great item !
B**N
Good
Good
S**.
Amazed
These are brilliant. You MUST WATCH THR YOU TUBE VIDEOS. Once you do it makes it so much easier for you to follow. May take a couple of attempts. But if you’re not happy then just put them back in the hot water xx I’m having my teeth out but couldn’t cope with the 3 week wait and then the 3 month wait for dentures xx
A**R
Hidious and a waste of money, read the reviews!
There are times when you say to yourself, "i will ignore the reviews on this one this time, because, you never know" Big mistake, they are the biggest waste of money i have every come across! Not only do they not fit properly not matter how many times i tried to fit them and it tried following the instructions to a T, they look hideous!! So take my advice and don't bother, or just throw your tenner in to the nearest river!! its the same thing!
A**N
Not as they seem
They are not as they seem you actually need teeth as they clip on to your own not worth the money as this is not made clear
G**Y
Easy, cosy effective option
Really thrilled to be able to smile again, took a few attempts to fit properly but once they're in the right position that's it done.
A**A
Très pratique
Très content 🤩🤩🤩🤩🤩
A**R
Rubbish
Crap just pure rubbish how could anyone sell this as a denture
C**N
Risolutivo!
Se si possiede manualità e si sa adattare il prodotto a un supporto il risultato è eccezionale. Nessuno immagina che non siano denti veri.
A**R
JUST DO IT!!
Okay, so.... while I have yet to perfect my "teeth", I wanted to write this preliminary review as a PSA for those really desperate to reap the benefits of a product such as this, because I really don't want y'all to miss out. That being said, as a get of the other reviewers wrote; to make this product useful and to achieve more than satisfactory results for the very purpose of this product, you do need time, patience, and some light "crafting" ability. Me, I had been using the thermal beads for years to "fill in" a deteriorated front tooth that a very old school veneer had trashed and later fell off. The thermal beads result in a pure white color when cooled, requiring a "tea stain" to get it to a natural color, but they've always done the trick (Just fyi). However, being that the rest of my teeth are gar from desirable and costly implants are not quite an option, I've decided to bit the bullet (pun intended) and buy these. I had bought these as well as some thermal beads just in case. Was really a good idea. So- right off the bat; I am telling you to not even mess around with the adhesive strip they have. It's WAY TOO MUCH, and you'll save yourself a bunch of trial and error if you simply remove all of the pink adhesive from the jump. Soak in super hot water, as directed, and peel and/or scrape off ALL of the pink adhesive. It's easy to do (scrape off) with a spoon when still hot and squishy, but also after its cooled a bit to peel it off. Please do so gently, as the teeth themselves do become extra pliable when hot and seems possible that they can "rip" with extra/unnecessary roughness. So, after you remove the punk adhesive, it's time to sand. Yes, sand, because even without any adhesive they will still, more likely than not, look like horse teeth. Luckily, I had read the review of another fellow that did this as well, so I bought a rotary hand sander...lol. (Mini Cordless Rotary tool) I personally was okay with this additional $22 expense as I knew I would use it. I suppose you could use a file or even just sanding paper, but.... So, I took the rotary hand sander, placed the teeth bottom side up on my couch armrest with a towel underneath (I think it's important to have a soft but firm surface) and just lightly go back and forth over the whole back side, teeth and gums, as (for me at least) the protrusion (horse teeth look) actually comes from having "something extra" between your gums and your lips, as opposed to the teeth protruding). So, I sanded, going slowly and taking frequent breaks to check out my progress in the mirror. I didn't want to go to thin and risk A) trashing/ripping the product and B) having them be too thin as not to serve their purpose. I got to a good spot, or at least was anxious to give them a trial run. I then melted SOME of the pink adhesive and some thermal beads (equal part of both) in about a half cup of water that I heated up in a small glass bowl and microwaved for 30 seconds. Was perfect. I added the scraps of the pink adhesive and the thermal beads AFTER I microwaved the water and in a few seconds was able to mix (smush) the 2 together to make an opal like color (not the bubblegum pink of straight pink adhesive). I made a strip the length of the teeth and the size of about a spaghetti noodle. Lightly pressed onto the teeth (a bit lower than where the "teeth" meet the gum line. Be sure to push some into the "anchor holes) on each corner. I forgot to remove the pink adhesive from them when I first removed all of the adhesive in the beginning, but it wasn't an issue using a toothpick to pop it out. I then smashed it onto my teeth. You can be somewhat forcefull at this point, as I wanted to get them as close to my real teeth as possible. The good thing with having a mix with the thermal beads is that it doesn't harden as quickly and releases your teeth a bit easier than just the pink adhesive itself. Stays pliable a bit longer so you can get the right position and good fit. Make sure to line them up center though. Haha. As with me, because of my smaller deteriorated tooth, my "center" is a bit off, so I just lines them up with my lip crease.lol. Be sure to spread the adhesive around the bottom edge of ALL of your teeth. This will be helpful to form the "encasing" that your teeth will "snap into" when you use them. Make it smooth and thin, but not too thin. You want enough to hold, but not too thin where it will get all "bendy" and loose its shape. Again, the benefits of mixing with the thermal beads is that you get a light opal color as opposed to bubblegum pink, and even after it's fully "hardened", its still somewhat pliable; which is good so when/if your bottom teeth "hit" the excess adhesive that's on the bottom of some of your wider teeth, the adhesive "conforms" to your bottom teeth so you can actually close your mouth. **in a picture I pointed to a spot that my bottom tooth "hit". It's only visible if your up in someone's face. And quite frankly, if you're comfortable being that up close and personal with someone, then you shouldn't mind that person knowing you are wearing these...lol. Again, you have some leeway to mold/form it to your teeth without the risk of having them cemented in. Since it does take a tad bit longer to harden with the addition of the thermal beads, swish with some ice water and then gently remove. Drop them in the ice water to fully "harden" If there's excess that you need to get rid of, don't worry about it until after it's fully hardened. You can either clip it off or use your handy sander. I am really pleased! Although I may still mess with them to get them "perfect" as I feel that they still protrude a bit in the gum area, they really don't LOOK as if there's much of a difference in how I look with them in and with them out. Could just be mind over matter with the feeling of having "something there" as opposed to it looking like there is. Anyhoos, the color is acceptable as well. I only say acceptable as I personally would have liked a nice bright smile with this product, but they are 1000% better than my own so I'm happy (just being greedy I guess). I looked at them out in the sunlight and really, they are just fine. I do wonder about using peroxide or a teeth whitener, but may get disastrous results. I'll have to research the materials and any chemical reactions that may turn them yellow instead of white. I'm also wondering the effects of wine, coffee, and cigs... lol. I guess we'll just see. All I know is that on my upcoming trip to Greece next month I'll be able to SMILE in my pictures!!!! So, I've included the following pics. My teeth (ugh- sorry), how I look without them in mouth closed. How I look with them in mouth closed as to show any difference with puffiness/protrusion. Then SMILING with them in. Then pointing to the excess on the bottom of one of my teeth (which I may or may not mess with). A pic pointing to some stragglers that I'll just snip off. A pic of how the mold looks- (that your teeth will "snap" into, and the thin "lip" that goes around the bottom of the teeth that helps hold them on. I also might mess with this to see if the molds my teeth made are enough to keep them in place. I'd believe it just might. Also, be careful not to drink/eat very hot foods as this may melt the adhesive. (It happened to me when I used just the thermal beads to fill in my tooth, so I don't really know how much the pink adhesive will counter act that or give it a higher "melting point ". I mean, I can't imagine that many can tolerate the level of heat needed to melt it down, but you never know. Just be careful. I guess I'd suggest that if it does happen, you take a sip of tea or something and you "feel it happening", just leave it, don't move (lol) and drink some cold water... Anyway, I hopes this helps and helps you decide to give these a try. Seriously, if you have the means, know how, and patience, you WON'T REGRET IT!! ***please ignore my "sun-stache"..lol. ... and of course the nasty pictures of my mouth. I know pretty gross, I just wanted to show you how dramatic the change is.
Trustpilot
2 months ago
2 days ago