We remain fully operational. Our teams are working around the clock to ensure your deliveries continue safely.

下载应用程序


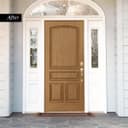
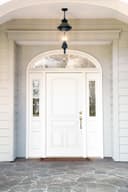
🚪 Upgrade your entryway with wood-look wow in a single afternoon!
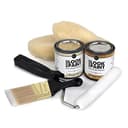
Giani Wood Look Paint Kit in Honey Oak delivers a realistic European Golden Oak finish for front and interior doors. Designed for steel, aluminum, and wood surfaces, this acrylic kit features a quick 4-hour cure time and a simple 3-step application that requires no priming. Covering 40 square feet, it revitalizes doors with rich, fade-resistant wood grain tones, perfectly pairing with popular door hardware finishes to instantly boost your home's curb appeal.


| ASIN | B077GX81GK |
| Age Range Description | Adult |
| Best Sellers Rank | #10,553 in Tools & Home Improvement ( See Top 100 in Tools & Home Improvement ) #26 in Interior & Exterior House Paint |
| Brand Name | Giani |
| Color | Honey Oak |
| Color Code | #96612D |
| Container Type | Can |
| Coverage | 40 |
| Customer Reviews | 4.3 4.3 out of 5 stars (1,362) |
| Finish Type | Wood Grain Finish |
| Full Cure Time | 4 Hours |
| Included Components | •8 oz. Honey Oak Wood Tone Base Coat |
| Indoor Outdoor Usage | Outdoor |
| Is Waterproof | False |
| Item Form | Liquid |
| Item Type Name | for Front & interior Doors (Honey Oak) |
| Item Volume | 500 Milliliters |
| Manufacturer | Giani |
| Model Name | Paint Kit |
| Model Number | Wood Look |
| Paint Type | Acrylic |
| Part Number | FG-WL HON FDK |
| Size | 16.91 Fl Oz (Pack of 1) |
| Special Features | Fade Resistant |
| Specific Uses For Product | Interior |
| Surface Recommendation | Metal |
| UPC | 856512007446 |
| Unit Count | 16.91 Fluid Ounces |
| Water Resistance Level | Water Resistant |
K**Y
Good product for a fresh up!
I really enjoyed this project and is a cheap way to change the look of things without the added cost. I used this for my mantle and the back of my front door. And it was plenty of material. The kit made it very simple and I was able to finish it in about 5 hours including dry times. I will add I am not the kind of person who tapes before I paint but because the mitt was thick I didn’t want to get the second coat on the wall so I didn’t tape. There were very few spots that bled and I was able to clean it off with a soap and water towel.
P**A
Trust the process 😉
I’ll be honest—I was a little skeptical at first when I started using this front door paint kit. The process felt a bit different than regular painting, and at the beginning I wasn’t sure it was going to turn out the way I expected. But I decided to trust the process and keep going step by step, and I’m really glad I did. As it started to dry and everything came together, the finish began to look more and more like real wood. The final result honestly surprised me—in a good way. Now my front door has a completely different look. It went from plain and boring to something with character and a nice wood-like finish. If you’re on the fence at the beginning like I was, just stick with it. It’s worth it in the end.
K**P
Easy process and great outcome!
This was such a great turnout for such a simple process and low budget! Highly recommend and already planning more projects! The only downfall is that there was BARELY enough product for my standard front door. I only painted one side of the door and two edges and I was scraping the paint out of the can.
C**E
Great product!
This is a great product that was easy to use. I cleaned and sanded my door and followed the instructions but I did do a few modifications. There was BARELY enough base coat to cover both sides of the door so be mindful. I was surprised it covered my bright read in one coat. I let the base dry for an hour but the painters tape that came with it pealed the paint up. I put the tape on some fabric a few times to make it less sticky and that worked on the back side. I liked the mitt, but also used the brush it came with and didn’t clean the base coat out of it and used the brush with the top coat paint color and it made it a great way to spread it. Overall very happy to not be spending $400 on a new door and instead $36 on paint. I plan to add a matte top coat finish to really seal it in once cured.
D**E
Saved me Thousands!
WOW! After getting multiple quotes for thousands for new interior wood doors I decided to try this! And wow it looks great and saved me so much money! Before and after photos below!
S**P
Pleasantly surprised!
Trust the process! Was definitely nervous after I put the first coat if top coat on but I’m pleasantly surprised by how well this turned out for just being a paint. The kit provides basically everything you need. Love it! Wondering if there is a top coat recommendation to keep it looking great for a longer period of time!
M**A
Streaky mess.
Updated Review: I decided to try a 4th coat on the door eventhough the manufacturer suggests 3. It looks much better after the 4th coat of the stain. It is still streaky in places from the stain drying too quickly, however, it does look nice from afar. I had high hopes, however, this was a total fail. Base coat went on fine, but the step 2 coat dries so fast, you are left with a streaky sloppy looking mess. The mitt is too large and bulky, I ended up trying to fold it up and use it that way. It does give the door a wood look, but only if you want it to look like it was poorly stained.
L**A
This is a FAUX finish!
Color: I chose the Honey Oak color for my back door since the entryway flooring was honey oak vinyl. I felt the base color was very light and slightly pinkish. The stain color is OK, but I think the contrast between base and stain (I refer to it as stain, but it is really a type of glaze that creates the wood grain look) is too great and a less than perfect application is very noticeable. I wasn't totally pleased with the results, but intrigued enough to try a different color. I chose English Oak this time. The base wasn't that much darker, but it had a warmer tone and the stain was much darker. Door: Essentially, the door I was working with was in pretty sad shape and not worth too much trouble. Layers of paint collected in panels that couldn't be easily sanded had to remain and I couldn't remove the door or knobs in fear that it could not be rehung properly or locks function. Removing the door is not necessary, but definitely remove hardware if possible. Application: I learned alot from my first attempt! 1. Base coat is easy, just straight painting. Directions say to pour half into a tray, but a little goes a long way and I just used it straight out of the can. Less waste/clean-up. 2. Taping for the staining is key. If you have a panel door, you will stain in two directions. Instructions say to tape out horizontal panels, stain/dry and then vertical panels, stain/dry. I felt the inset panels looked messy when the whole panel was done horizontally. I took an extra step to tape out the vertical and horizontal sections of the panel and created the look of a mitred corner(I did this in the window corners also). Even though it's a crappy door, it made a difference. 3. The graining mitt is huge! As a woman I don't have a small hand, but I was swimming in it and it was hard to control. I tucked the thumb to prevent it from creating unwanted strokes in the finish and I only applied stain directly to the end of the mitt (not the whole palm as instructed). The instructions say to dampen the mitt in water and wring out the excess. It was very difficult to wring it enough and the stain got watery and dripped excessively. Learning from this I only lightly damped the one side of the mitt I used. 4. Use quick light strokes. Instructions say 2-3 coats depending on desired effect. I used four. (I might have done 5, but I was low on stain because I had also refinished the beadboard under the back door overhang. Looks great and only used 3 coats) The first couple coats might look a little messy, but as it gets darker with additional coats there is less contrast and it starts to look more natural. It dries fast, but with the extra coat I wanted to be sure the taped corners were dry so I did my vertical and horizontal sections on separate days. All said and done I am fairly pleased with the results, but I also accept it for what it is, FAUX!! I don't feel it would be worthy of my front door, but I am considering the garage door version. The kit is loaded with everything you need. It's too recent to really judge the durability, but seems pretty good so far.
A**I
المنتج ممتازواللون ثابت ومثل الصورة انصح به