We remain fully operational. Our teams are working around the clock to ensure your deliveries continue safely.

下载应用程序


✨ Elevate your kitchen game with a weekend makeover that everyone will envy!
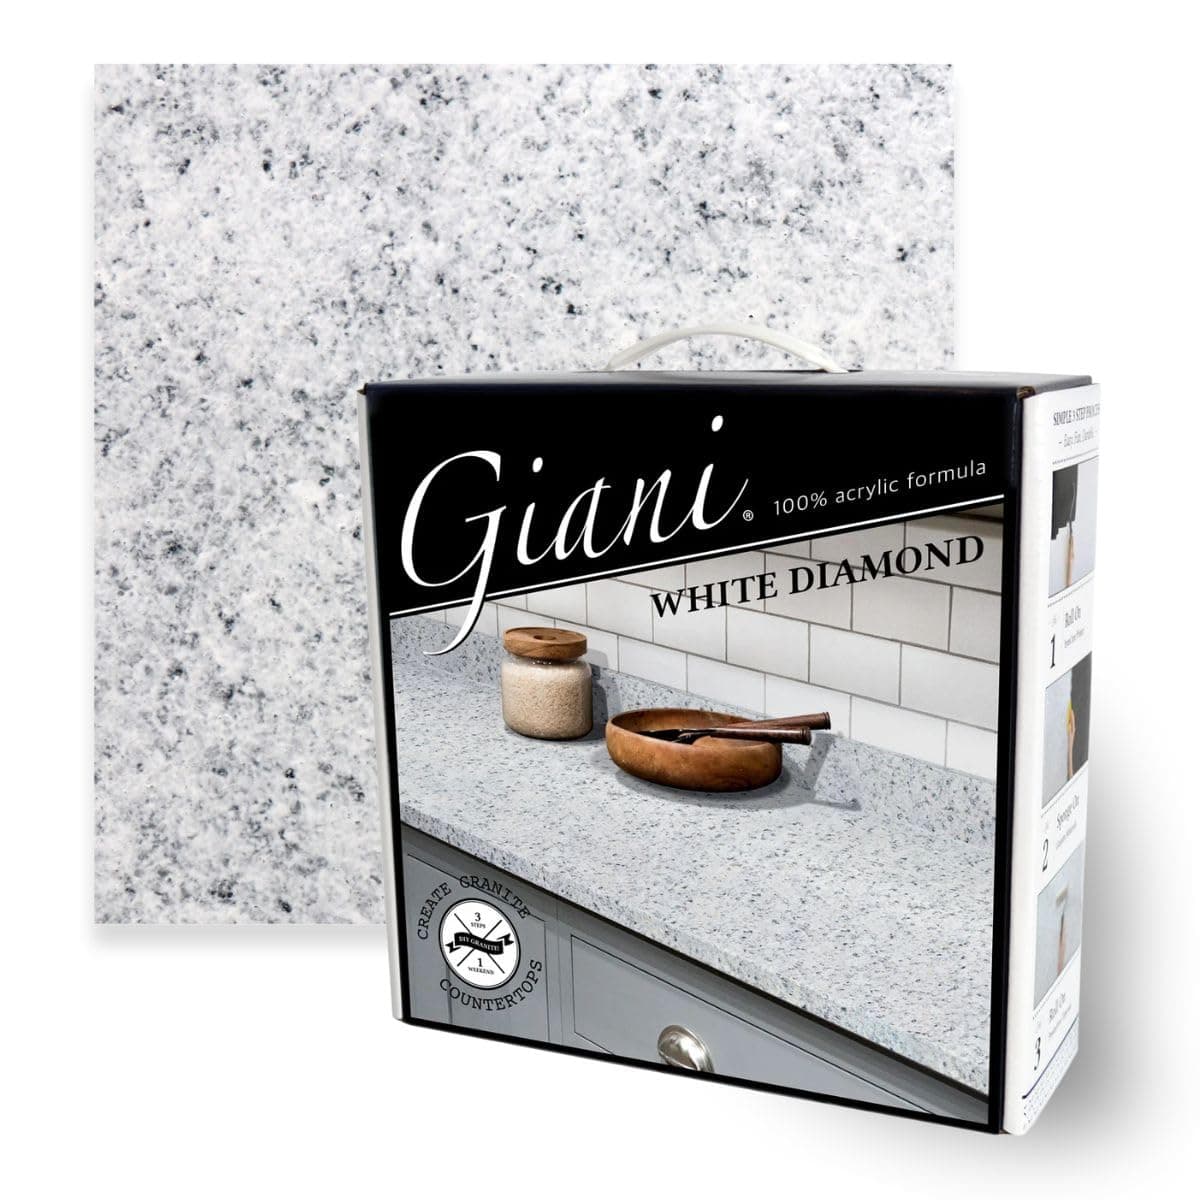
The Giani Granite Countertop Paint Kit 2.0 in White Diamond offers a professional-grade, 100% acrylic, low-odor, and food-safe finish that transforms various countertop surfaces in just three easy steps. Covering up to 35 square feet, this durable, high-gloss kit features a cool-toned granite look with subtle blue undertones, customizable application, and is proudly made in the USA.


| ASIN | B092DR12R7 |
| Age Range Description | Adult |
| Best Sellers Rank | #12,290 in Tools & Home Improvement ( See Top 100 in Tools & Home Improvement ) #6 in Household Countertop & Tile Paint |
| Brand Name | Giani |
| Color | White Diamond |
| Color Code | White Diamond |
| Container Type | Can |
| Coverage | 35 square feet |
| Customer Reviews | 4.4 4.4 out of 5 stars (3,817) |
| Finish Type | Gloss |
| Global Trade Identification Number | 00850015970092 |
| Included Components | Applicators, Paint, Sponges |
| Indoor Outdoor Usage | Indoor |
| Is Waterproof | True |
| Item Form | Liquid |
| Item Volume | 500 Milliliters |
| Item Weight | 6 Pounds |
| Manufacturer | Giani, Inc. |
| Model Number | FG-G2 WHT DI |
| Paint Type | Acrylic |
| Part Number | FG-G2 WHT DI |
| Size | 56 Fl Oz (Pack of 1) |
| Special Features | Low Odor |
| Specific Uses For Product | Interior |
| Surface Recommendation | Indoor |
| UPC | 850015970092 |
| Unit Count | 56.0 Fluid Ounces |
N**E
EASY CHEAP COUNTERTOP TRANSFORMATION
I have used this TWICE! If you need a cheap way to make your countertops look amazing THIS IS IT! I have pictures of before and after and you can see that I used it before. The before I used about 4 years ago. And I did the black marble recently. This stuff is amazing and it has transformed my kitchen TWICE! It is very easy to use and I was able to complete it with two small kids. It took me a couple of days and a lot of patience but it got done and looks amazing! And you get amazing looking counter tops with minimal cost! I do have a tip for the black marble. I wasn’t confident in my first attempt at it but I trialed it and it turned out good! 1. Apply the base coat (black). Dry 2. Sponge white and brown marble 3. Sponge black marble (I applied the 3 while wet then dried) Dry 4. Apply top coat x2. Let first coat dry then do another second I have picture of the steps you can check them out.
R**N
Easy to do, looks amazing!
Just got done and waiting for the topcoat to dry/cure. Love it!!! Great inexpensive way to change the look. There is one before photo where the counter is black with brown and orange specks so you can see how well the iron core primer and mineral paints cover it up. This kit was easy to use, great instructions and lots of videos to watch. I chose the kit with the acrylic topcoat as I was looking for a less glossy finish. I also wanted the counters to lean more towards the white limestone color so I did 3 sponging layers of that mineral color total. For the seams and tops of the vertical pieces, I used a very small triangle cut off of the sponge that was provided and a pair of tweezers to get in there and sponge on the mineral colors. When it gets hit with sunlight, it's beautiful and has a nice sheen to it. When the undercabinet lights come on, it has a slight bluish cast. The glitter topcoat is a nice touch. It is subtle but makes it look even more like granite.
H**Y
Manageable process and makes the counter look so much better
This was great. I did another step of the first color as the top color after going through all the sponge painting steps (slate option). It was really straightforward. The practice paper is important, the sponge dabbing was a bit of an art, but very manageable. The counter looks so much better! I don't know how long it will last, as I just did this, but the process was very doable.
J**.
Beautiful Product!
I initially purchased this set approximately 4 years ago, so I feel like I have given this product enough time for an honest review. Overall, great product. Well worth the money and beats replacing old, outdated counter tops. The process from start to finish was time consuming as I had a pretty large space to cover, but it goes by quick once you get into the rhythm and start to see it all pull together. This kit comes with everything you need besides painter's tape. Now how for this counter paint holds up. I have put this to the true test and clean my counters daily with very MINIMAL flaking after 4 years. This could have been my own fault when applying the primer + seal since it was only in one small area. I was able to use left over paint a few years later to fix the flakes so you can't even tell where they were. Overall, this project took a few days from start to finish as I had to allow dry time so don't expect to have this finished relatively quick. For the price point and the quality of the product, I will recommend to anyone who is interested in sprucing up those outdated countertops!
M**R
Transformed my 50 year old countertop!
Was looking for an easy, inexpensive way to fix my 1970's formica countertops. These were originally installed in 1979 and had some sort of textured paint stuff put on about 15 years ago. The paint was peeling off in some places and stuck like crazy in others. I started by trying to scrape off the old textured paint with a razor blade, which worked in some spots and not in others. Finally gave up and just used a sander with 80 grit to remove, knock down edges and smooth out as much as possible. This kit was super easy to use! After the sanding prep and cleaning well, I went in with the primer, right over top of the stubborn painted parts that wouldn't budge. The primer went on easily. Waited the instructed amount of time for drying then did the sponge painting part. I was a little nervous that I would mess it up, but quickly realized that even if I did end up with a big blob of the mica paint, it was easy to go back and fix it by adding more layers where needed. The only thing I found a bit tricky was that towards the end, the Sponges were so loaded with paint that it was almost impossible to get the nice "speckled" looked. I would definitely recommend getting an extra sponge to use when the first one gets too loaded with paint. Even with the sponge challenge, I was able to make it look pretty good. Used glitter topcoat twice. Again, super easy to use. I am so impressed with the way it turned out! I wasn't expecting perfection, just trying to make it look half way decent. I would say mission accomplished! Completely tansformed my almost 50 year old eyesore of a countertop! I can't speak to the durability yet, but for the price and ease of the project, I am very happy!
B**H
READ ALL THE INSTRUCTIONS
The instructions said sanding isn’t necessary but I still did it anyways because my counters had a previous “land lord special” (someone painted over dirt and stuck on bits and bugs). The make sure to wash and have a nice clean surface and follow the instructions they are important and there for a reason. It looks BEAUTIFUL. I have only had them a week so I can’t so for how long it lasts. I will update in a few months if I ever notice any peeling or not. It’s not SUPER smooth like resin or stone but that may depend on prep work and my counters were in terrible condition before I started. It was definitely worth the $100 in my opinion and I would buy again and 100% recommend to anyone. My family came by to look at it and were very impressed. I had enough for all my kitchen counter plus the counter of my sink in the bathroom!!!
H**B
Expensive for paint but cheaper than having what was a tired looking kitchen torn apart. Completely transformed the look of the kitchen. Very clear instructions provided as well as the tools needed to apply the paint and acrylic.
M**I
Amazing experience, good quality. It gives my kitchen a beautiful fresh and modern look.