Some deliveries may take a little longer than usual due to regional shipping conditions.

下载应用程序


📶 Elevate your WiFi game — coverage and speed that keep you connected everywhere!
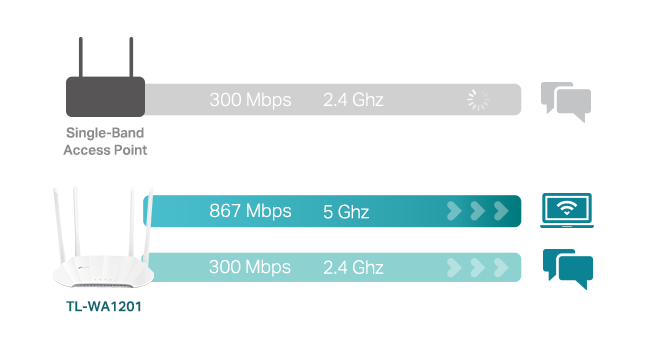
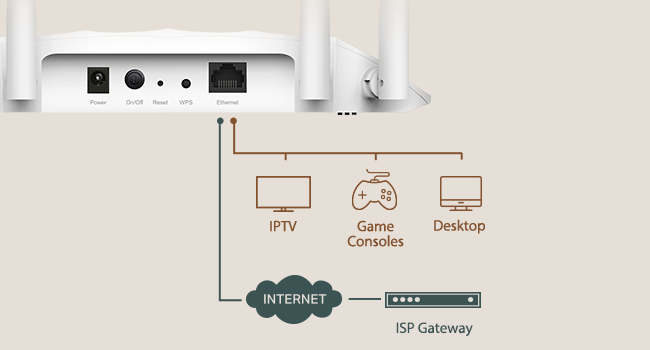
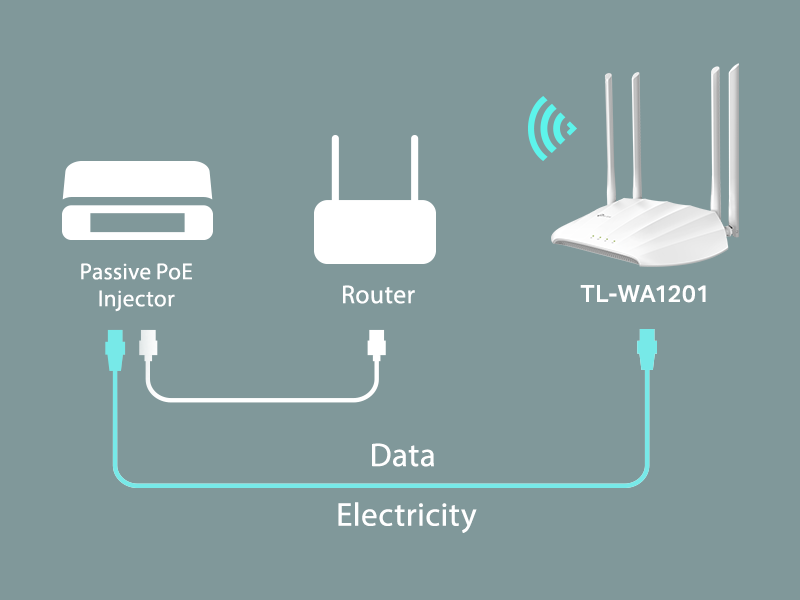
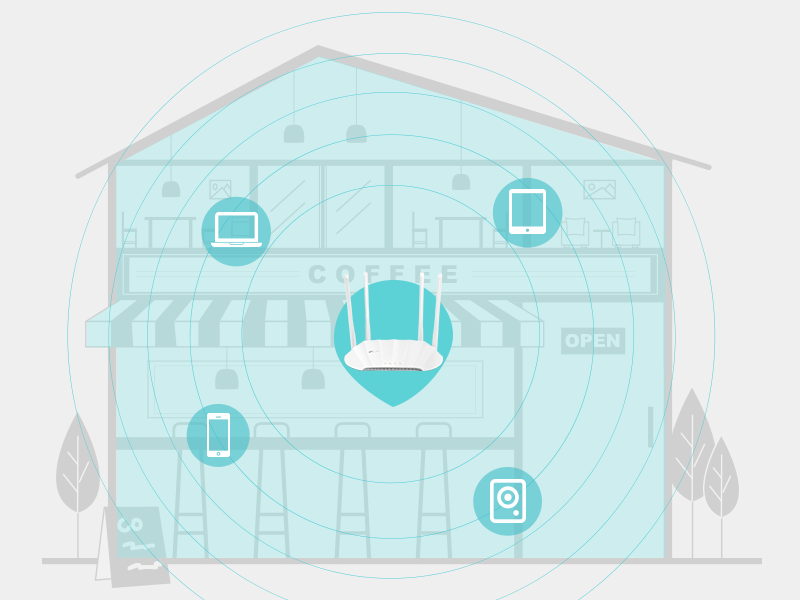
The TP-Link AC1200 Wireless Gigabit Access Point (TL-WA1201) delivers dual-band WiFi speeds up to 1200 Mbps using advanced MU-MIMO and Beamforming technology. Featuring four fixed antennas and support for multiple operation modes—including Access Point, Range Extender, Client, and Multi-SSID—it offers versatile deployment options. Passive PoE power support simplifies installation, while extensive coverage and seamless roaming ensure strong, reliable connectivity throughout your home or office. Trusted by thousands with a 4.2-star rating and limited lifetime protection, this device is a cost-effective solution for eliminating WiFi dead zones and boosting network performance.


| ASIN | B08SBXVSF3 |
| Antenna Location | Home |
| Antenna Type | Fixed |
| Best Sellers Rank | #4 in Computer Networking Wireless Access Points |
| Brand | TP-Link |
| Built-In Media | Power Adapter, Quick Installation Guide, RJ45 Ethernet Cable, Wireless Access Point TL-WA1201 |
| Color | White |
| Compatible Devices | Personal Computer |
| Connectivity Protocol | Wi-Fi, Ethernet |
| Connectivity Technology | Ethernet |
| Control Method | Touch |
| Controller Type | Switch |
| Coverage | Extensive coverage |
| Customer Reviews | 4.2 out of 5 stars 4,306 Reviews |
| Data Transfer Rate | 1200 Megabits Per Second |
| Frequency | 5 |
| Frequency Band Class | Dual-Band |
| Has Internet Connectivity | Yes |
| Is Modem Compatible | No |
| Item Dimensions L x W x H | 8.86"L x 5.73"W x 1.46"H |
| Item Type Name | Access Point |
| Item Weight | 0.3 Kilograms |
| LAN Port Bandwidth | 1000 Mbps |
| Manufacturer | TP-Link |
| Maximum Upstream Data Transfer Rate | 600 Megabits Per Second |
| Mfr Part Number | TL-WA1201 |
| Model Name | TL-WA1201 |
| Model Number | TL-WA1201 |
| Number of Antennas | 4 |
| Number of Ports | 1 |
| Operating System | ZyNOS |
| Other Special Features of the Product | WPS |
| Router Firewall Security Level | Moderate to High |
| Router Network Type | Wireless |
| Security Protocol | WPA, WPA2, WPA-PSK, WPA-PSK2 |
| Special Feature | WPS |
| UPC | 840460603102 845973084035 |
| Voltage | 12 Volts (DC) |
| Warranty Description | 2 year warranty |
| Wireless Communication Standard | 802.11a, 802.11ac, 802.11b, 802.11g, 802.11n |
| Wireless Compability | 802.11a, 802.11ac, 802.11b, 802.11g, 802.11n |
D**J
Excellent AP for the price
If your home has ethernet in it (or MOCA), don't bother with mesh wi-fi. Instead, get an access point like this one, and set it up in a dead zone, or a place where your wi-fi signal is weak, AND where you have an ethernet wire that runs back to your primary router/gateway. (Often called "wired backhaul"). The instructions are unclear and missing a few steps. I followed them precisely but it wasn't setting up, so I took matters into my own hands. Here's how I did it, if you are trying to set this up in ACCESS POINT MODE (which they claim is the default mode): 1. Plug the provided ethernet chord DIRECTLY into a PC that's already on your network (wired or wi-fi, doesn't matter), and plug the other end into the access point. 2. Plug in the access point's power, and wait a minute or two for the lights on the front to light up and stay on. 3. Go to your computer and log in to your EXISTING router/gateway (NOT the access point), and in there, you should see some sort of "discovery" or "show all devices on network" button somewhere. Every router/gateway is different, so that's about as specific as I can be. 4. Once all connected devices are showing, you should see a new device, this access point - you can recognize it by its MAC address (12 characters, without the dashes or colons), listed on the decal on the bottom of the access point. Get the access point's IP address (usually starts with 192.168 or 10.0.0 depending on what type of network protocol you're running) and write it down. While you're in there, you can reserve an IP address for your access point so it never changes again if you want to, but I don't think it's necessary or anything. (I reserve IP address to anything I can log into, like this access point, but that's a personal preference). 5. Next, log out of your existing router/gateway, and in Chrome (Edge didn't work for me, but Chrome did), type in the address you wrote above, and hit Enter. It should load a generic splash screen about logging into the access point, showing a field for a username, and a password. On the bottom of the gateway is a decal with the user name (usually "admin") and password to log into it. (I always take a picture of these labels with my phone in case I ever need them again). 6. Once you're in, change the password and/or user ID so it's not the default, for security purposes. From here, what I did was I changed the default SSID and password to match my gateway (and the rest of my network), so that when the access point is set up, it matches. This way, your devices can roam about your house and will choose this access point if it's the strongest one, and if you roam back to where your gateway/router is strongest, it will hop off of the access point and join up with that one, all seamlessly in the background. You can still use different SSID and passwords on the access point if you want, but I find the "hop" between access points is faster if they all have the same SSID and password. 7. Save everything and log out of the access point, unplug it, take out the ethernet cable, and now to go the ethernet jack where you want your access point set up permanently. Plug the access point into the ethernet jack and plug in the power brick and then test using a smartphone (I like the Android app "Wi-fi Man") that the access point is on and giving a signal. Mine worked on the first try. FYI, this thing also works with a MOCA setup (in case you can't run ethernet in your house, you can instead use existing cable coax as a "network"), but setting that up is its own set of instructions not relevant here. Hope this helps.
H**D
Very strong signal!
My ultimate goal is to put this outside near the edge of our property to get a signal where it is now very weak. Currently the mesh network inside our house barely reaches the device I have out there and so it drops off regularly. Since it's quite cold out, for the time being I've done some other testing. Set up is quick and straightforward. I had it configured and working in under 15 minutes. I hooked it up indoors, in my computer room a couple feet away from my primary mesh node. I plugged it directly in to my switch, just like the mesh node. I then ran speedtest from my phone, once with the mesh network and once with the EAP110. The results were shocking! The EAP was getting 50 Mbs while the mesh network was getting 40 Mbps. I then went to different locations inside the house, in different rooms. We have two other mesh nodes in the house providing full coverage. To my phone, the signal from the EAP was as strong or stronger than the mesh signals in most locations. Being extremely happy with these results, I moved the EAP into my garage, and pointed one of the antennas in the direction of the device with the weak signal I was ultimately trying to reach. Again, the signal strength was stronger than what it had been receiving from the closest indoor mesh node. This should be good enough until the weather gets warmer and I can move it outdoors closer to the device and set it up as I intended. Also note, I'm using some bigger high gain antennas that I had. Update 6/2/2025 So, after a year and a half, I finally moved it out of the garage to the outdoor location I had originally intended. I am even more impressed with it now, as the signal range I am getting across my ~4 acre property is astounding. If you have line of sight, you can go very far from it and still have a good signal and decent bandwidth. As you can see in my photos, the final location is atop my very old C-Band dish that I've repurposed as a huge monopod which has 2 Tapo cameras, an air quality monitor, and now the Omada Access Point. All of my cables, power, and network devices are in a weatherproof box buried at the base of the dish. Since these are so inexpensive, I just purchased another to install on the other side of our property so we can be bathed with a strong wifi signal no matter where we are outdoors. I couldn't be more happy with this device. The bang for the buck is off the charts. I may need to buy a third one, just to keep as a spare.
R**R
Solid Access Point with One Quirk
This is a great little unit — reliable, easy to set up, and performs well as a WiFi access point. I gave it 4 stars instead of 5 due to one design limitation: although it supports passive PoE, it doesn’t work directly with a standard PoE switch. Instead, it requires its own included adapter, which you have to insert inline with the Ethernet cable and power separately using a dedicated power supply. That means two outlets are needed — one for the switch and one for the adapter — which adds a bit of clutter and complexity to the setup. Aside from that, it’s a solid performer and a good value for the price. Just be aware of the power setup if you're expecting true plug-and-play PoE.
R**F
Stock firmware is unstable on 5GHz, but OpenWRT works great
TL;dr -- this AP is another case of good hardware, awful firmware. The OEM firmware makes this device unusable, but flashing OpenWRT makes it useful again. Full Review: I bought this access point to use as a wireless client bridge for a computer in my house that gets an extremely poor wireless signal. Initially, I was disappointed because I was limited to a 2.4GHz connection, as the 5GHz connection was too unstable to be used. I'd regularly run into issues watching YouTube videos, browsing the web, or making Zoom calls. The solution was to use the 2.4GHz radio instead. This meant that my connection was limited to ~45-60mbps, which pales in comparison to a typical 5GHz connection speed of ~250-300mbps. For reference, my iPhone 11 is able to pull ~560-620mbps when placed next to the hardwired access point. i initially considered returning the AP, but then I found someone online had ported OpenWRT to this access point. Although this may void the warranty, it solved my issue. No longer do I have stability issues with the 5GHz radio, which means that I have both a reliable and fast connection to the Internet again my home office. OpenWRT is great, although it's far more complicated of an interface than the default TP-Link one. I would not recommend using this device in this configuration unless you're familiar with more advanced networking concepts or are willing to learn. Pros: - Inexpensive - Supports wireless client bridge mode. - Supports PoE using the provided injector. This is extremely beneficial to my setup, since I can place the AP where I best receive a signal, even though I don't have a power outlet nearby. - The Qualcomm Atheros QCA9886 802.11acn wireless radio has excellent performance - Gigabit LAN port (to the reviewer claiming it doesn't have one, this is simply not the case; there's no way I'd be able to pull 300mbps if it had a 10/100 interface). - The default firmware supports bridge mode with DHCP & NAT disabled, which means that every device connected through this AP has its real Ethernet MAC address exposed. If you plan to use this on a college campus or want your connected device(s) to be bridged to the parent network, this is very useful. If you use this mode, you can still control the AP's settings using the assign IP address for the access point itself. Cons: - Default firmware means that the 5GHz radio is unstable. I also had problems with controlling the LEDs and updating settings. Bonus Pro-tip: I only used this device with one computer, but you could easily use an Ethernet switch with the single port on the back of this device to connect multiple computers/devices.
C**E
Fantastic piece, it's the BOMB!
This piece is the BOMB !! TP-Link TL-WA-1201 I had let two different 'range extender' pieces drive me nuts, their software was hard to use, but once figured out it still didn't work, signal was lame and choppy. So drilled into web and learned superiority of Access Point. Thought I'd try a base monel to learn on. Trust me, TP-Link really knows what they're doing. Instructions were clear, everything I was sent to look for was there, the steps made sense, their website fed back reliably, and within a couple hours IT WORKED! And it waxs LOUD! Signal next to it 76%, outdoors 30-ft from unit is still 65%. Amazing, Software is brilliant, now that I did one, doing the next will take about ten minutes, it's a breeze to work with. BUY THIS, even if you don't need it. Yet. You will, it's a spoiler.
K**N
Great as a client bridge to connect a PC to wifi via ethernet
I bought this to be used in client mode in order to replace the built in motherboard wifi on a PC, which had a loose connection between the antenna and motherboard that I did not want to attempt to fix (nor was I sure whether an internal wifi card would fit next to the GPU). If anything this is massive overkill for my use case, and is working very well as a glorified wifi antenna so far : ). Setup was painless for client mode, I only had to log in to the device's wifi signal and go through the simple setup to switch to client mode, at which time the wireless radio stopped broadcasting its' own signal, which was a relief as I was worried about possible interference with an extra, unnecessary wifi signal in the house.
L**E
Works great, POE adapter included.
fired right up, easy to set up. Worked perfectly right out of the box.
C**K
Lots of modes of use for the price.
I'm using this as a true access point. There are actually 4 different modes this unit can be used in. As a range extender, it gathers and repeats your wifi network to cover dead spots in your home. Used in client mode, it's antennae capture signals from your wifi and allow you to run a connected device via ethernet port. In multi-SSID mode create multiple SSIDs an VLANs, useful if you have devices you want to be able to communicate together, but separate from other devices on different VLANs (which wouldn't see each other from a connectivity standpoint). I had hoped to use it as an access point and connect it to my primary router via CAT6 cable that runs from one end of the house to the other. From there, I set up a different SSID from my primary router so that I could run a small office wirelessly. I have a 1 GB fiber connection as my main internet source. Speedtest rates it as 950mb- 1GB both upload and download. The ehternet connection to my router brings the full 1 GB back to the access point over hard wire, but testing the wifi from this access point only gives about 50mb up/down on Speedtest.net. Fortunately, 50 mb per device is sufficient for everything I do (video calls, internet browsing, access to web based apps like Teams), but I had hoped for better wifi speed. Easy to install and setup, the directions are very good. The price is very attractive, and you can use it in multiple modes. Of course, I may be an extreme case. If you are only getting 50mb from your primary internet connection, this works great.